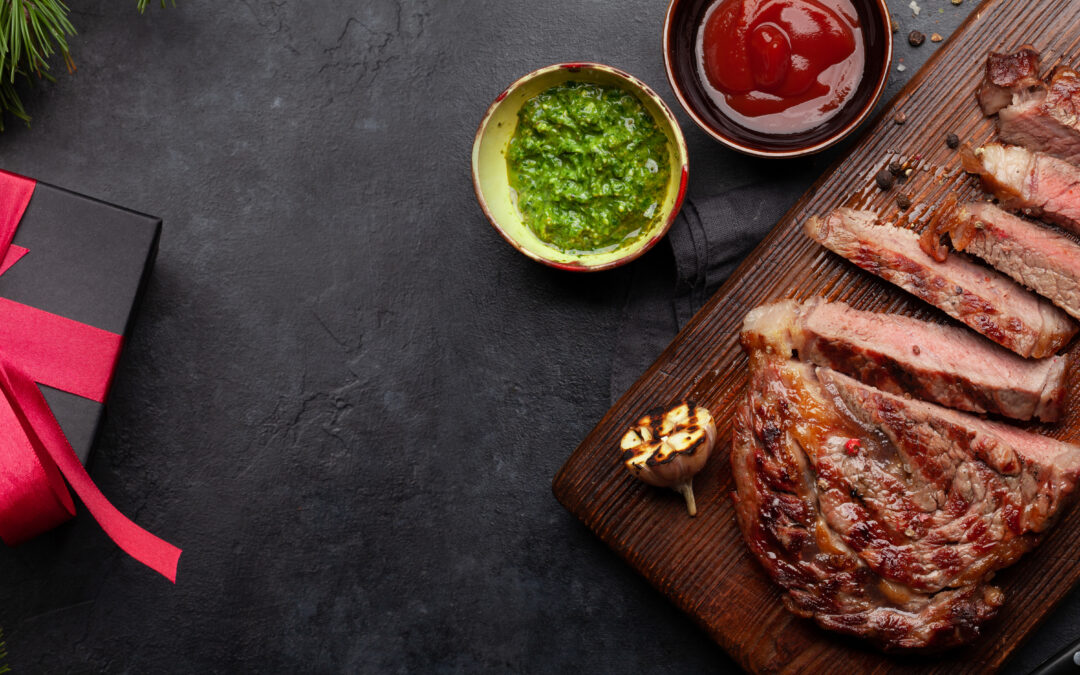
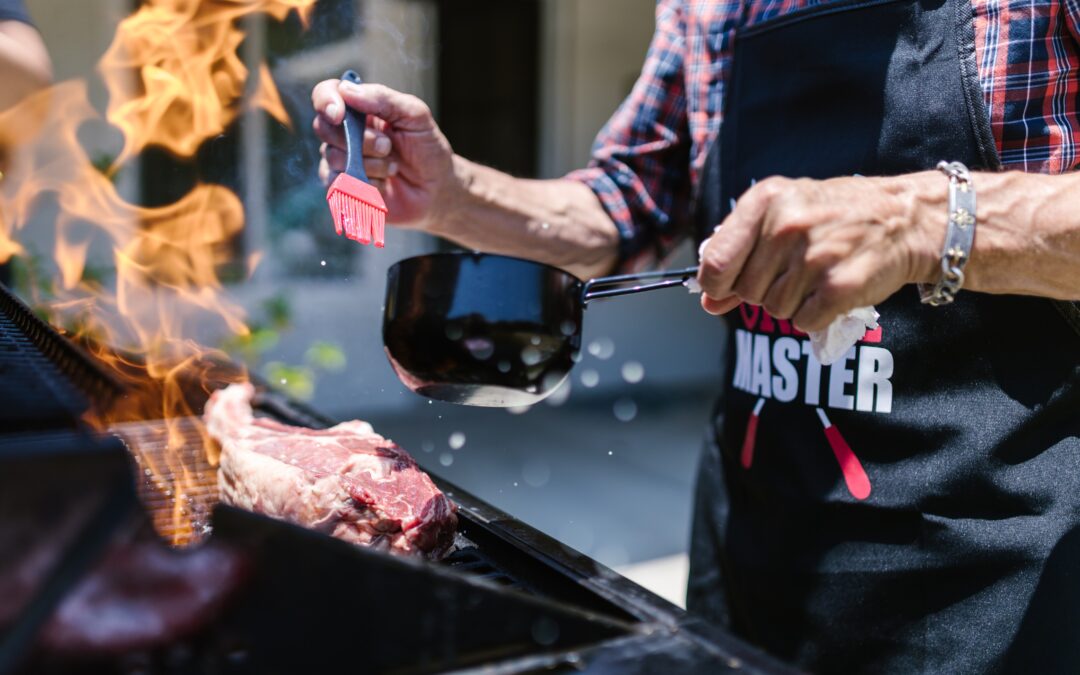
Such a great month – winter is starting to go away (at least in southern/central regions), we’ve got March Madness and … St. Patrick’s Day!
And what’s the one food that is associated with St. Paddy’s? Corned Beef!
Given that this is a barbecue blog and all about smokey meats, let’s talk about the magic that happens when you take tasty Corned Beef, and you apply barbecue techniques of rubs, low and slow heat and smoke to it.
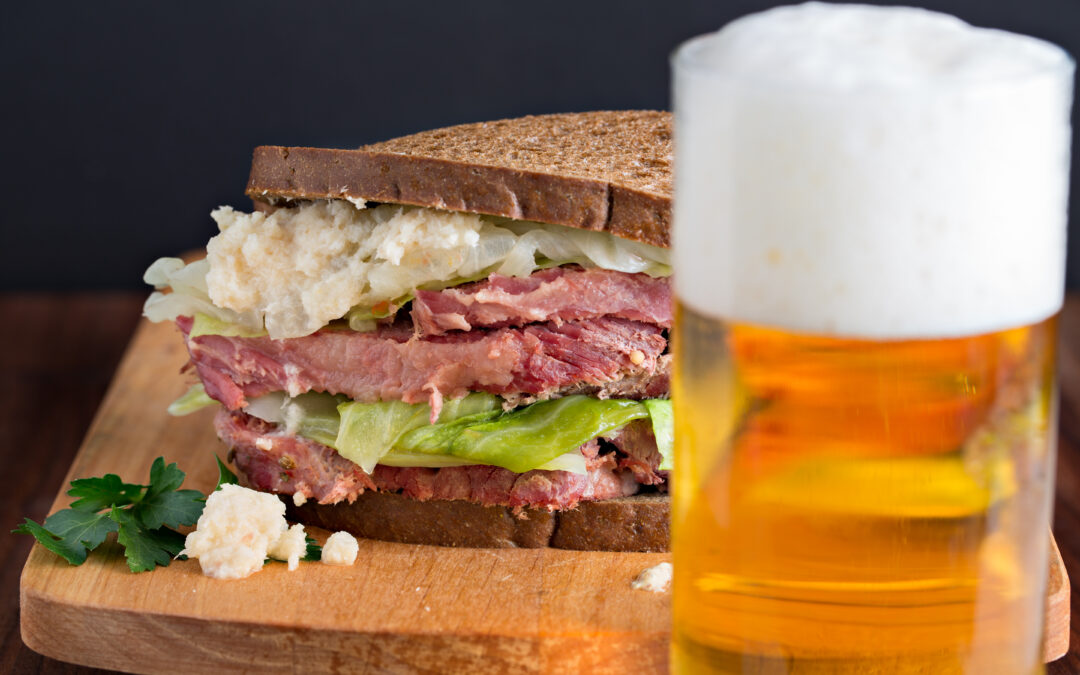
They call that magic Montreal Smoked Meat!
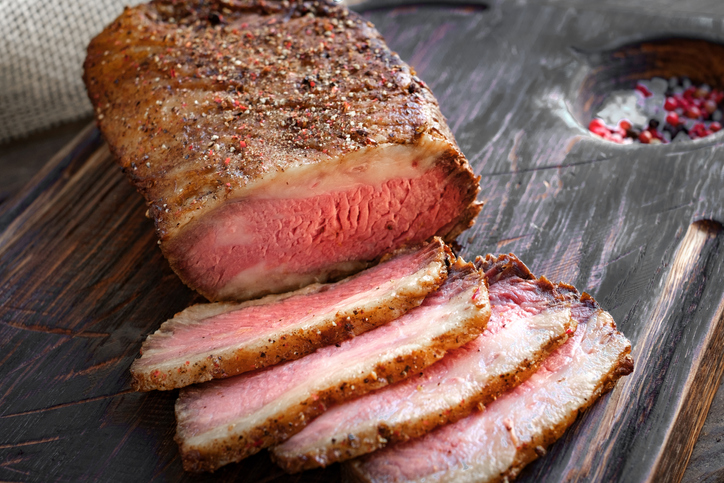
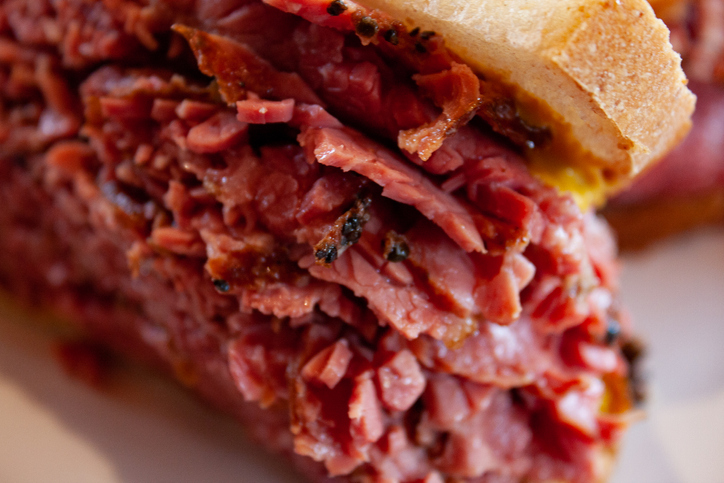
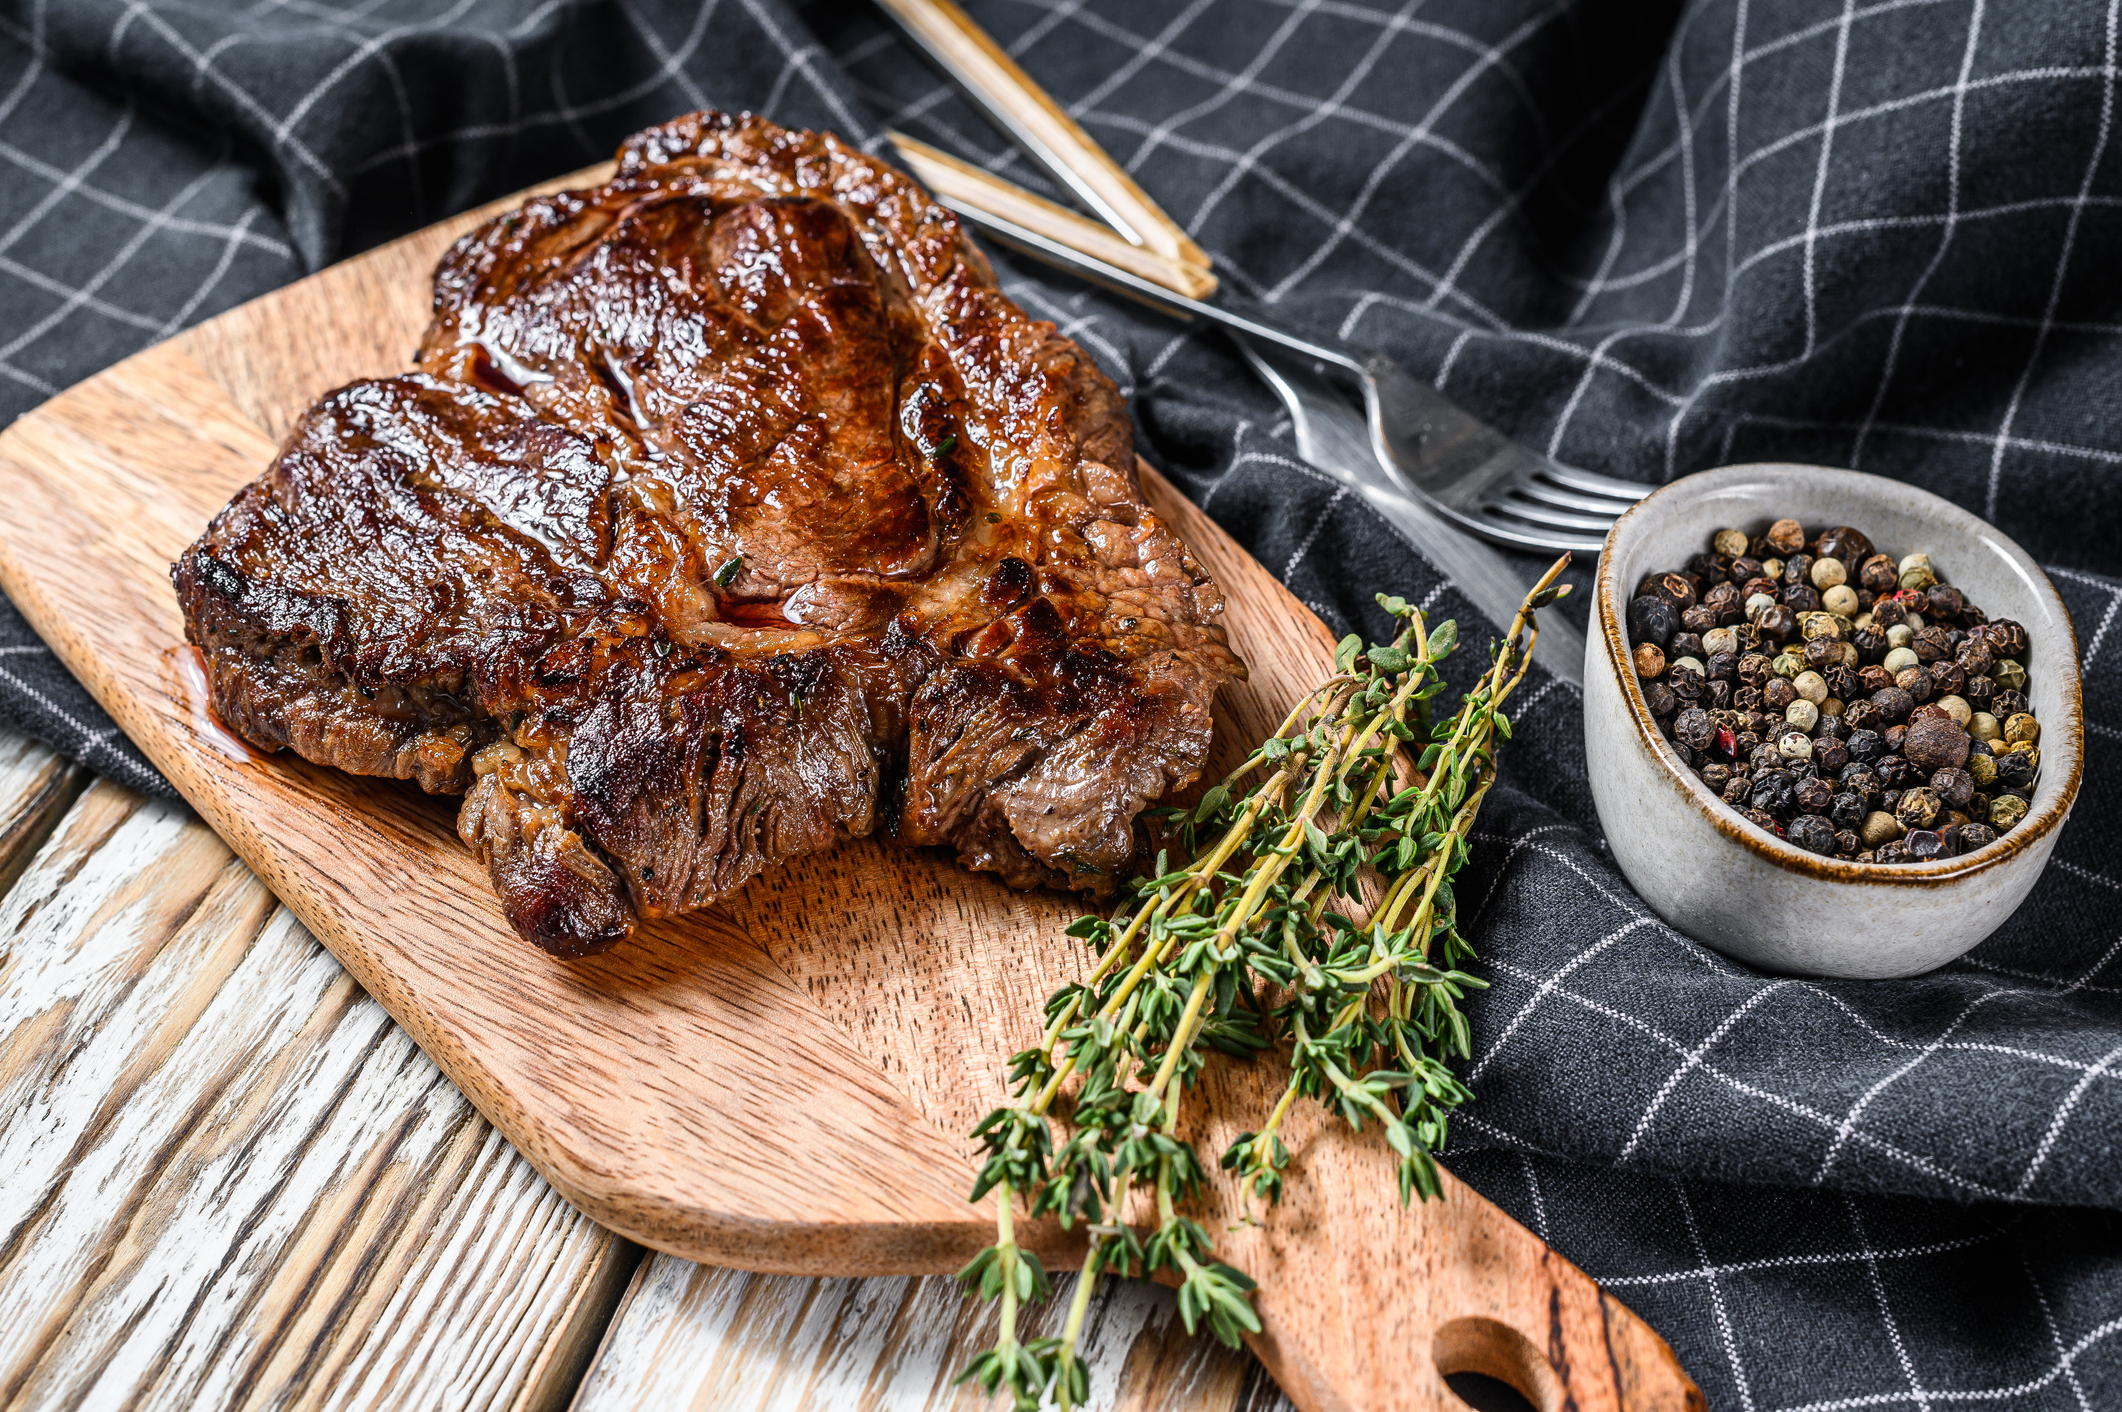
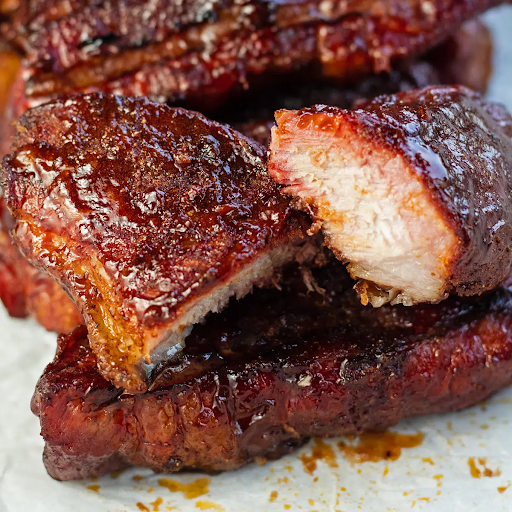
So exactly what is Montreal Smoked Meat (MSM) and why do we love it so much? It is cured brisket (aka Corned Beef) that is then smoked with an amazing (and spicy) coating that forms the bark on the outside.
It is a specialty of restaurants in Montreal (hence the name), and in fact THE place to get it in Montreal is Schwartz’s deli. MSM is like a brisket takes a trip to a New York Deli, on the way through Texas. It is similar to pastrami, only smokier and because it’s brisket (pastrami is a different cut), tastier! It’s got peppery spice, cured meat flavor and barbecue smoke! Pure heaven!
What makes “MSM” unique from regular barbecue brisket is the curing process. This chemically preserves the meat and gives it a unique flavor, versus raw brisket. The difference between Montreal Smoked Meat and regular corned beef is that corned beef is wet cured in a brining liquid (“pickled”) with peppercorns. The peppercorns are the primary spice (hence “corned” beef) while MSM is dry cured with a curing rub full of spices.
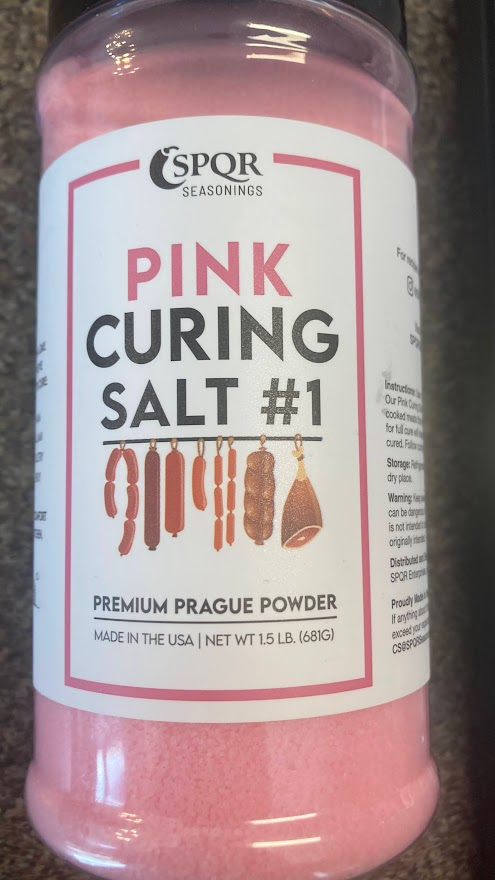
Making MSM is not a quick process – it takes about a week in total, but the results are amazing and worth your time. The only special thing you’ll need is curing salt – also known as “Prague Powder #1” or “Pink Salt” or “Pink Cure.” It is 6.25% granulated sodium nitrite and 93.75% table salt. The reason it’s pink is because it’s dyed that color so you don’t mistake it for salt and put it on your food like a seasoning. And don’t freak out about nitrates and nitrites in your food. You’ll eat more nitrate in a serving of spinach than you will in a serving of MSM.
The Montreal Smoked Meat Process
The process for making this is very straightforward:
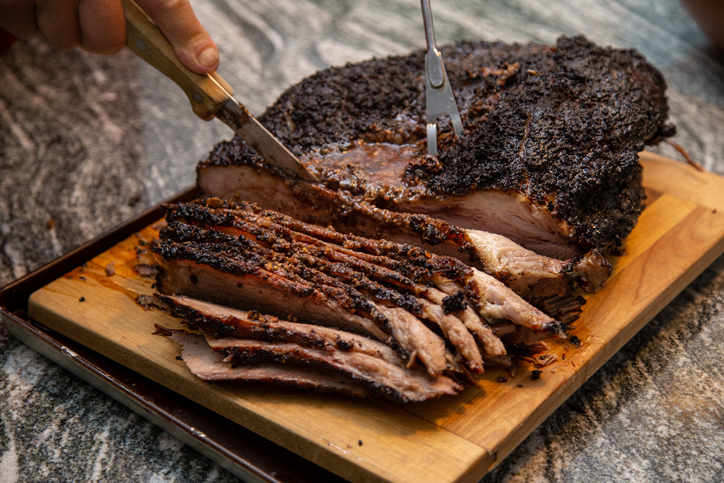
First you cure the meat for 5-6 days with a rub that contains the Prague Powder #1. Then you rinse off that rub, rub it again with a peppery rub and you smoke the meat.
Finally, an hour or two prior to serving, you steam the meat to finish the cooking. Then you slice it thin against the grain and enjoy!
Because you only partially smoke the meat, this is an easy brisket to make. The smoking takes between 5 and 7 hours, then you steam it to finish it. You can also smoke it one day and steam it the next, making it very flexible around dinner plans.
Now, if you’re in a bit of a hurry, and want to shave some time or you think the whole curing thing isn’t your jam, you can make MSM from … commercial corned beef!
It’s a huge shortcut, and while you won’t wind up with truly authentic Montreal Smoked Meat, only a deli man in Montreal would know the difference. If you want to make it that way, skip forward to Step 3 in this post.
Montreal Smoked Meat – The Recipe
BUY:
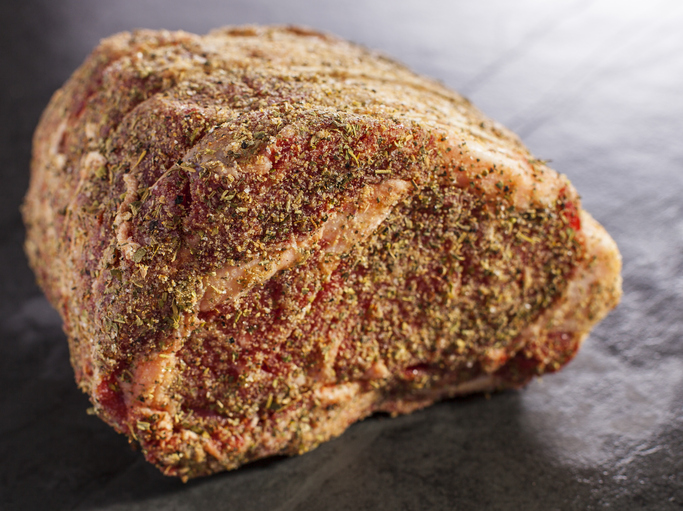
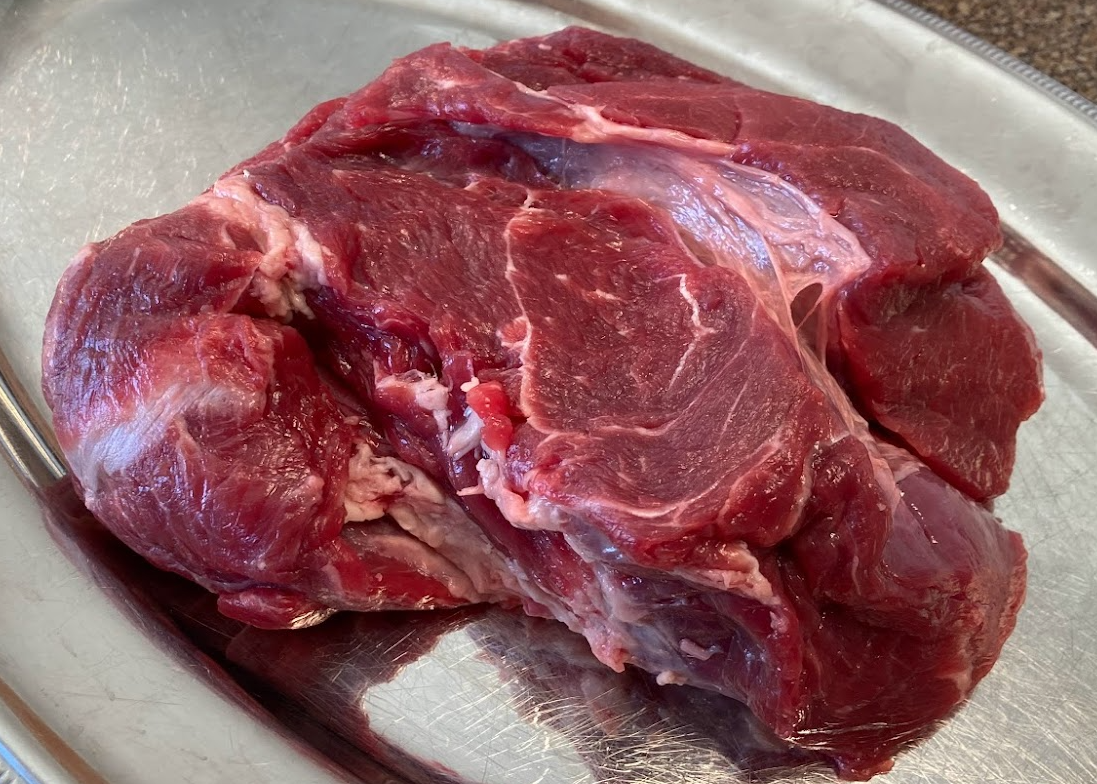
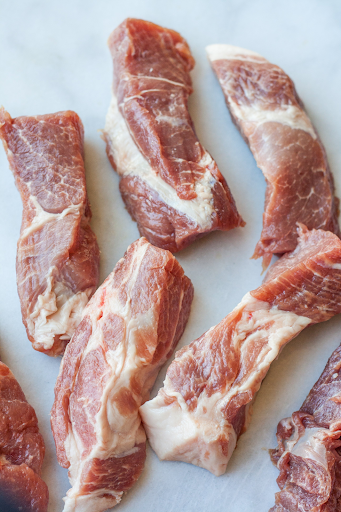
A brisket. We have done these with just brisket points (ohh yeah!), brisket flats (just as good, but leaner), and whole packer briskets. Regardless of which you’re doing, you’ll want to trim it out well. We suggest checking out one of the gazillion videos on YouTube for advice on that. For the fat cap though, shave it down until it’s only ¼” to ⅛” thick. You want the rub and cure to flavor the meat. Our most recent effort was done using only a 3 ½ lb brisket point that we had separated from a large packer and used the flat for a braised brisket dish.
The first step is to dry brine it for a week in the curing rub.
You’ll need to be able to keep it in the fridge, flat, for a week, so if your fridge is anything like ours, well, eat your leftovers and clear some space! For a curing container, we like to use those big 2.5 gallon zip closure bags. The meat will give up liquid as it cures, so we like to put the meat in the bag, squeeze out the air, zip it up and put the whole thing in a foil roasting pan just in case the bag leaks.
A note about the curing rub – the amount of curing rub you put on the meat is based on the weight of the meat, and that’s because there’s a specific ratio of meat to the Prague Powder#1 that you’re supposed to follow – 1 teaspoon per 5 lbs of meat.
Therefore, the recipe below is for 5 lbs of meat. If your packer brisket is 10 lbs, then double this – if it’s 12 lbs, make roughly 2 ½ x this recipe, etc.
⅓ cup kosher salt
1T ground black pepper
1T ground coriander
1t Prague Powder #1
2t granulated table sugar
½ t ground bay leaf (or take 3 bay leaves and smash them up)
½ t ground cloves
After trimming your brisket, apply this rub all over the meat, covering every part of it, and be sure to use all the rub. Slide the rubbed brisket into the big ziplock, squeeze out the air as best you can and close it up. Put that in the big pan and slide it into the fridge. Let it cure for at least 4 days and up to 6 days (we always do 5) – flipping it over once a day.
Step 2 – Rinse and Soak:
The day before you’re going to smoke it, take it out of the bag, flop it into the sink and rinse it well to get the curing mixture off as best you can – we use a clean dish brush (make sure it has NO soap on it!) to help persuade the mixture off the meat. Some pepper bits will stay stuck in the meat and fat – that’s fine, but you’re clearing the way for the next rub.
After rinsing, fill a large roasting pan or other container with enough cold water to fully cover the meat and soak it for at least 2 hours, changing the water every 30 minutes or so while it soaks. This helps take the salt out of the surface of the meat, which is important so that the next rub can do it’s thing!
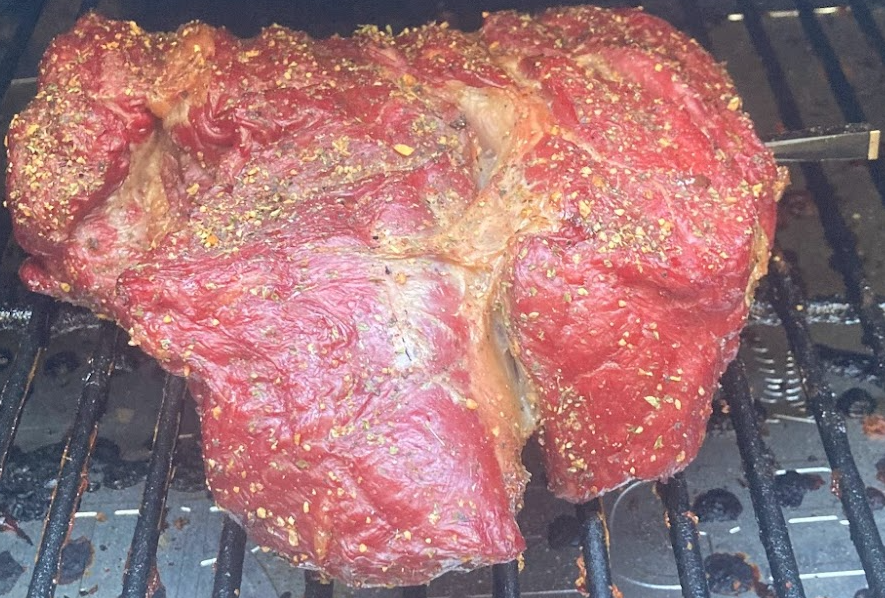
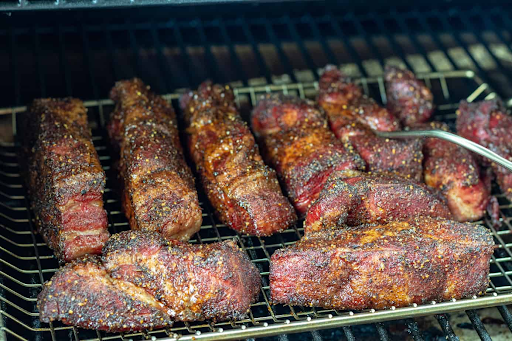
STEP 3 – Rub #2 and Smoke
Fill your pellet smoker with your favorite Griller’s Gold pellets – for this we recommend either Smokeshack Blend or Fruitwood Blend, but really they will all work great. Fire it up and preheat it for at least 20 minutes at 275 degrees.
While the grill heats up, mix up the next rub (and again this is for every 5 lbs. The difference with this is you don’t have to use all of it, so we actually make this in a larger quantity as it is fantastic on steaks – ever hear of Montreal Steak Seasoning? This is a homemade version.)
1 T coarse ground black pepper
1 t ground coriander
1 t paprika
1 ½ t garlic powder
1 ½ t onion powder
½ t dry ground mustard
½ t celery seed
½ t crushed red pepper
Optional ½ t ground Worcestershire powder (We make this optional as this is kind of hard to find, although it is very available online. This is great for a lot of things and gives a really great umami-boost.)
Spread this generously over the meat and pat it to make it set into the surface of the meat. Again, be sure to do all the surface area of the meat – edges too!
Grill On!
Ok, meat ready, grill hot, let’s get this on!
If you have a probe thermometer, place the probe in the thickest part of the meat with the tip in the center. If you’re doing a full packer brisket, we recommend placing the meat on the grill with the thickest part away from the chimney of your pellet grill. Smoke the meat until it hits an internal temp of at least 160F in the center – you can go a bit higher, but there’s really no need to. And if it stalls at 155 or so, that’s fine too. Depending on how big your brisket is, and what cut (full packer, point only, flat only), this could take anywhere from 2 ½ hours to 6 hours.
Take the meat off the smoker, bring it inside, put a layer of foil over it and a folded towel over that and let it rest for an hour.
LAST STEP – Steaming and Serve!
This is the kicker step for this – and it really makes great meat. Preheat your oven to 300 degrees F (or increase the heat on your pellet grill to that level if your oven is busy).
Prepare a roasting pan with a rack in the bottom that will allow for at least ½” or so of water without touching the meat. Lay the brisket on the rack, then seal the whole roaster up with foil, tightly, so the steam doesn’t escape. If you are using a probe thermometer, poke the probe through the foil and into the center of the thickest part of the meat. Try to keep the hole as small as possible. Slide it into the oven and let it steam for between an hour to 2 hours. You’re going for at least 185 internal temp although it can safely slide as high as 205. Once you’re at 185 though, you’re done.
Remove from the pan, put it on a board and slice it thin across the grain.
It makes amazing sandwiches on rye bread with spicy mustard, and also is just great plain – no sauce needed. And since we’re talking St. Patrick’s day – this kicks the whole “corned beef and cabbage” thing to a new level since this meat is a flavor bomb! You’re not going to be making the cabbage in with the corned beef, but serving this with a side of boiled potatoes and cabbage is very very tasty. Especially when you pair it with a classic St. Patrick’s day beer like Guinness, Smithwicks, or Harp Lager.
Montreal Smoked Meat sounds complicated, but really, it isn’t. But what you will have is a dish that will blow away your friends and family when you serve it.
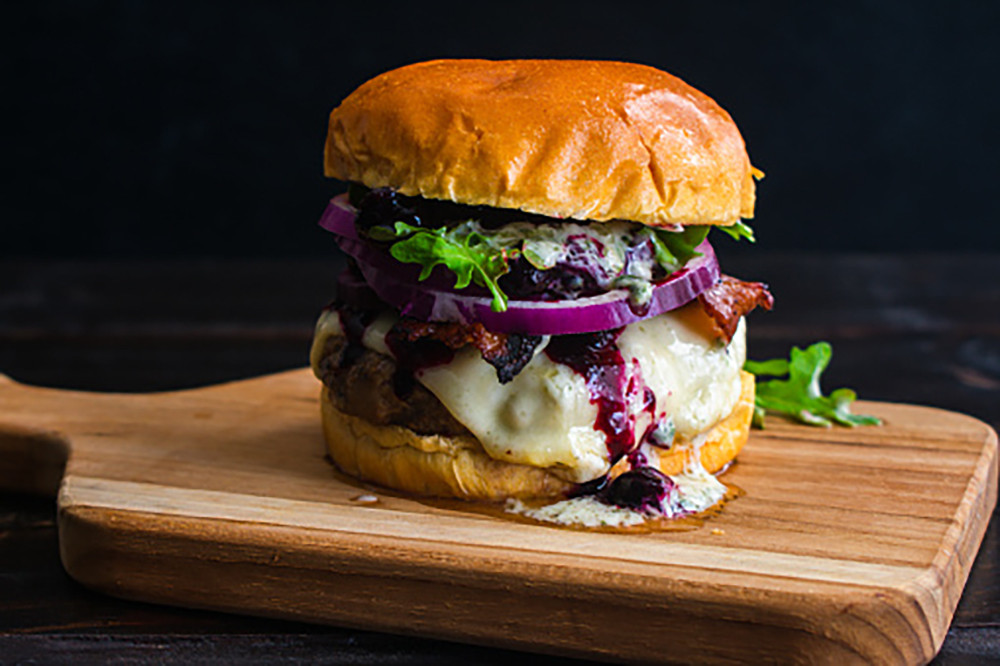
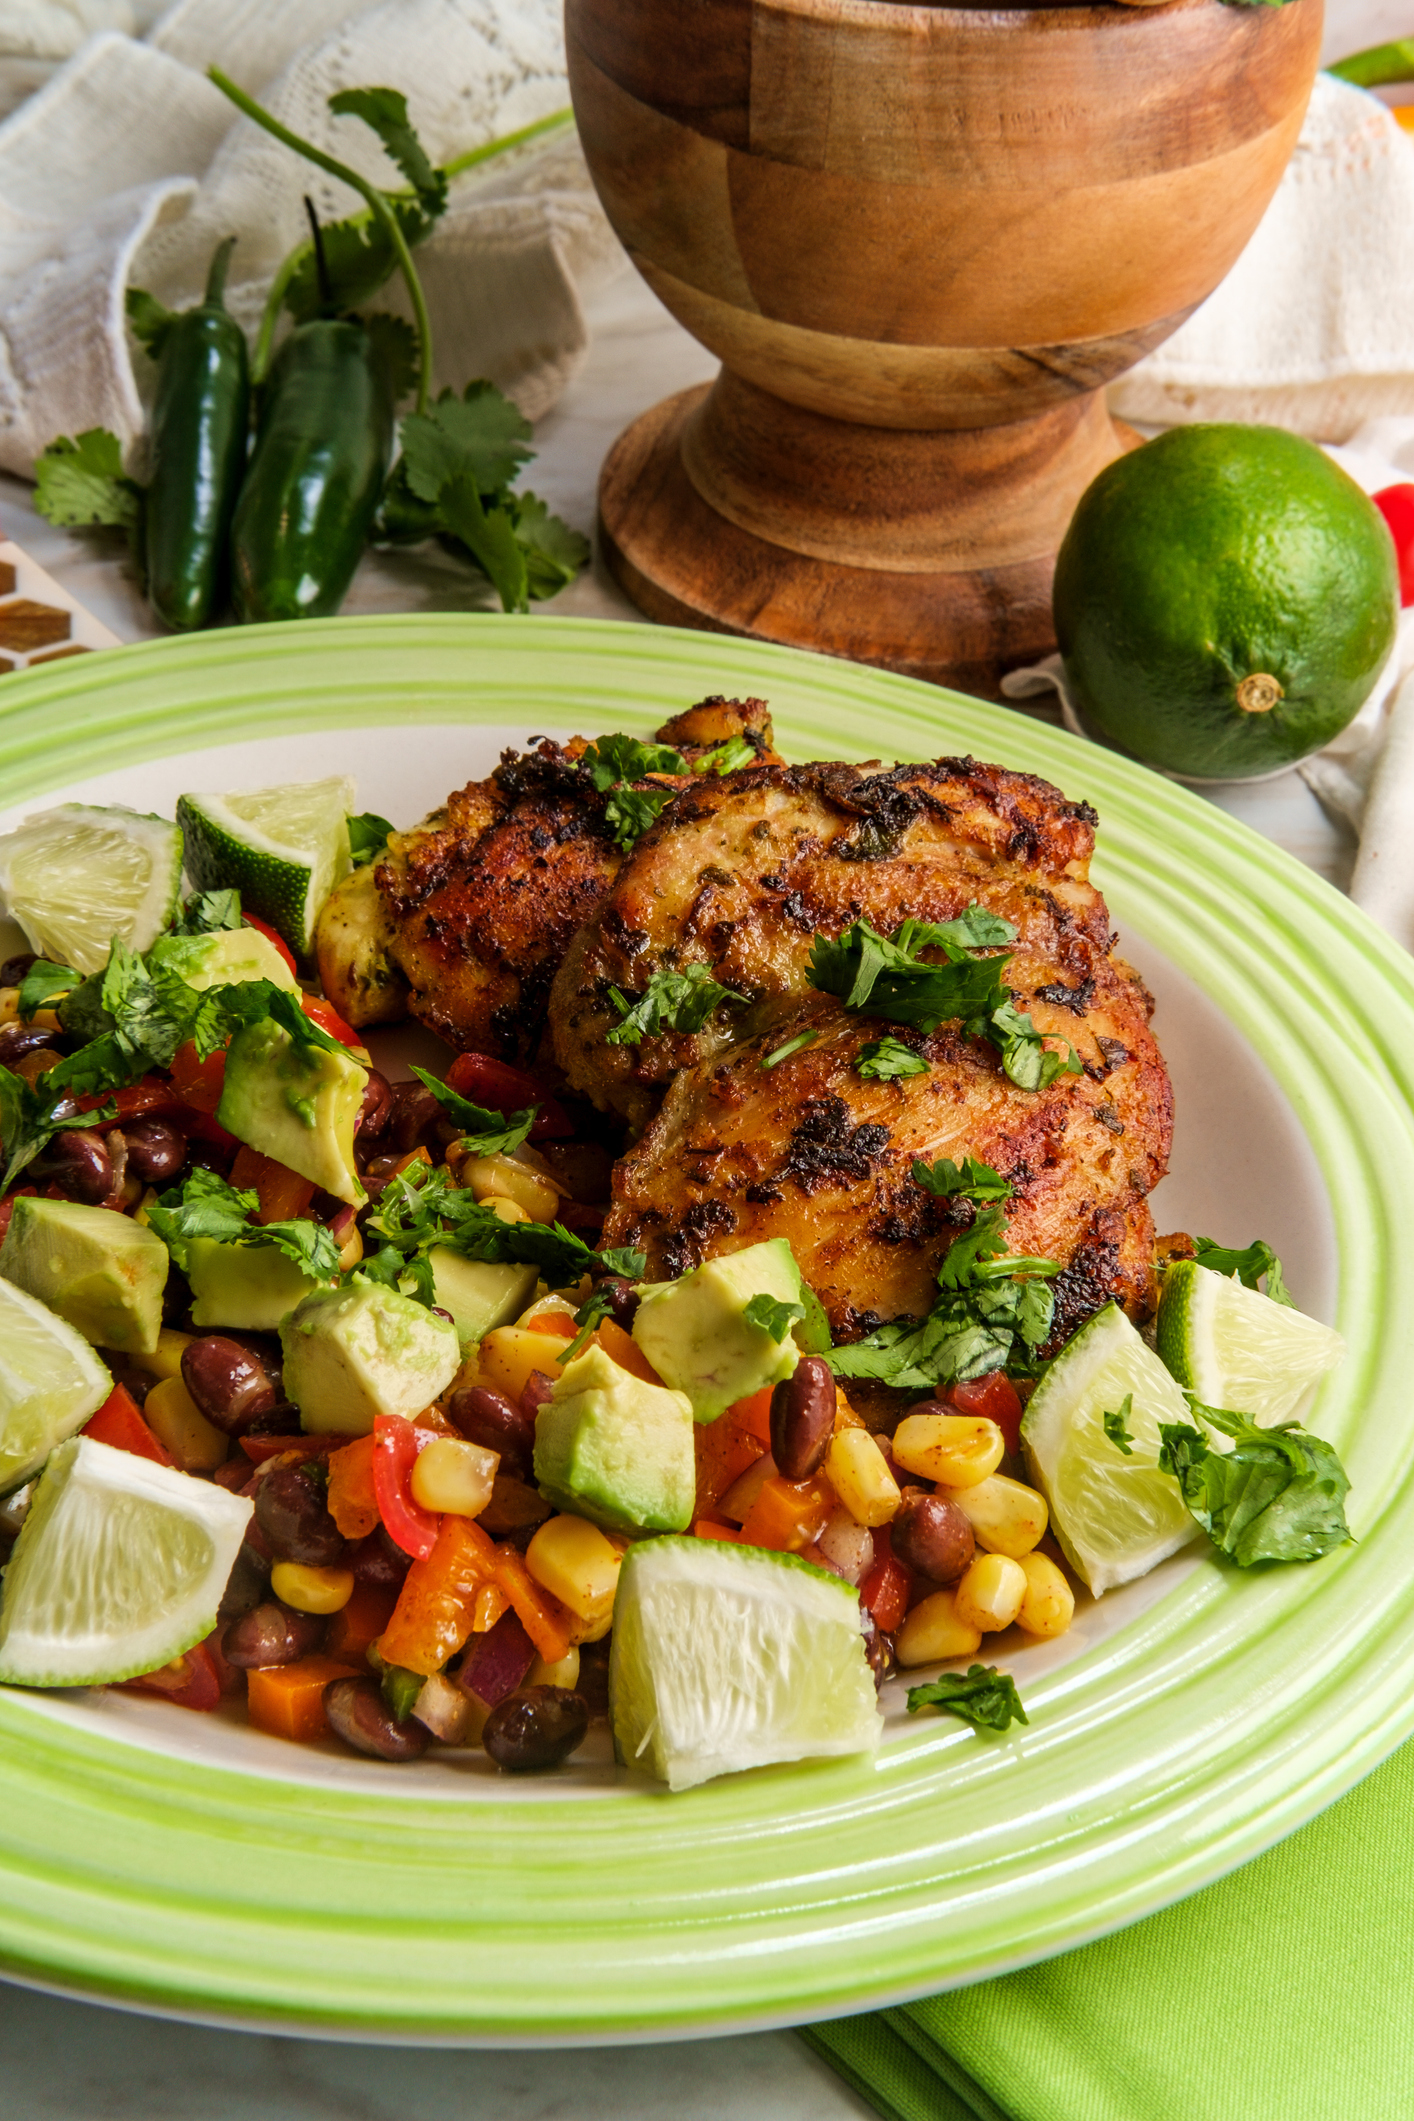
In our minds, there’s nothing more American than a good ‘ol hamburger. And yet no other food item is subject to more variation than the good ‘ol hamburger.
From fast food “discs”, some of which are good, to a fantastic, big ‘ol greasy burger at your favorite pub (best served with an ice cold beer), and of course, home grilled burgers, we don’t think there’s any food item that is more subject to individual interpretation than the hamburger.
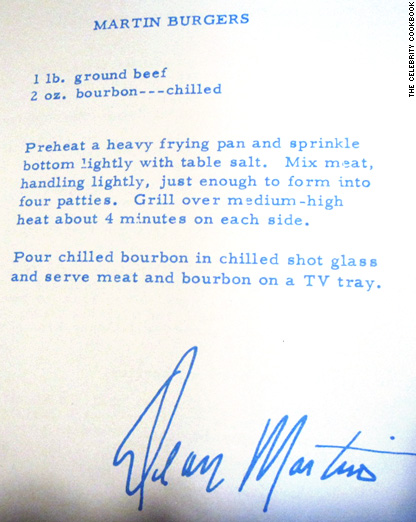
Celebrity chefs of course put their own stamp on them – every chef from Bobby Flay to Julia Child has made their burger recipes their own way. Gordon Ramsey even has his own chain of burger restaurants, called Burger, of course. Dean Martin even famously published his personal burger recipe back in the 1970s!
From the Celebrity Cookbook
So this all said, OF COURSE the Griller’s Gold blog crew has a couple of great burger recipes up our sleeves. And they are of course fueled by the wonderful, all-hardwood Griller’s Gold premium pellets!
We do have to admit to taking some technique hints from the celeb chefs, especially Gordon Ramsey and also Nigella Lawson, but like everything, your personal style is always the sum of your influences.
So this all said, here’s what we do:
Choosing The Meat
It all starts with ground beef, and we good ol’ simple, ground chuck, 80/20% lean to fat ratio. That said, if you have the time and the equipment (and the equipment is a proper meat grinder), grinding your own fresh hamburger gives absolutely sublime results. But good ‘ol supermarket 80/20 ground chuck is the go to here.
Mix-ins: NO!!
A lot of folks mix a lot of stuff into their burgers. Not us. We don’t add sauces, seasonings, binders, etc. to the beef. Good quality 80/20 chuck doesn’t need it.
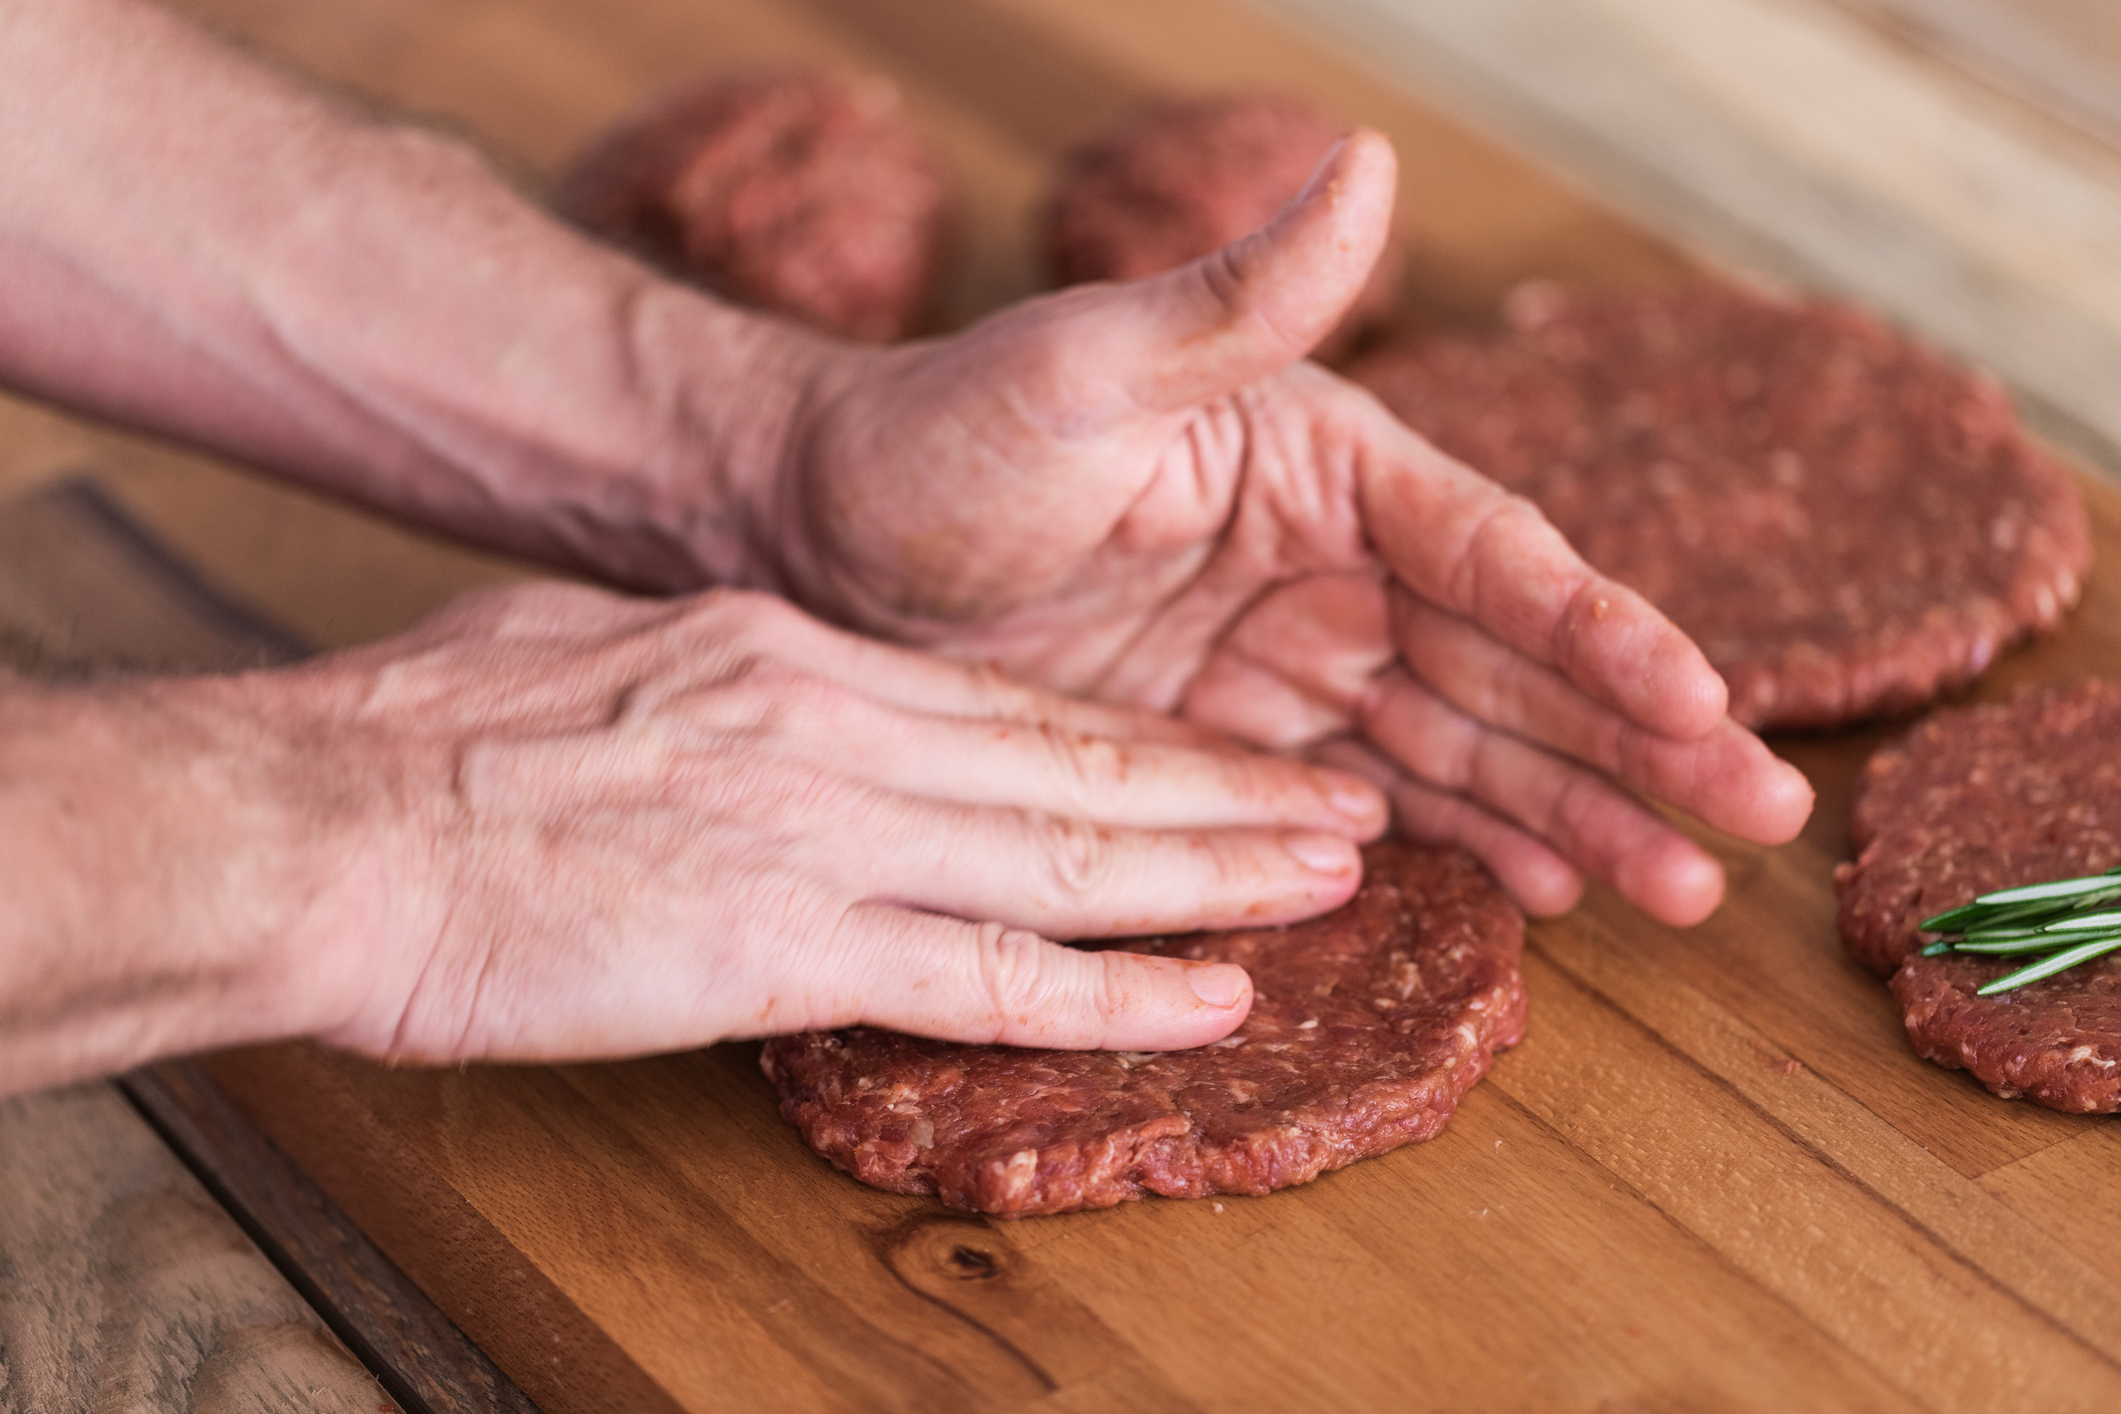
Forming and Pattying:
A great “rule of thumb” size for burgers is a 5.25 oz pre-cooked weight burger. It’s thick/massive enough to still cook nicely and allow you to leave it to your desired temperature. The technique here is to portion the meat out in pre-weighed balls, then wearing nitrile gloves (this helps keep the heat of your hands from melting the fat of the meat), flatten the balls down to half-inch thick patties. Finally after the patty has been placed on the platter to go to the grill, use your thumb to create an indentation in the center of the patty. This helps keep the burgers at an even thickness as they cook up.
How to Season Your Burger
For burgers, simplicity wins the day: A generous sprinkle (and we mean generous – at least a 1/4 tsp of kosher salt per side) and a good grind of freshly ground pepper is all you need. If you want to be fancy, maybe a shake of garlic powder. Just do the one side that’s up right now, you’ll season the other side at the grill.
The Grill/Preheating
Fire up your pellet grill to as hot as it will go – 450F, 500F, give her all you’ve got. Those Griller’s Gold natural hardwood pellets will deliver the heat!
We like to preheat the grill on this hottest setting for at least 15 minutes – you want all that metal to get good and hot. Your grill may say that its pre-heat cycle is complete, but letting it go longer ALWAYS helps. This is where it’s important to know your gear and how long it takes to heat up – but 450-500 degrees seems to be the magic number to hit.
Another great thing to use for this on your pellet grill is some sort of heat collecting/concentrating device – our two favorites are either a cast iron skillet or a set of GrillGrates. Grill Grates are “aftermarket” sets of extruded aluminum grates that magically collect and amplify grill heat. Put them on your 500 degree grill and their surfaces somehow wind up at 650F or better. I don’t know how it works, but it’s magic for searing.
Give them a try!
Grilling techniques for the perfect Burger
We have a couple of techniques here for you – give them both a try and see what works for you!
The Grill:
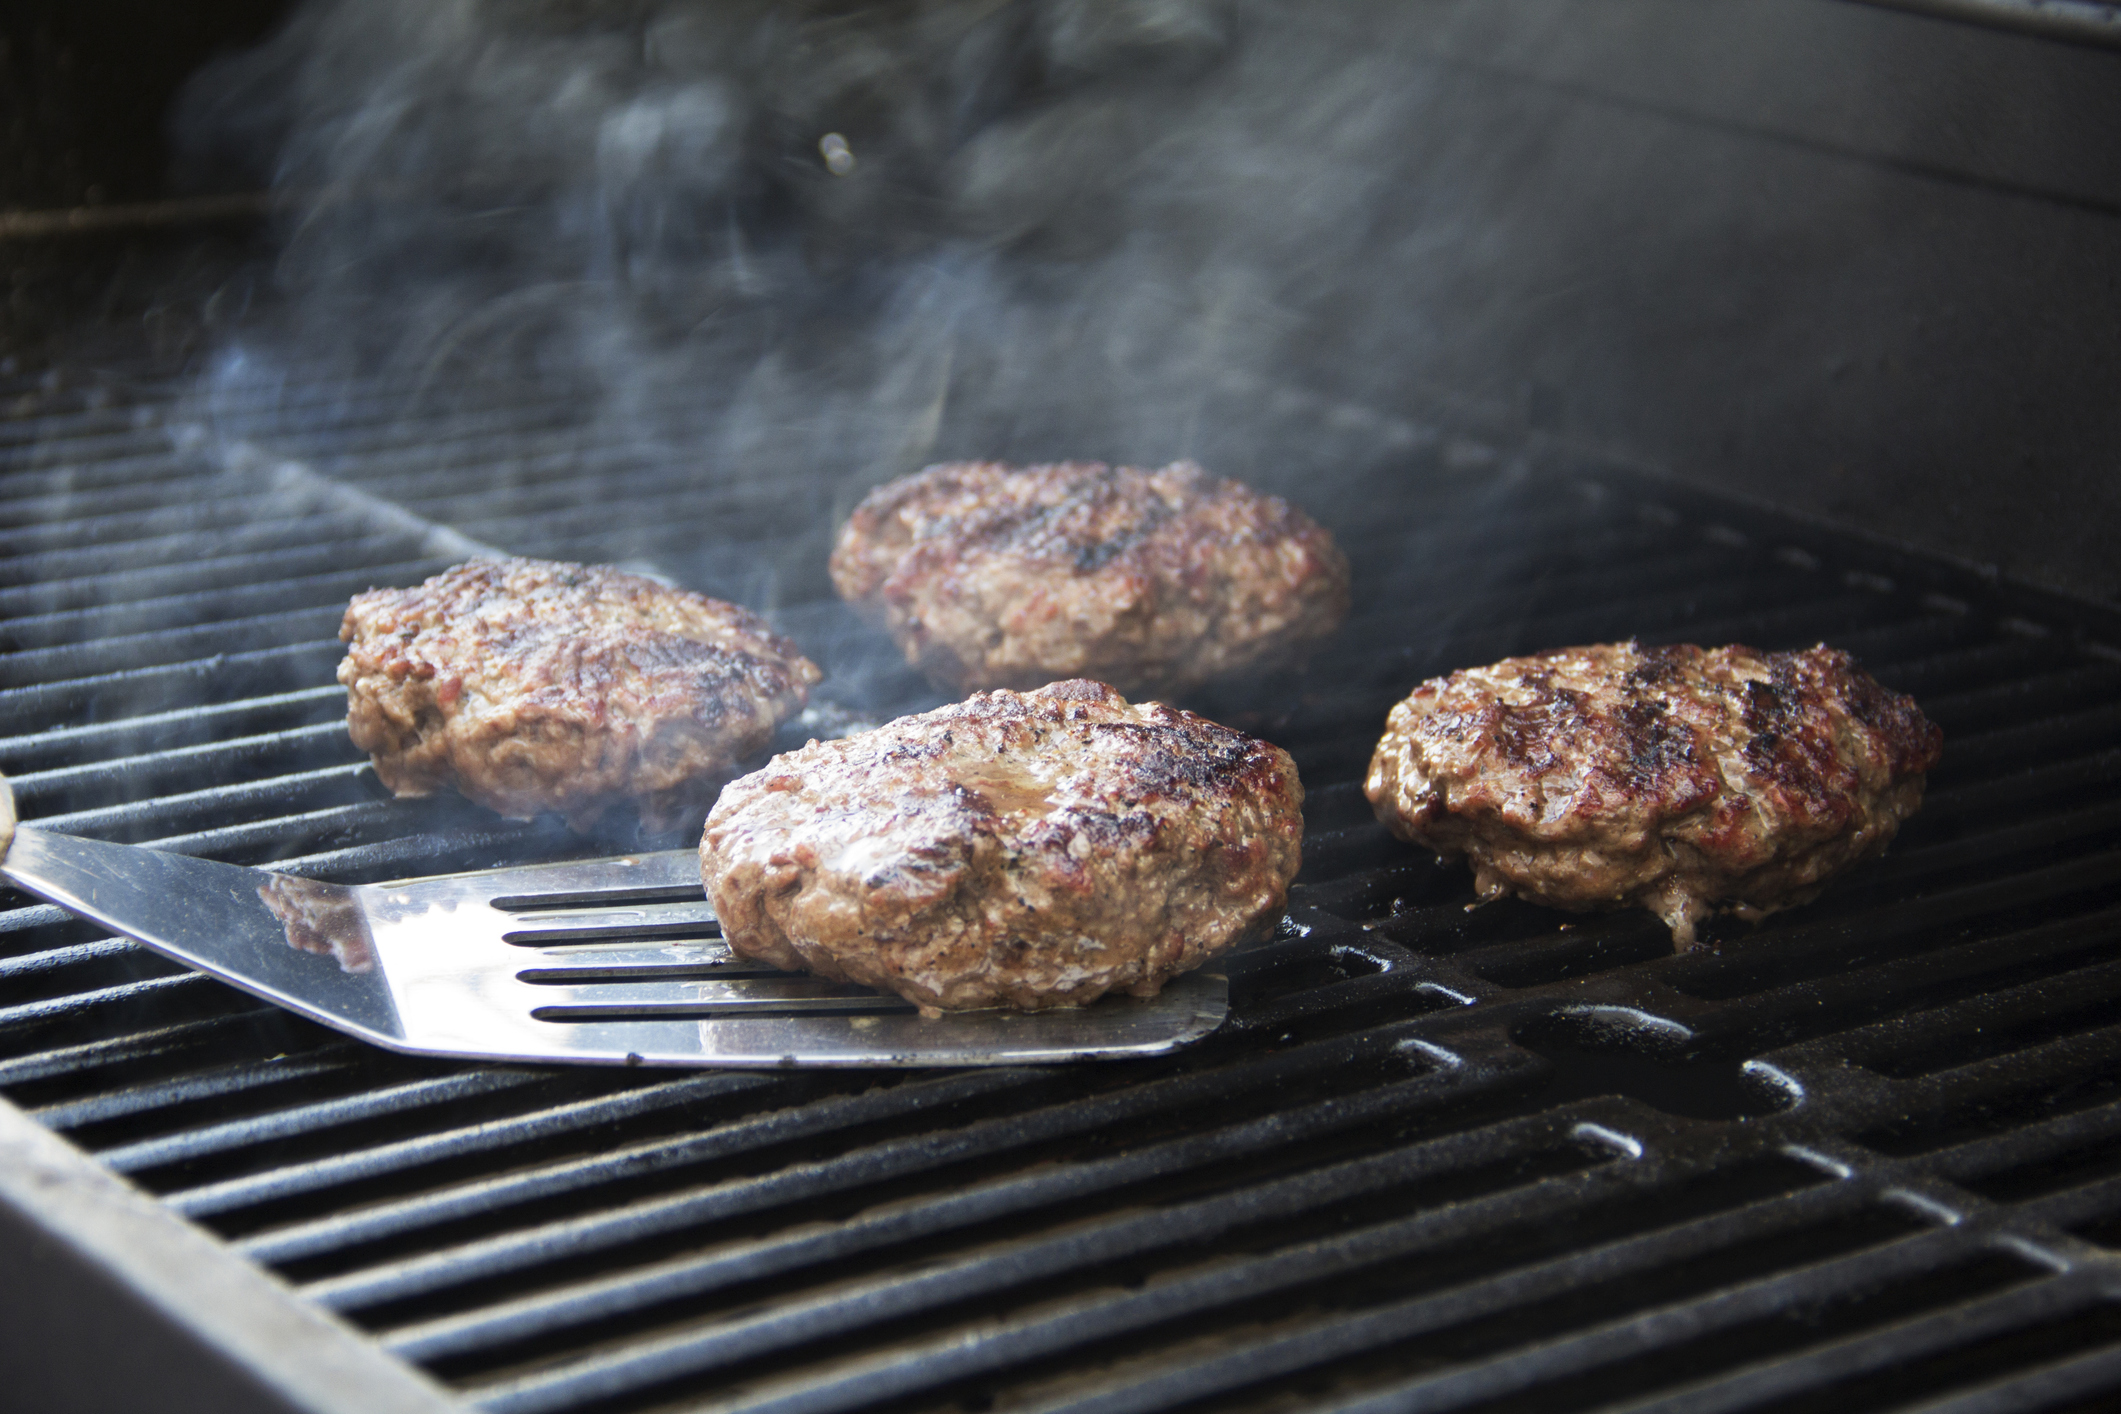
If we are just simply grilling on the grill grates (or GrillGrates), then we put the patties indentation side up on the grill and immediately close the lid and set a timer for 4 minutes.
At 4 minutes, open the lid, flip them over, season that side with just salt, and close the lid. This time the timer gets 3 minutes. At the end of the 3 minutes, open the lid, put on the cheese, close the lid and go for 30 more seconds.
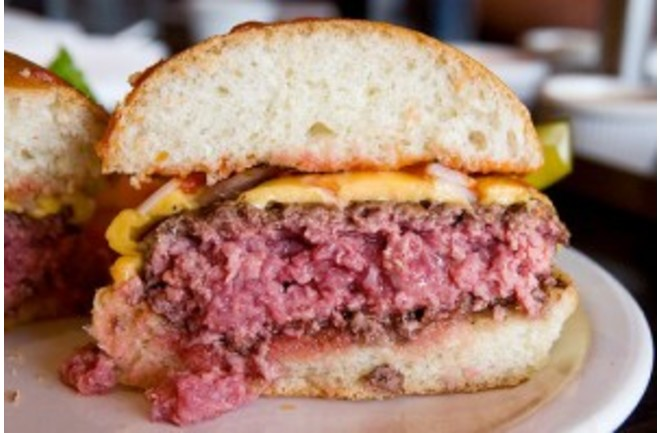
Then off onto the platter and ready to serve. This yields a perfect, medium rare burger for me – pink and juicy in the center. Amazing.
If you like medium (dryer and grayer in the center), extend the side 1 and 2 intervals by a minute and the cheese interval by 30 seconds.
The Flattop or Cast Iron Skillet Method:
We like using a couple of flattop grilling things – a cast iron griddle and a stainless flattop. Both of these are great to do a burger on.
Same methods as above apply, including timings – just put the flat top item or cast iron skillet on the grill when you preheat, and again, use your highest heat setting.
The Smashburger:
Now if you’re at all like us, you probably love some smashburgers. These are burgers that have been pressed flat on a flattop grill so they get crispy edges. Here’s some quick bullet points on doing smashburgers:
Use a cast iron skillet or other flattop as a grill topper. Put it on your grill at the start of preheat and preheat to your hottest possible setting.
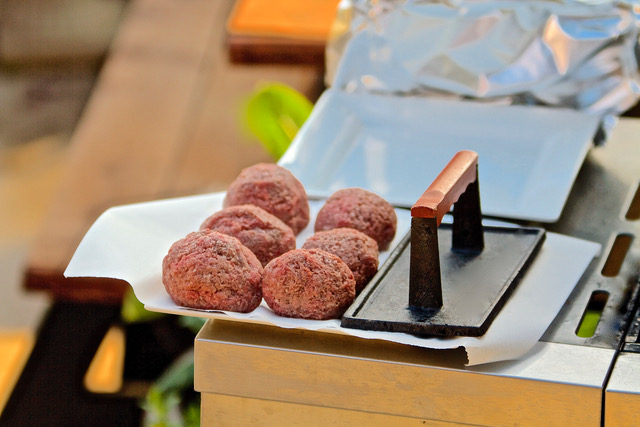
Form your burger into 3 ½ ounce balls – you’ll want to make double cheeseburgers with these! Roll the balls in coarse kosher salt. Nothing better than a salty smashburger!
Cooking: It’s the 1+1+1+1 method: Put the balls on your flattop and flatten slightly, close the lid and time for 1 minute. At the end of 1 minute, SMASH that burger with a big spatula backed up by a good weight (or invest in a cast iron burger or bacon press) – we like to use a big can of beans as our weight – one hand on the spatula the other pressing down on the can of beans. You want that burger flat, baby! It should expand to almost 6” and be about ¼” thick max at the center. Then give it 1 more minute and flip it.
Make sure you scrape it up well off the flattop – don’t leave any of that great flavor on the metal! After the flip, time another minute, then put on the cheese, and time one more minute.
Done – burger perfection in 4 minutes!
Buns/Bread/Add-ons/Condiments/etc.
Cheese:
Well our fave is American cheese – but not pre-wrapped “singles”. We buy it in the deli section of the grocery store and we get it cut slightly thicker. Blue cheese is fantastic, as are cheddar, gouda, gruyere, swiss and more.
Buns:
Our favorite buns are bakery-made brioche buns, although both the S. Rosen and Pepperidge Farm brands make amazing brioche buns.
Second place in the bun category would be a good sesame-seeded commercial bun. And of course dark rye bread is amazing too.
If doing buns we like to mix up some garlic butter – just add a couple of cloves of minced garlic to a half-stick of softened salted butter and mix well – then spread the buns with the butter. We like our buns or bread toasted, so I put them on the grill to toast during the pre-heat phase. They toast in like 30 seconds per side.
Toppings:
We are kind of purists for burgers, so we really don’t put much on them – maybe a little mustard and mayo on the bun, and then dip each bite in ketchup. Others on the GG team here love lettuce/tomato/raw onion burgers, and the team also loves sauteed/grilled onions on burgers as well.
In all of these instances, the fresher and cooler and crisper your add-ons, the better.
And that’s it! This is what burger heaven looks like for us:
Ok, now we got that out of our system, today’s topic is … guess what? Bacon!
We’re going to cover a few items all devoted to that food that EVERYONE loves.
Bacon!
Seriously, if you don’t love bacon, we don’t know you! In this post, we’re going to show you how to cure and smoke your own bacon, and then share with you several of our bacon-starring recipes. And all of this is fired up and designed to be cooked on a pellet grill fueled with Griller’s Gold Hardwood BBQ Pellets. Let’s get to the BACON!
Home Cured and Smoked Bacon
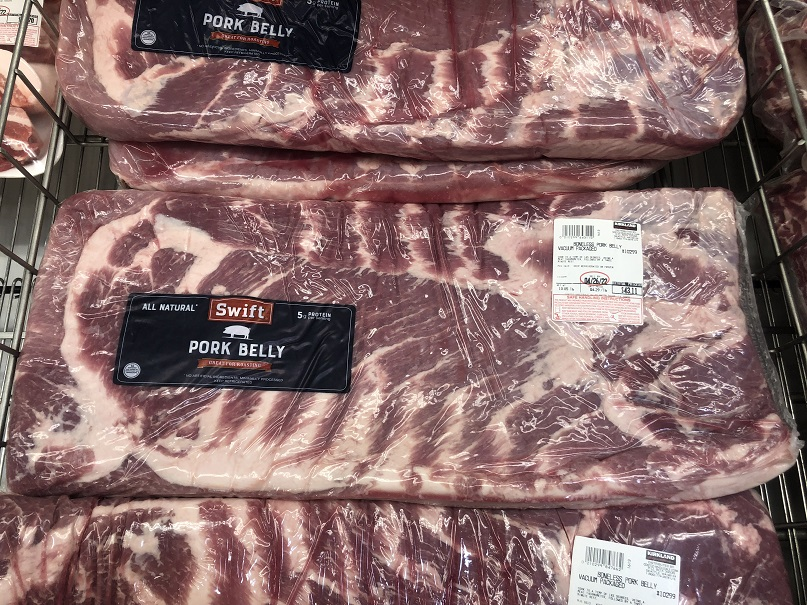
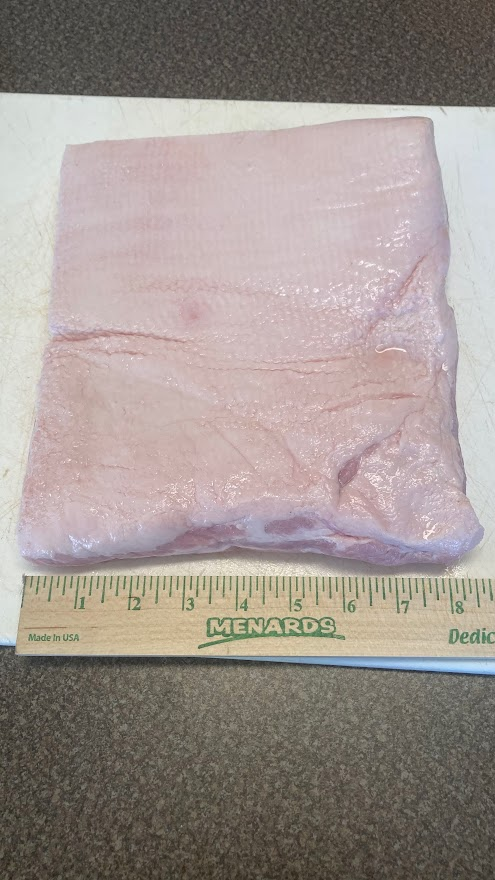
The first time you make this you will wonder what took you so long to try it, as it is ridiculously simple and the results are beyond spectacular. The hardest part about this is buying the pork belly to make it from. Seriously.
So, about that pork belly! Bacon comes from the “belly” of the pig, and it’s exactly that – it’s the ab muscles of the pig, although most pigs we know don’t have six packs! That said, in the diagram below, where it says “bacon” is where the fun lies. Now that diagram is a misnomer, as it is actually the pork belly but … anyway, we’re making bacon.
Buying the Pork Belly:
As usual, we have the best luck buying our pork belly at Costco or Sam’s Club, but you can also buy it at butcher shops, Whole Foods, and nicer grocery stores. Your local grocery store butcher can also order it in for you. At Costco, it usually is a piece about 7-10 lbs and between 10 and 12” wide by about 18” to 22” long. Be sure to buy a nice slab of it in one piece, versus cut into strips. The strips are great for making pork belly burnt ends (see our post about that!) but for making homemade bacon, buy the slabs. From what we know about butchery, that’s actually one half of a full pork belly. The belly from Costco and Sam’s club comes without skin. If your butcher has it skin-on, ask them to remove the skin.
Image by Stewart Campbell
Sizing for Your Bacon:
So the big piece from the big box store is actually a bit unwieldy for making bacon – it’s hard to handle for curing, smoking, etc., so we like to cut it down in either halves or thirds (depending on how big the original piece is). We try to make it so the piece is about 8” wide in one dimension to make it easy to put in bags for curing. The nice thing is other than cutting it into a manageable size, that’s about it for knife work unless the butcher sold you a piece with the skin on. If that’s the case, using a thin filet knife slice underneath the skin and remove it. People like to save that for making cracklin’s! Save and freeze the other half to make more bacon, or pork belly burnt ends or … so many possibilities!
Image by Stewart Campbell
Curing the Pork Belly:
The process to make the pork belly into bacon takes 5 to 7 days, but is really REALLY easy. First step is cure, second step is smoke.
First Step – Curing:
The cure is no more complicated than making a marinade for a steak or a brine for a bird, just takes a special product called Prague Powder #1 which is regular salt mixed with sodium nitrate. It is dyed bright pink to help make sure you don’t mistake it for regular salt. The sodium nitrate cures the meat by chemically altering it in a process somewhat similar to pickling. That helps stabilize the meat and fight bacterial growth. Prague Powder #1 is available widely at butcher shops, well equipped grocery stores and of course from Amazon. A little goes a very long way – the recommended “dose” of it is 1 tsp per 5 lbs of meat.
Image by Stewart Campbell
For our pork belly, which weighed in at 4.25 lbs after cutting to the size we wanted, needs just over ¾ tsp of Prague Powder #1 in the brine.
Brine Recipe:
¾ tsp Prague Powder #1
1 cup warm water
¼ cup brown sugar
¼ cup kosher salt
1 tsp freshly ground pepper
¼ cup dark amber maple syrup (the real stuff, not “pancake syrup”!!)
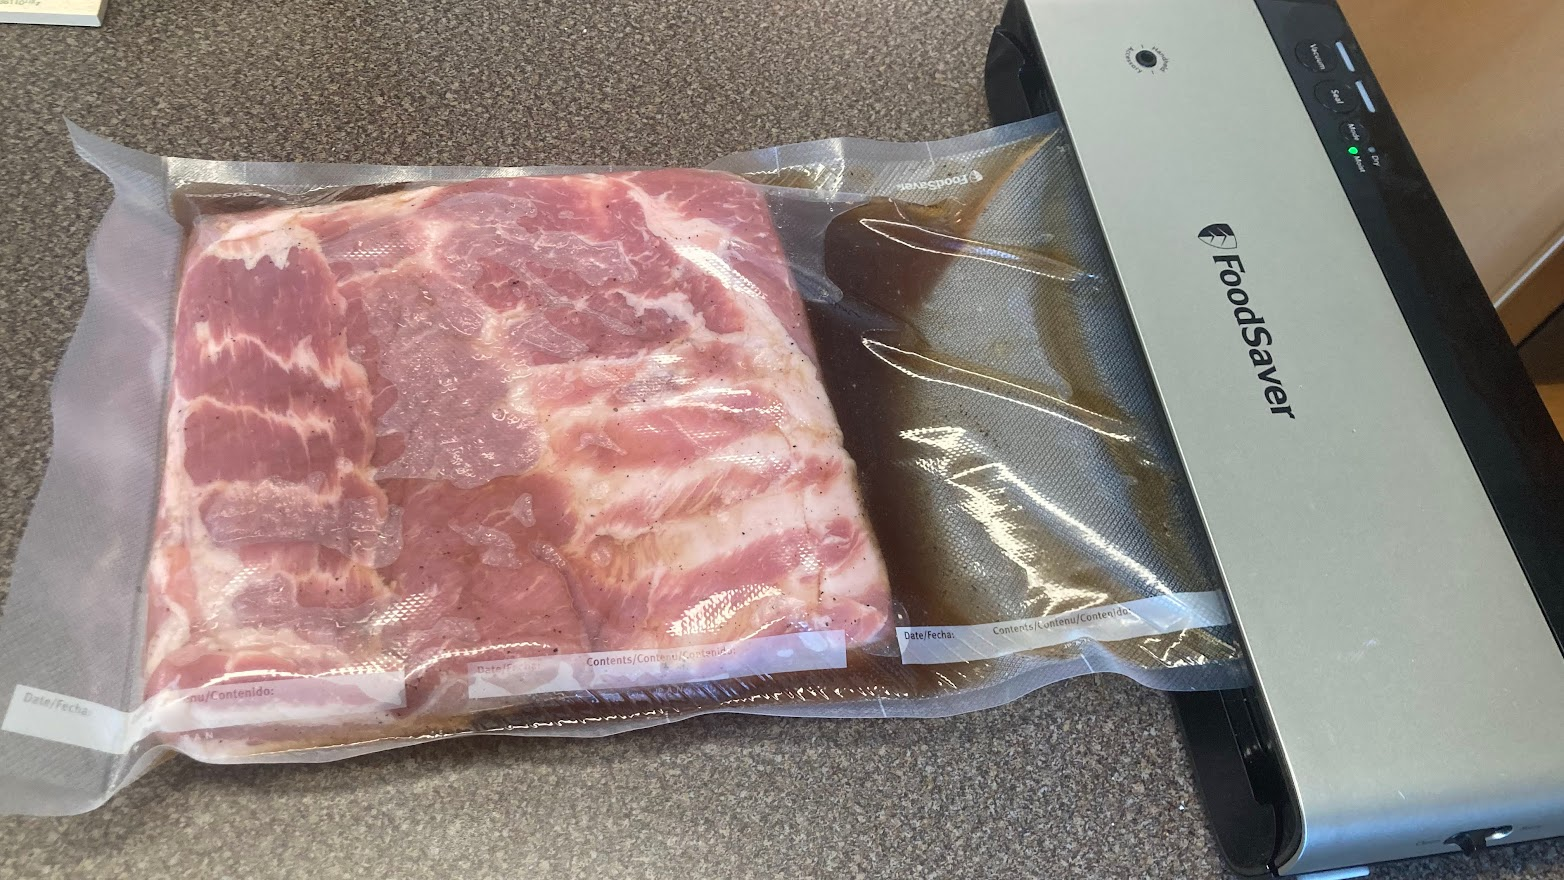
Mix that up well. We like to marinate in vacuum sealed bags as they won’t leak in the fridge like a zip lock can. Other things that work well are a plastic-wrap covered glass dish, or a plastic storage container. Avoid metal because of all the salt in the brine cure.
For ours, we made a sealed vac bag about 8” longer than our piece of belly, sealed it up, and slid the belly in. Then we poured in the cure brine and using our “wet” setting on our sealer, we sealed it up. Again, you do you – you want the meat not folded and laying flat for maximum surface exposure of the meat to the cure.
Image by Stewart Campbell
This goes into the fridge and needs to cure for a few days – the size of the belly determines the time, but an easy rule of thumb is divide your meat in pounds by 1.25 – that equals 3.5 days for our 4.25 lb piece. An extra day won’t hurt, but don’t short it.
Key tip: turn the bag over every day that it is curing. That helps make sure the meat is fully steeped in the liquid cure.
The Pork Belly Pellicle:
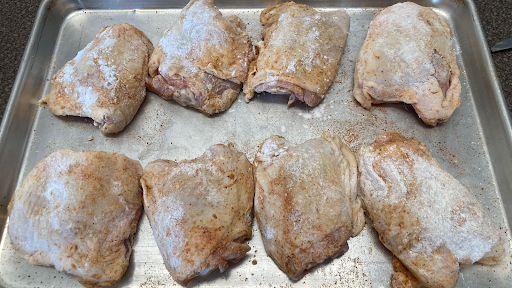
For best smoking results after you’ve hit the right amount of curing time, remove the belly from the curing bag or container and give it a rinse in the sink and then set it on a rack over a rimmed baking sheet and put it back in the fridge overnight. This will help dry the surface into a sticky coating called a “pellicle” and that helps suck up the smoke flavor!
Second Step – Smoking the pork belly:
Start by firing your pellet grill up to its lowest setting – ours is 165F – you can also use the “smoke” or “super smoke” setting if your grill has that. Use your favorite Griller’s Gold pellet – the classic flavor is either Hickory blend or Fruitwood blend, but use your fave!
The smoking technique is interesting – you’re cold smoking – definitely not the usual “low and slow” method. Pull your belly from the fridge, rinse off any juices that landed on your baking sheet and fill that baking sheet with ice cubes. Set the rack with the belly on it, fat side up, over that and then put the whole works on your grill. The ice cubes will last about a half hour and will help keep the meat cool while it absorbs smoke. Here’s where having a reliable probe thermometer really helps – you’re smoking to just 155 degrees internal. Between the cure and the smoking heat, that will preserve your bacon without rendering out the fat. Remove at 155 and put it in the fridge right away – you want it to cool quickly.
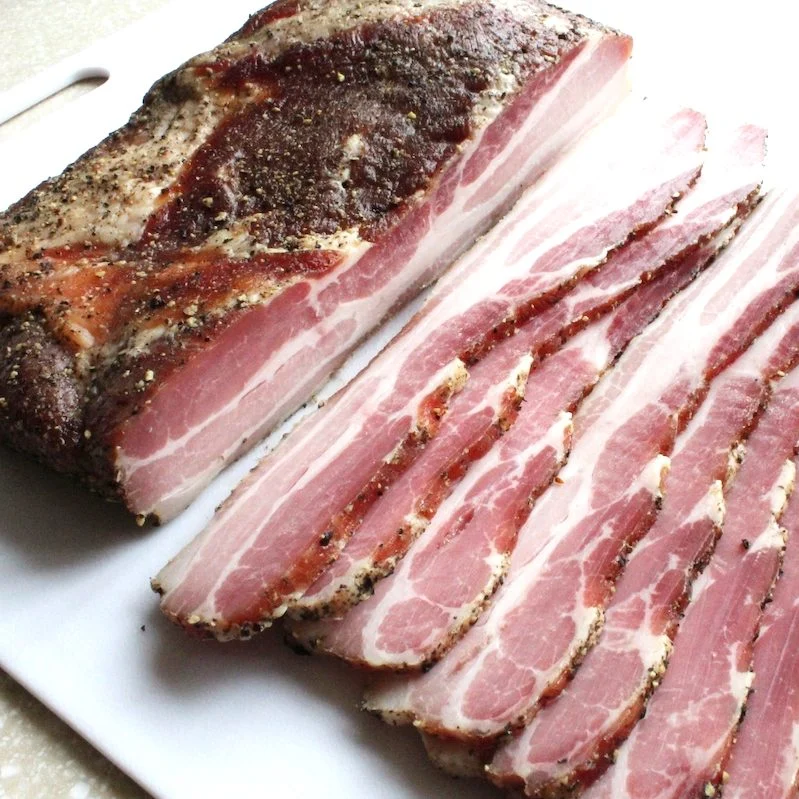
And that’s it – now you have this amazing slab of bacon. We like to slice it into ⅛” thick slices for cooking for breakfast, sandwiches, etc. You can also dice it for smoked pork lardons, thick slices for pancetta, big chunks for flavoring beans, soups, stews, etc.
Image by Stewart Campbell
It will keep in the fridge for about 3 weeks, and will be good for at least 3 months in the freezer. We like to slice it all into ⅛” strips, then freeze in vacuum bags in 1 pound packages, which is what we tend to use in about a week.
Bacon Dishes/apps
And here’s some fun, quick ways to use your bounty of THE BEST BACON YOU’LL EVER EAT!
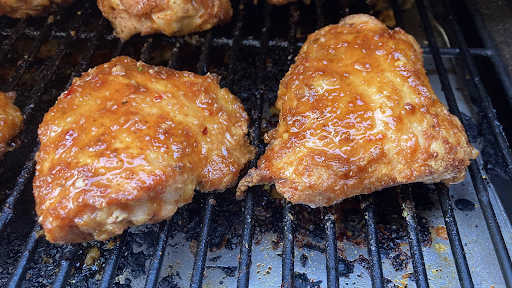
Bacon on the Grill:
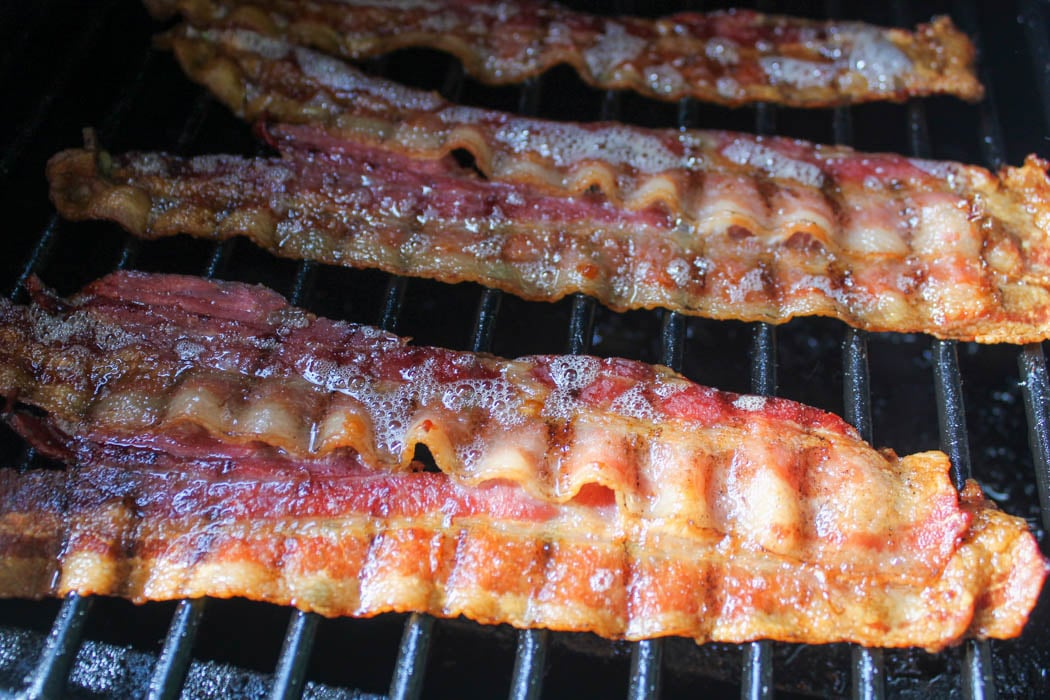
Your pellet grill is a great way to make slices of bacon. Preheat your grill to 375, put the slices directly on the grill, turning once in about 4 or 5 minutes, done in about 9 or 10. Note if you do this – line the heat deflector plate with foil, and then throw that away after the cook and scrape any accumulated fat out of the fat drip area on your grill to avoid future grease fires.
Image by Stewart Campbell
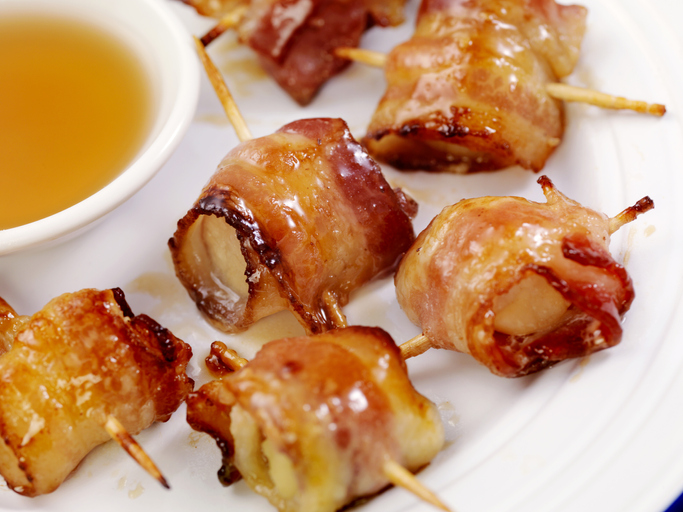
Bacon Wrapped Scallops:
Buy big, nice sea scallops and then wrap each with a slice of your marvelous homemade bacon, securing with a toothpick. Grill at 425 degrees, turning frequently until the scallop is done and the bacon is cooked, about 10 minutes.
Bacon-Wrapped Filet Mignons:
Buy nicely-sized and shaped filet mignons and wrap them with a slice or two of your homemade bacon. We like to do these Reverse-sear style to medium rare. See our article on mastering reverse searing!
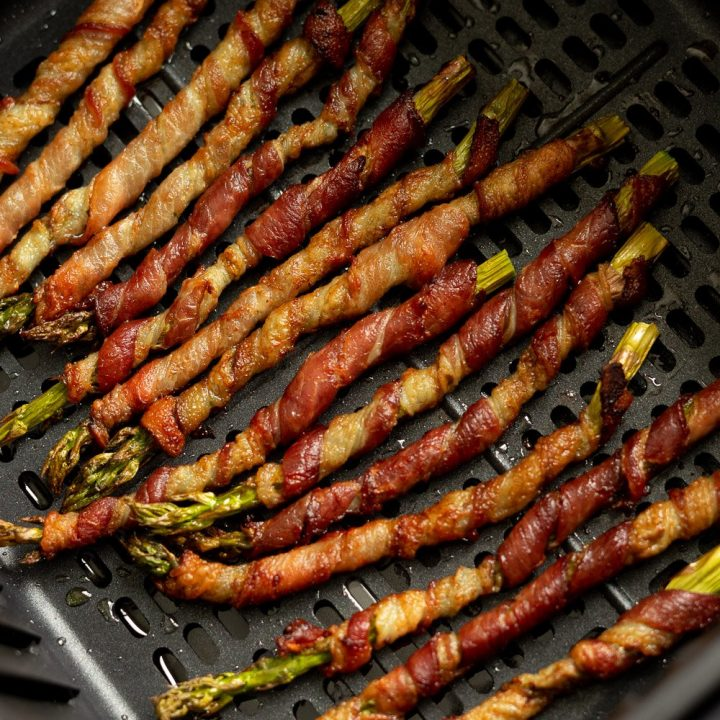
Bacon-wrapped asparagus spears:
Oh yeah, these are good! Buy thicker (about ½” thick at bottom) asparagus and wrap in a spiral with your bacon. Grill until the bacon is cooked, turning frequently.
Image by Stewart Campbell
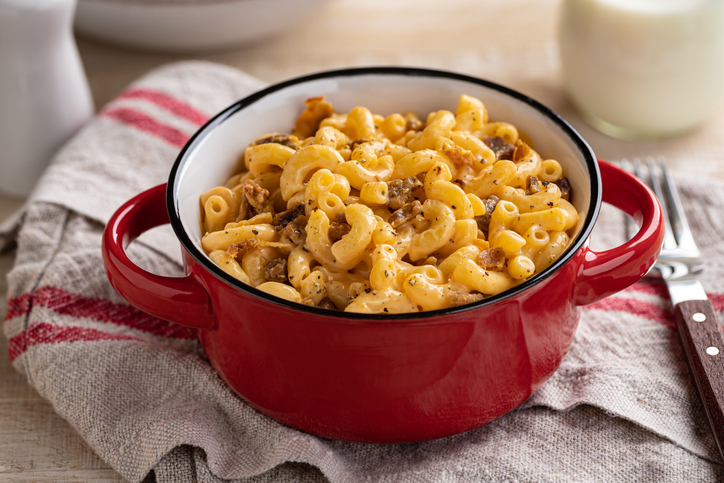
Bacon Mac & Cheese:
Take your favorite mac and cheese recipe and kick it up a bunch of notches by cooking up a bunch of your homemade bacon and adding it to your recipe. Best when added to the sauce as you’re cooking it, then mix the bacon spiked sauce up with the noodles and scatter more over the top when baking it. OR, if you’re doing “the blue box” just fry up a few strips and crumble it in once you’ve mixed yours up!
Got a griller in your life and finding it hard to shop for him or her?
Well our grilling blog crew at Griller’s Gold happens to be a bunch of “gear heads” and always love shopping for the latest and greatest bits to use when we indulge our favorite hobby. That is of course, turning out favorite yums for our families and friends on our pellet grills fueled with Griller’s Gold Premium Hardwood Pellets.
We hope that our idea list below sparks some good ideas for your griller:
Thermometers
No good chef or serious BBQ griller doesn’t have their favorite thermometers. Having the ability to accurately measure temperatures means that you can accurately deliver food off your grill that is to the right doneness level, at a safe eating temperature and is of the highest quality.
Here’s a few of our favorites in a couple of different categories:
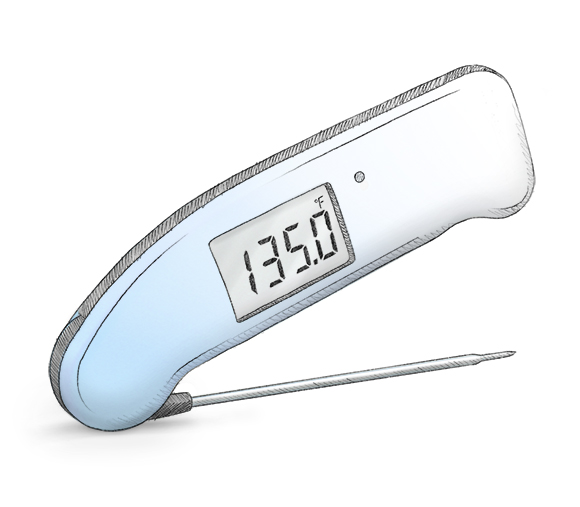
Instant Reading Thermometer: The ThermaPen
Ask any serious chef which instant-reading thermometer they use, and they’ll all say the same thing: ThermaPen.
A ThermaPen is a product from ThermoWorks, a company that makes professional quality temperature measuring devices for a variety of applications. The “standard” ThermaPen has a folding probe, and the best part is its speed and accuracy – it measures the temperature at the absolute pinpoint of the probe, and it delivers the reading within a few seconds. It is truly a pro tool!
A ThermaPen isn’t cheap by any means (regular price around $100) but they are built like tanks and last forever. We have one that is 20+ years old and still works perfectly! On sale now at $69.95 at https://www.thermoworks.com/thermapen-one/
Remote-Monitoring Thermometers and Probes
Some pellet grills come with plug-in temperature probes and that’s great – but we’ve heard they can be pretty variable on accuracy, and accuracy is what it’s all about. Here are some great products proven and used by the Griller’s Gold Team for remote-monitoring of your food (meaning that you can get the information without standing at your grill).
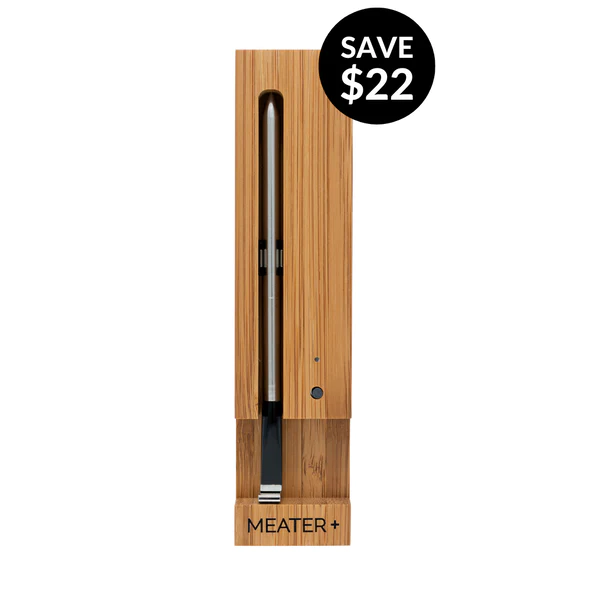
Meater Thermometers: We have to admit to falling in love with this thing when it was just an idea on Kickstarter and after waiting a year for it to arrive, well, we weren’t disappointed.
That’s several years ago now and they have continued to evolve and innovate the product. The concept is simple – a metal probe pen that you insert in your meat and pair with your phone and you’re good to go!
It measures both temp of your food and the ambient temp of your grill. They come in single packs, multiple-pen setups and more! Lots of sale prices right now at https://store-us.meater.com/products/meater-plus
Inkbird Remote Thermometer: Inkbird is a pretty cool company and they make a variety of temperature control and temperature measurement products. A remote thermometer like this has several probes that you can push into your food, hang in your grill to monitor temperature, etc.
Great for if you’re cooking things that don’t get done at the same pace like a chicken plus a beef roast. Rather than picking just one for you, we suggest you shop their website – they have everything from fairly inexpensive bluetooth probe setups ($51.99) up to multiple-probe wifi-enabled counter-top consoles. See what fits your budget and your griller’s needs at https://inkbird.shop/collections/bluetooth-bbq-thermometers
ThermoWorks Smoke remote thermometer: Another item we’ve had for years – ours is past 10 years old now and is still on its original set of batteries!
This thing is bullet proof and works great and is on an insane deal. This is only a two-channel thermometer, but it’s dedicated remote receiver seems to have a much longer range than standard Bluetooth.
And the reason we’re suggesting this one is it is at an insane deal right now – $64.35. We paid close to double that when we first bought ours. That said, Themoworks has a huge selection BBQ products so you may want to shop a bit on their site. Here’s the link to the SMOKE: https://www.thermoworks.com/smoke/
Tools and Accessories for the grill
These items are fun/useful tool items to add to your pellet grill to be able to make different food items, enhance your grill’s performance, and the best part, have more fun:
GrillGrates
GrillGrates are accessory grates that lay right on top of your pellet grill’s cooking grates. They work by absorbing the heat of the grill and somehow concentrating it, delivering up to 200F more heat at the grate rails, which delivers great searing and grill marks – moreso than what you can get from your grill’s standard grates.
We don’t need to know why they work, but trust us, they work great. We have them and love them! They make kits sized to fit your grill, or you can buy their standard sizes.
Flat top grills are metal plates you can lay on your grill’s cooking grate to cook typical flat-top grill foods like burgers, breakfast items like pancakes, hash browns and eggs, and even Japanese “Hibachi” style food.
There are a lot of selections out on the marketplace and for this category, we don’t have a particular one we recommend.
We do know that the GrillGrate folks (above) also make one. Things to keep in mind on these are to make sure that if you buy one that’s the same size of your grill that it is made for it – we’ve heard that these can obstruct airflow if they aren’t designed for your grill.
Now this all said, one “flattop” solution we love the best is our simple cast iron griddle from Lodge Cast Iron – this isn’t anywhere near the size of our pellet grill but it’s big enough to make a couple of omelets, or a few fried eggs all at once. A flat top on top of your pellet grill can save you the cost of one of those big dedicated flat top grills. Here’s a link to that product on Lodge’s site:
Of all the grill-friendly cooking accessories to have, cast iron cookware is the most versatile.
We own several sizes of skillets, as well as the griddle mentioned above, and because a) they are all-metal; and b) are cast-iron with no special finish to discolor or get ruined by grill use, they are perfect for grill cooking.
What to cook in them? Side dishes such as potatoes or vegetables, fish, especially delicate fish that might fall apart on grill grids, and even desserts (ever tried wood-grilled peach cobbler?) are amazing when kissed with that delicious Griller’s Gold flavor from your pellet grill!
Our favorite brand is good ‘ol, USA made Lodge, made in South Pittsburg, TN near the border with Alabama and near Chattanooga. Great place to visit! Visit their website for lots of ideas for gifts for your favorite griller. https://www.lodgecastiron.com/
Grilling gift hand Tools:
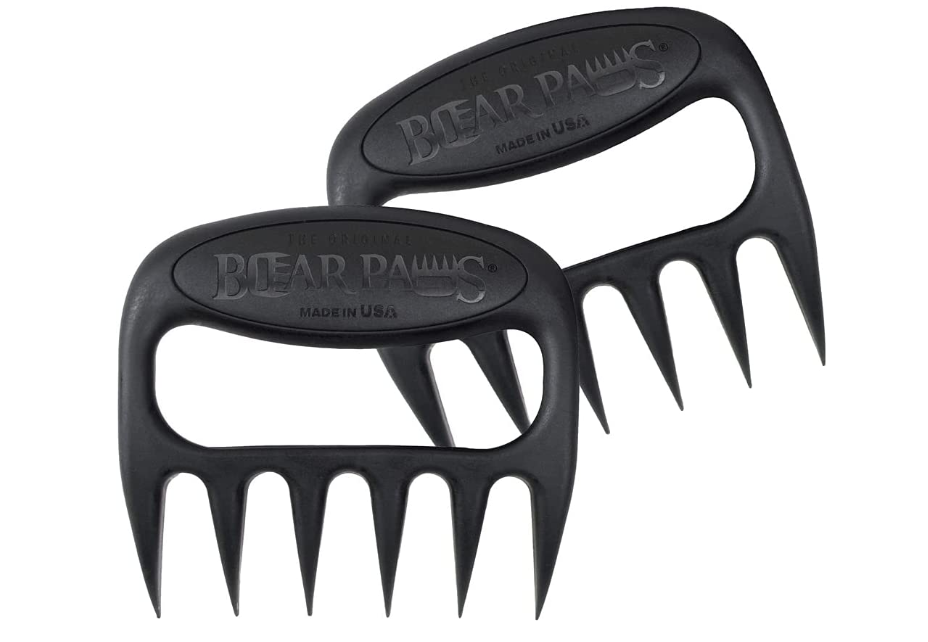
Here’s a list of things in our grilling bits cabinet that we can’t live without:
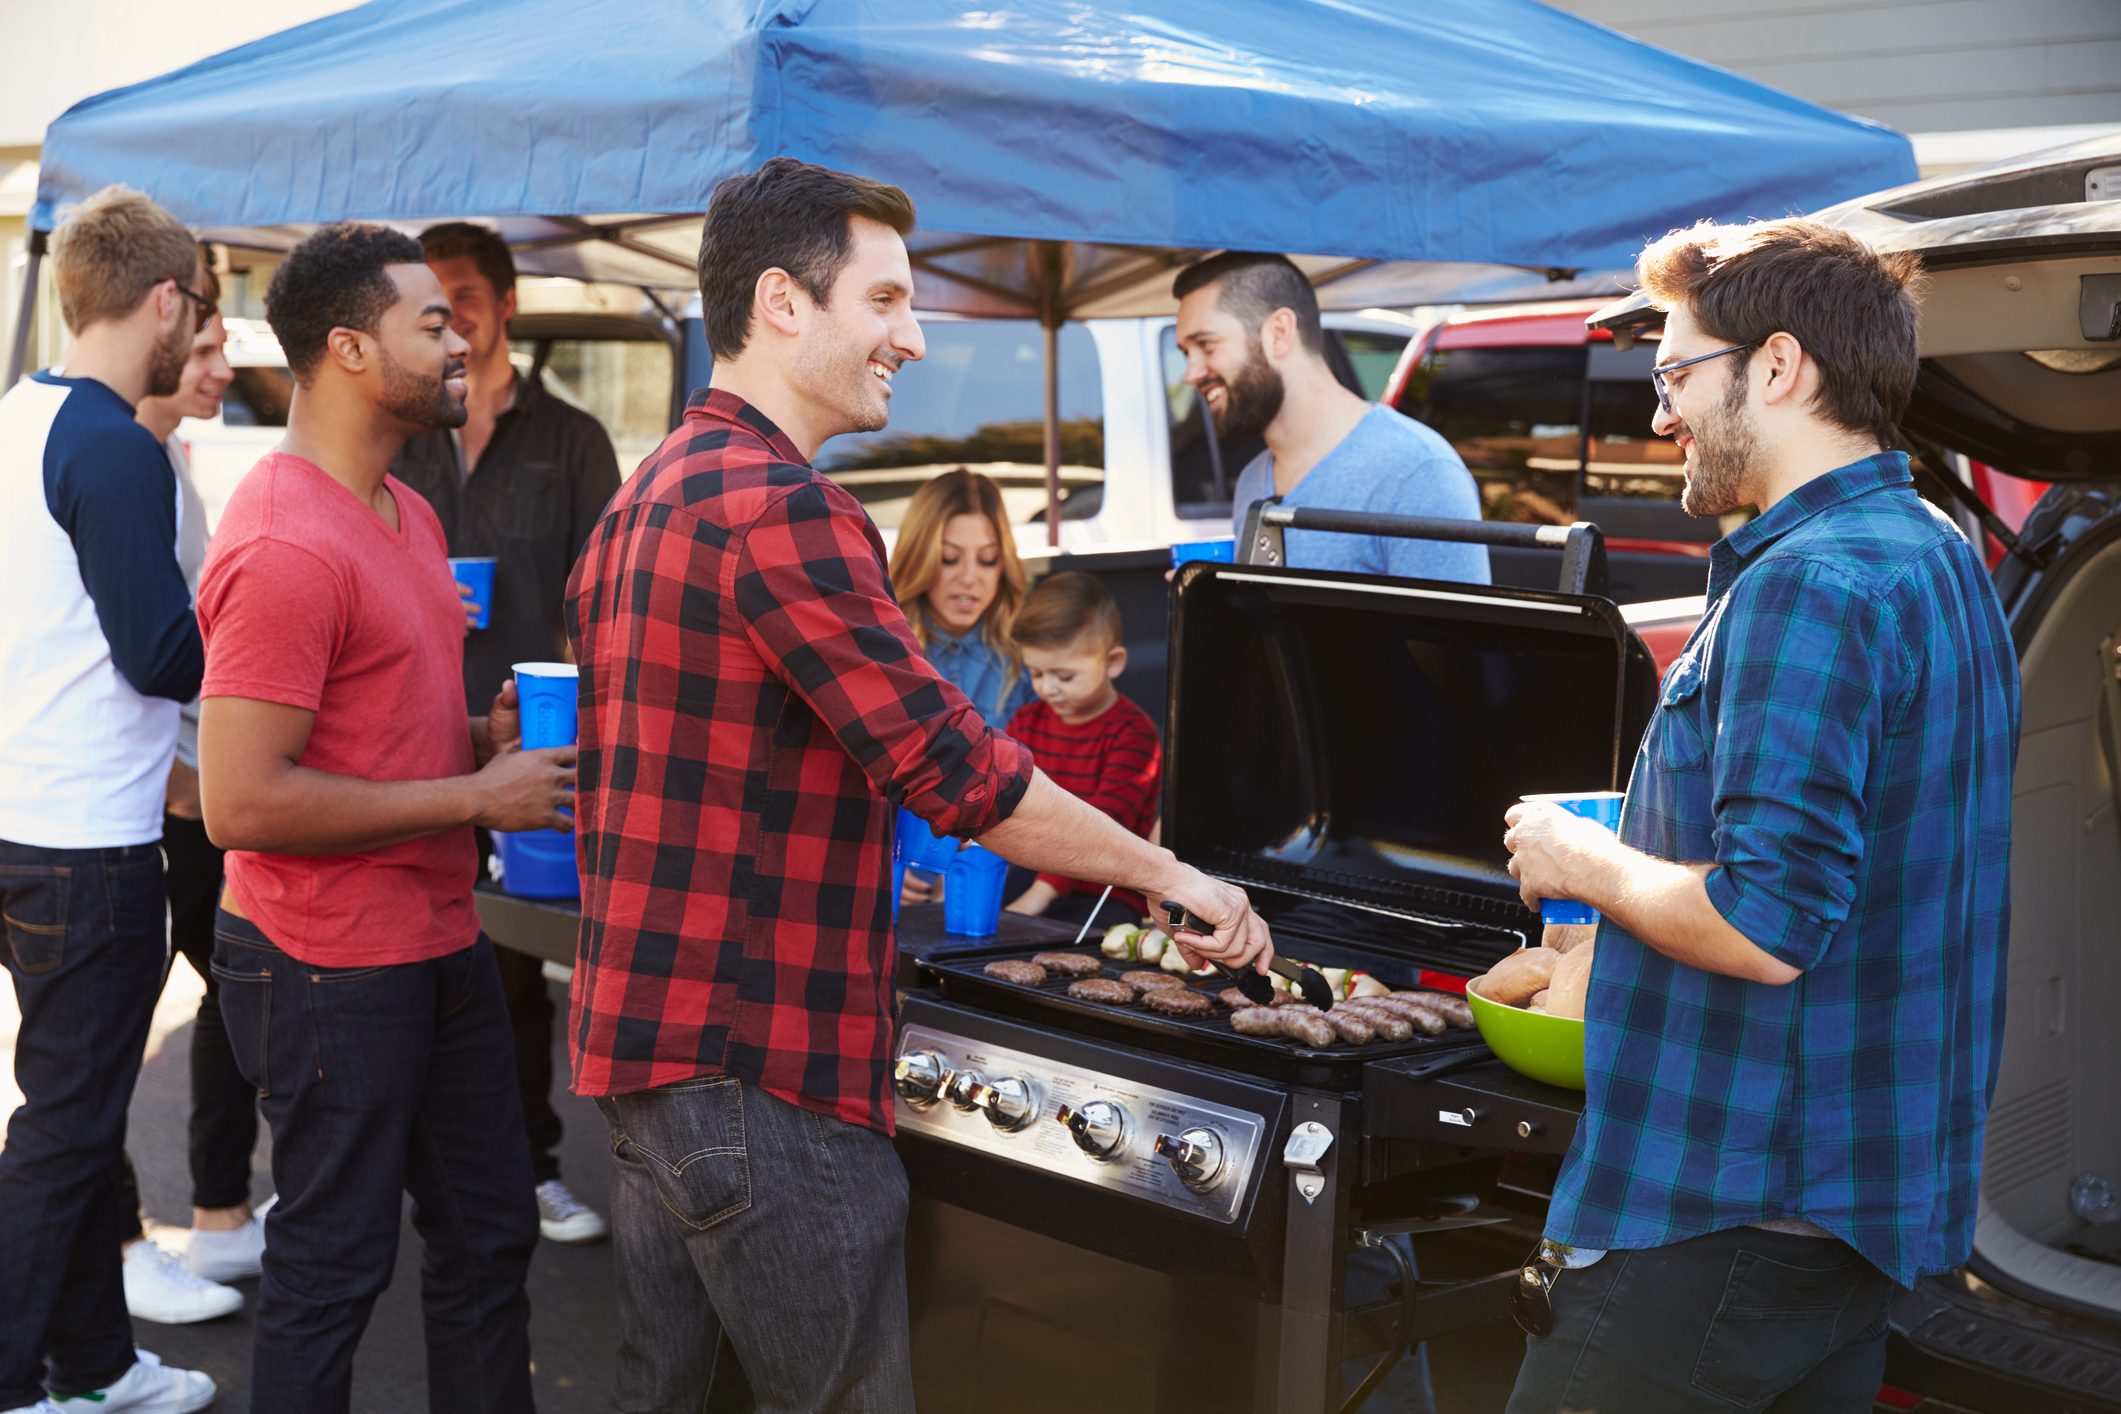
What’s more fun in the fall than to pack up the car with your tailgate setup, put on your team colors, and head to the big stadium for game day? Not much!
Nothing goes with tailgating better than grilling, so here are some ideas to up your tailgating fare using your pellet-fueled grill at home to prepare stuff for the game!
So, here’s an assumption. We know that there are some pellet-fueled portable grills out there, and good for you if that’s your setup. You can shift all of these ideas to make at the game versus make at home. But we’re assuming you have a nice big pellet-fueled grill for home and a portable gas or charcoal grill to pack for the game. Each of these recipe ideas are designed to be made at home on your Griller’s Gold Hardwood pellet-fueled grill and then reheated on your small grill at the game.
The gang at Griller’s Gold are PRO tailgaters. We’ve been going to college and NFL games for years and we have our game down. Our first rule is “No hot dogs!” Nothing wrong with a little dog, burger, or brat tailgate, but we always go for the “oh, I want what they’re making” factor when we bring our tailgate game.
Here we go…
Make a Tailgate Plan
Our tailgate crew makes a plan for each game. It lays out the main items we’re making, perhaps some special drink items, and then we fill in around the edges. We typically will have 2 or 3 appetizer items, then a big main or two. But we plan this all well in advance and make most everything at home. That way, at the game, it’s just a fast reheat on a hot portable grill and we’re eating.
For reheating all of these, it’s best to set your grill up (if you can) for indirect heating. If you are using charcoal, push the charcoal to one side to make a hot zone and a cooler zone. On a portable gas grill, if you have two burners, shut one side off. If you’re on a small charcoal grill or a single burner gas, keep the heat moderate by building a smaller fire, or turning the burner down a bit. Then make sure to keep turning/stirring the food to avoid burning it.
Appetizer/Starter Ideas
Bacon Explosion:
You want to come out of the gate strong, with something bold, tasty, and well … filled with bacon and cheese! Fortunately, there’s this amazing thing called a “Bacon Explosion!”
It goes by a few other names out there, but the gist of it is simple – it’s bacon, cheese, and if you want spice, chopped pickled jalapenos, stuffed into a log of sausage that’s rolled in a bacon lattice. For a recipe on how to construct one of these, this is a good link: http://www.bbqaddicts.com/recipes/pork/bacon-explosion/.
Our recipe diverges from theirs in that we add a generous amount of shredded cheddar and don’t put the barbecue sauce in. But, the construction techniques are solid here. To cook a bacon explosion, fire your pellet grill up (we like to use Griller’s Gold Smoke Shack Blend for this one!) to a temperature of 350F degrees. Cook it until it is 165F with a thermometer in the middle. On game day, all you’re going to do is reheat it on your grill until it’s hot all the way through. Keep it moving and turning though as you don’t want to burn off all the bacon.
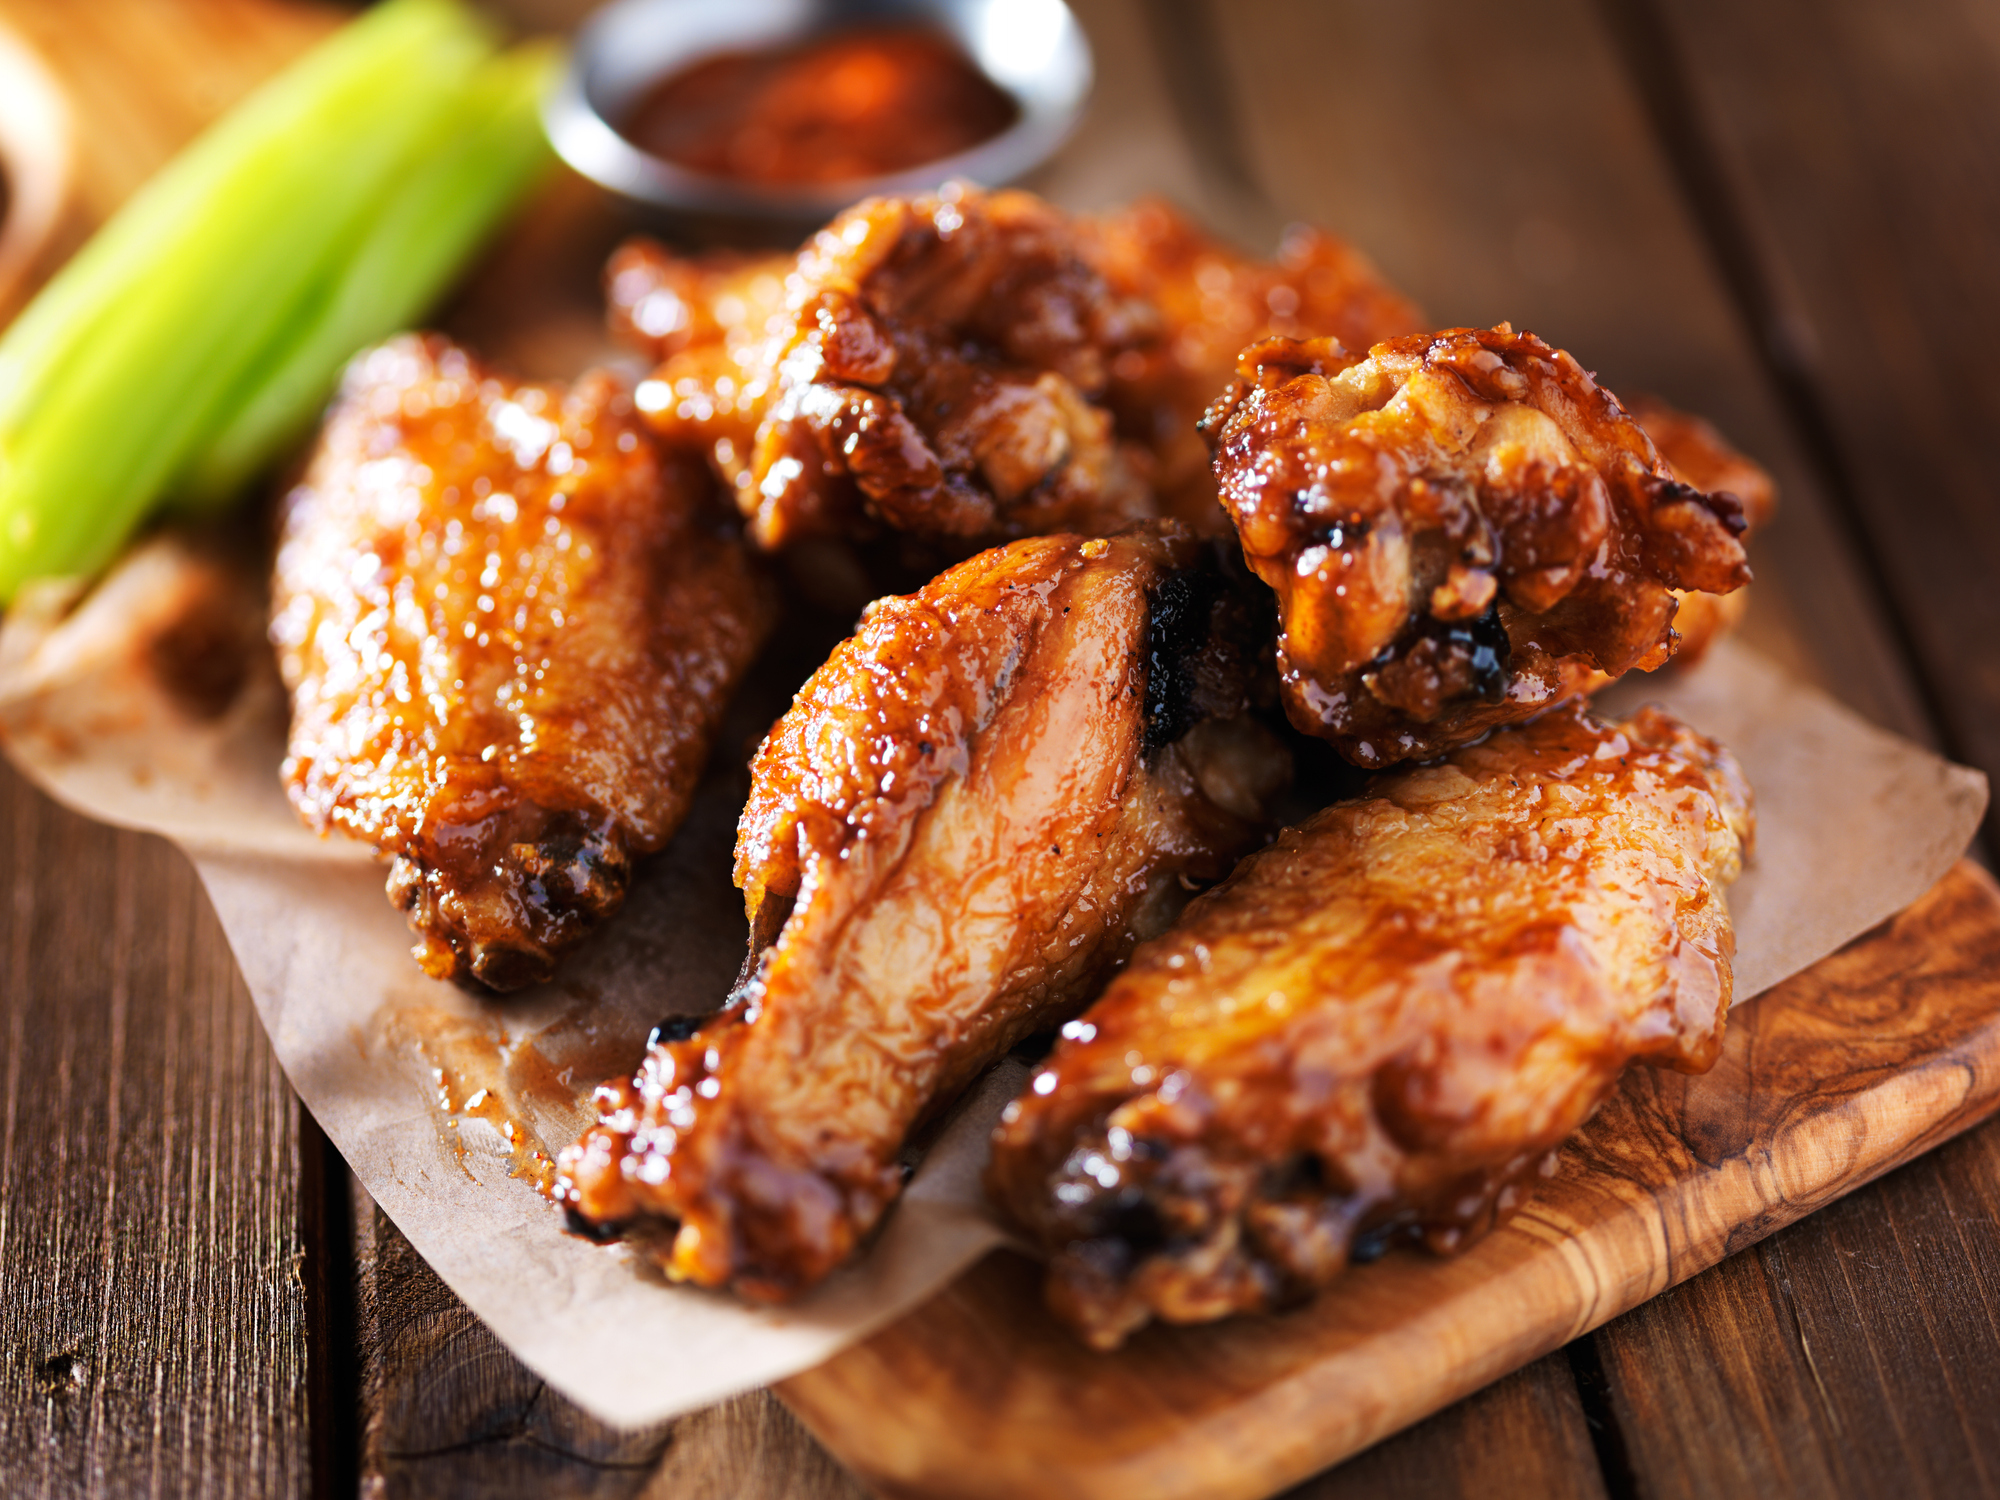
Tailgate Wings
Another great game day recipe that is easy to make ahead is good ‘ol wings. Make these ahead by seasoning them with your favorite barbecue rub, then grilling them on your pellet grill at 425F until crisp and done.
What we do for game day is hold off saucing them until we’ve reheated them on our tailgate grill, then sauce them with our favorite commercial sauces. We have great homemade sauces too, but the commercial stuff is handy for game day.
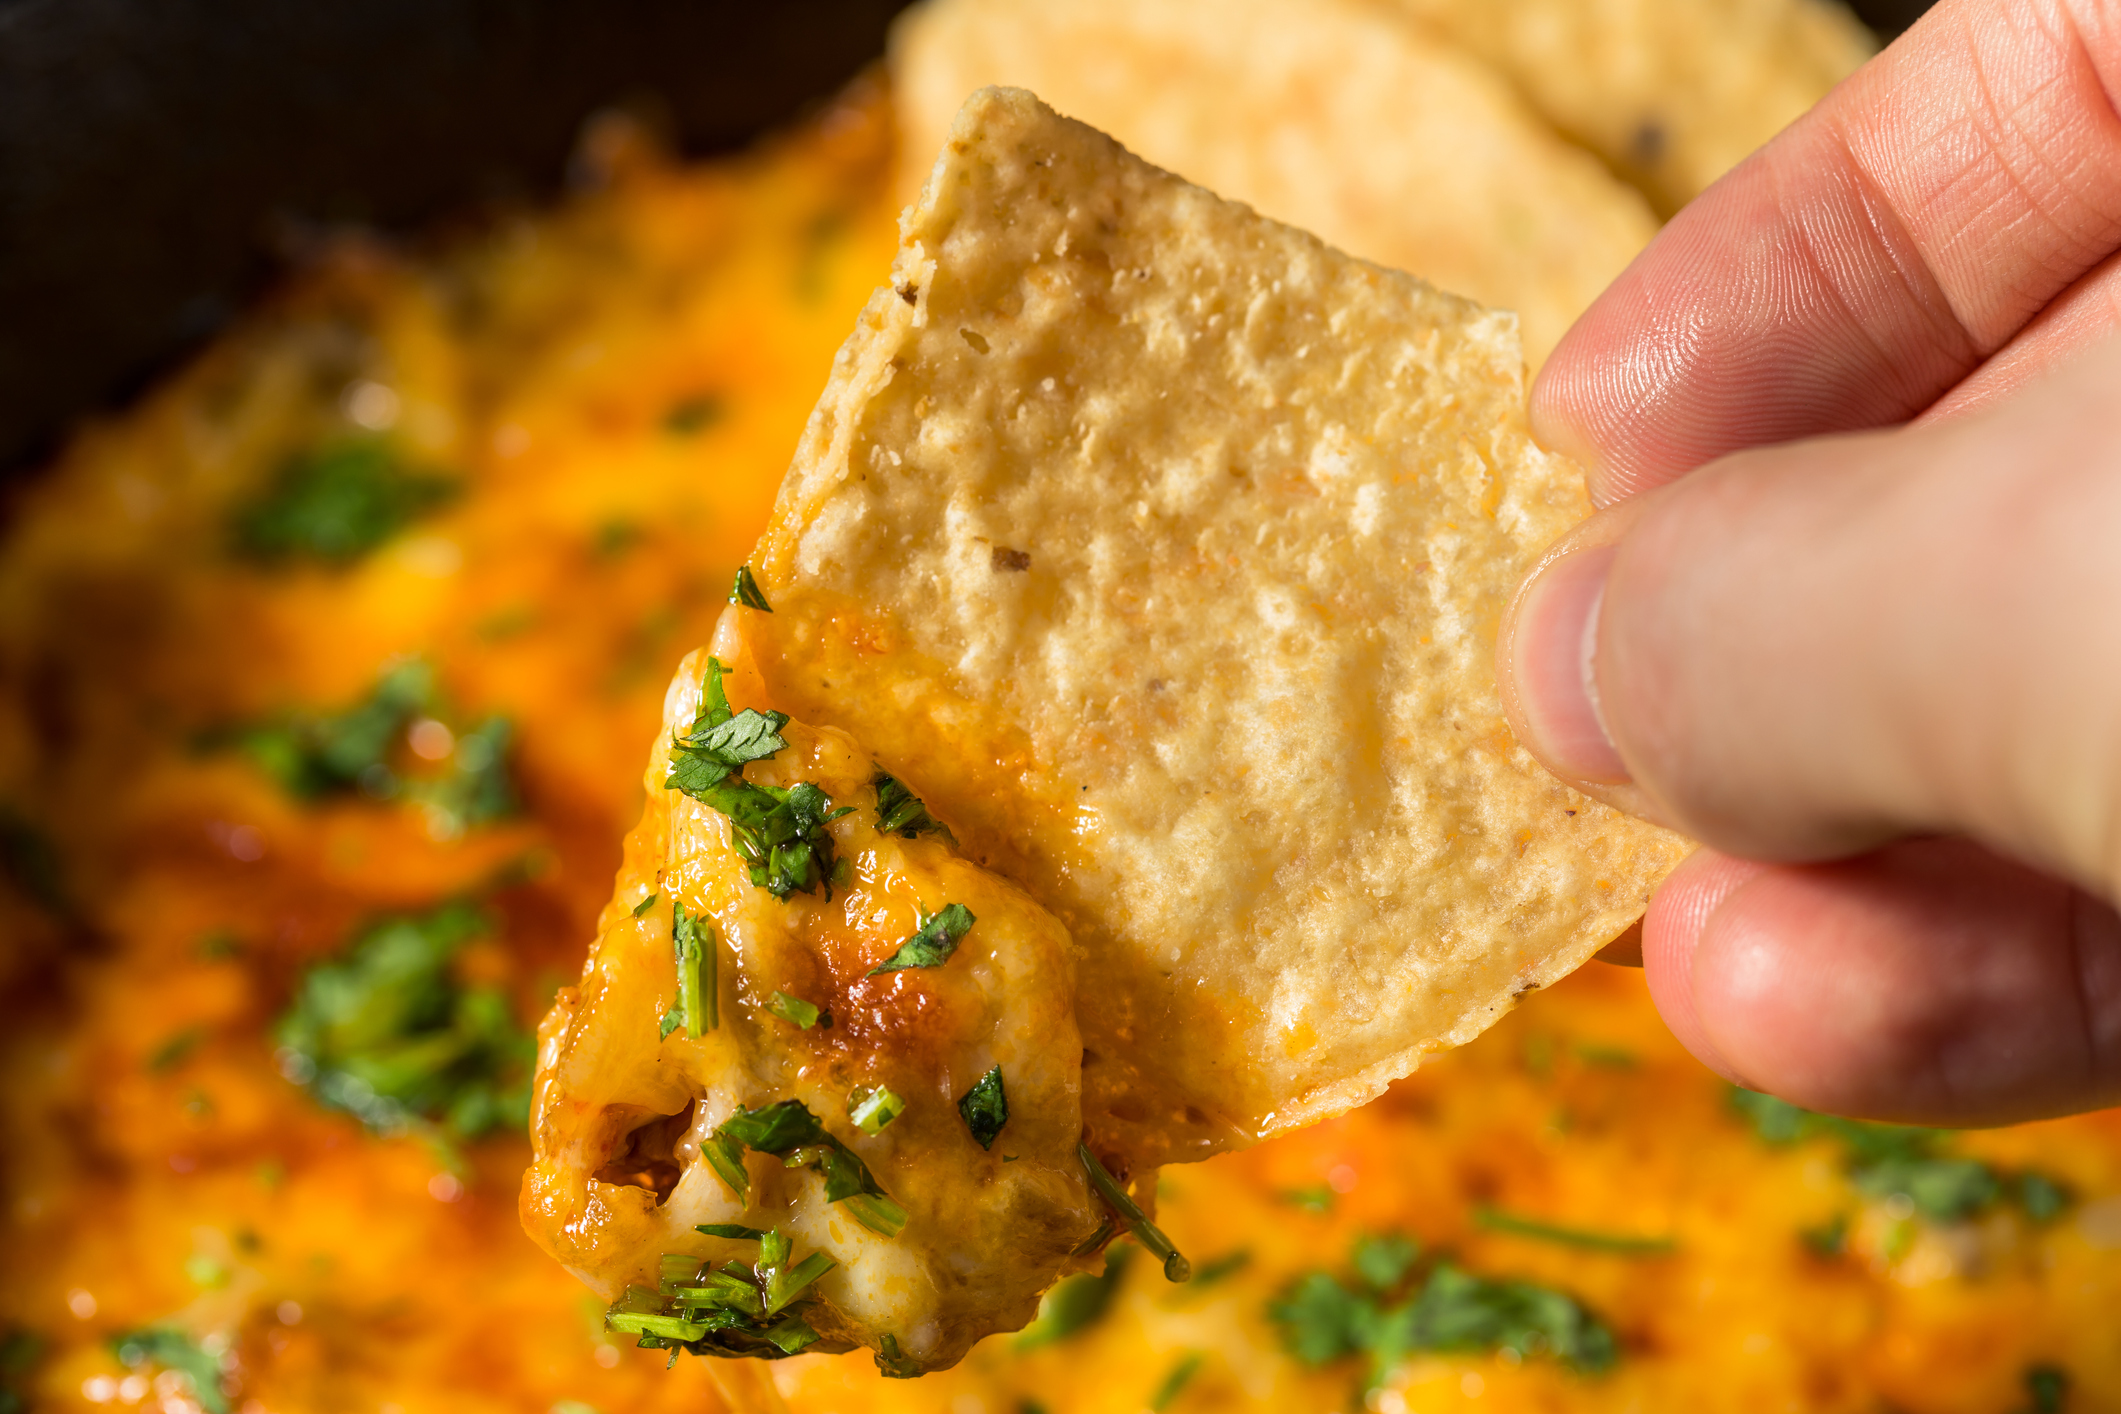
Smoked Queso
Want to raise the ‘ol “chip and dip” game? How about SMOKED QUESO? This recipe has been all the rage around the grilling and pellet grill barbecue social media forums for the last several years and for good reason – it’s amazing!
Creamy cheese base with peppers, onions, chorizo sausage, and more mixed in. So good – and way easy. Use our recipe from the Smoky Snacks blog post from a few months ago. Again, make this ahead at home and on game day, put it on the grill to reheat, stirring every couple of minutes to make sure you’re not burning it on the bottom, then serve with a generous supply of tortilla chips.
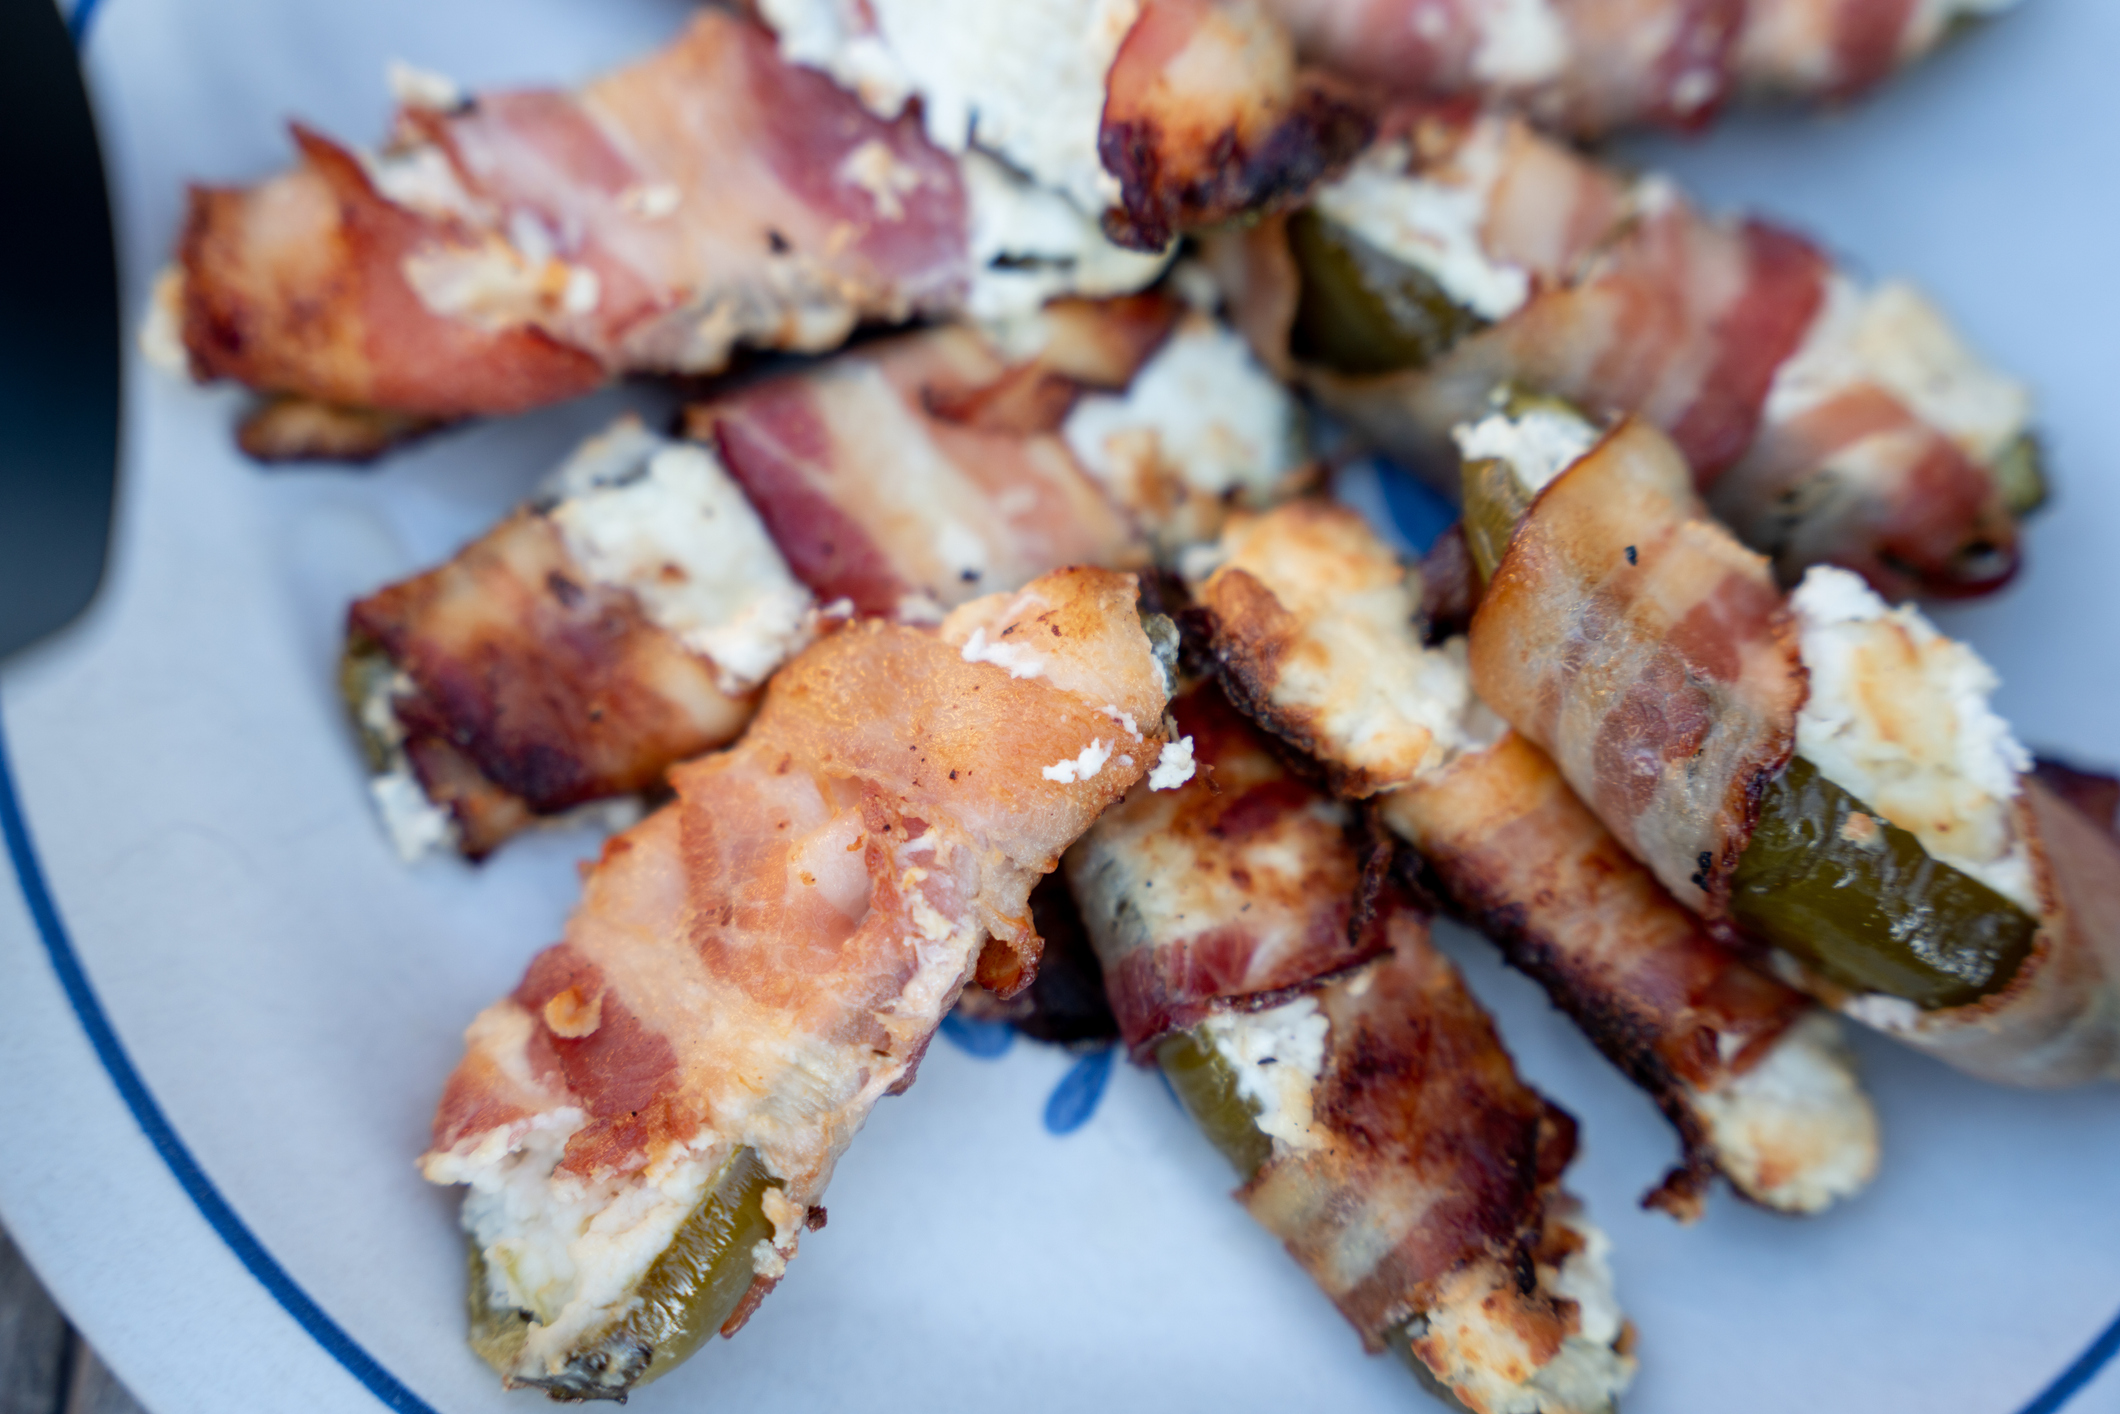
Tailgating Poppers
Finally, how about some homemade, pellet grill-smoked, bacon-wrapped Jalapeno poppers? Jalapeno, stuffed with cheese, wrapped with bacon … OMG so amazing and so easy. Just like the other apps here, make ahead on your pellet grill at home to get that wood-grilled flavor, then reheat on game day – keep them moving so you’re not burning the bacon if you don’t have an indirect heat setup.
As we said, with our tailgating crew we go for the “I want what they’re having” effect! Nothing wrong with a burger or a bratwurst at a tailgate, but … we always feel that anything worth doing is worth overdoing!
Therefore, here are three great ideas that are both “hand food” and also fantastically tasty, and deliver those all-important envious glances from nearby tailgaters. Do what we do – make a ton and share with all the tailgaters who couldn’t get outside the hot dog box.
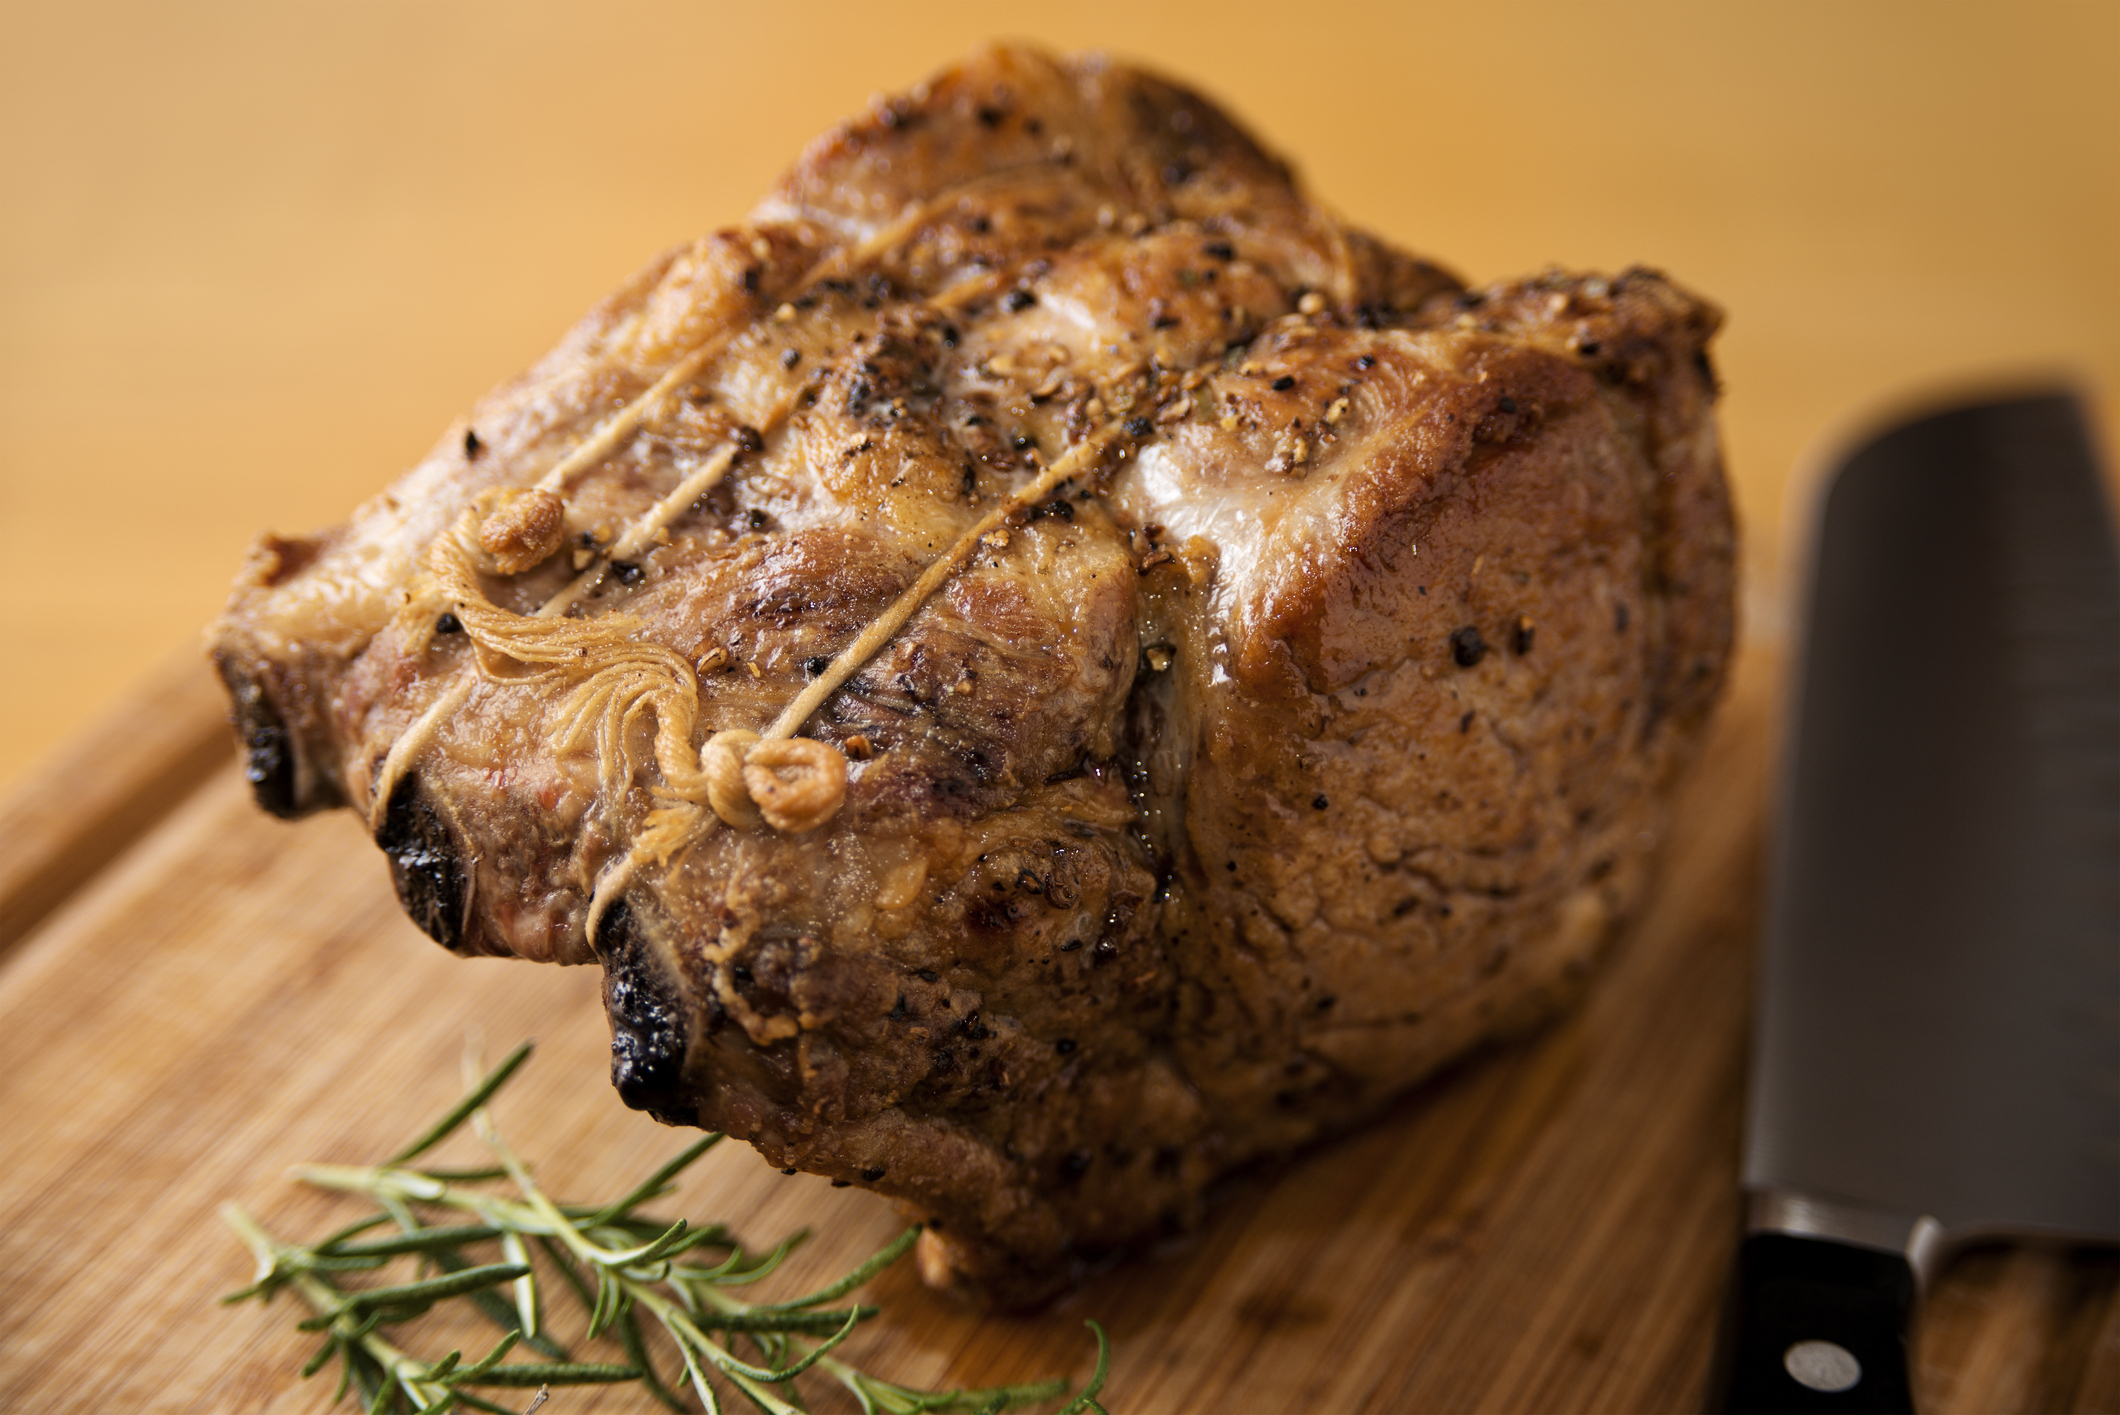
Rack of Pork
Yeah, we go there! A rack of pork is a big bone-in pork loin roast with the ribs on it. It’s used most frequently in a crown roast of pork, but we like cooking it straight (not curled up) and then slicing apart the individual rib chops so you wind up with a pork chop on a stick!
Have your butcher take the chine off it (that’s where the ribs connect to the spine), which makes a nicer presentation, and makes it easier to cut the individual chops. We like to season ours with salt, pepper, garlic powder, onion powder, and paprika, then we slow-grill it on our pellet grill (we like Griller’s Gold Fruitwood Blend, or Cherry for this recipe) at 250 degrees until 135 degrees internal. Yup, that’s a touch under done for pork, as you’ll then finish it on the grill at the game. The slow grill gives it lots of wonderful wood-grilled flavor, and if you want you can finish it with some barbecue sauce at the game. Then slice into individual chops and serve, using the bone as the stick!
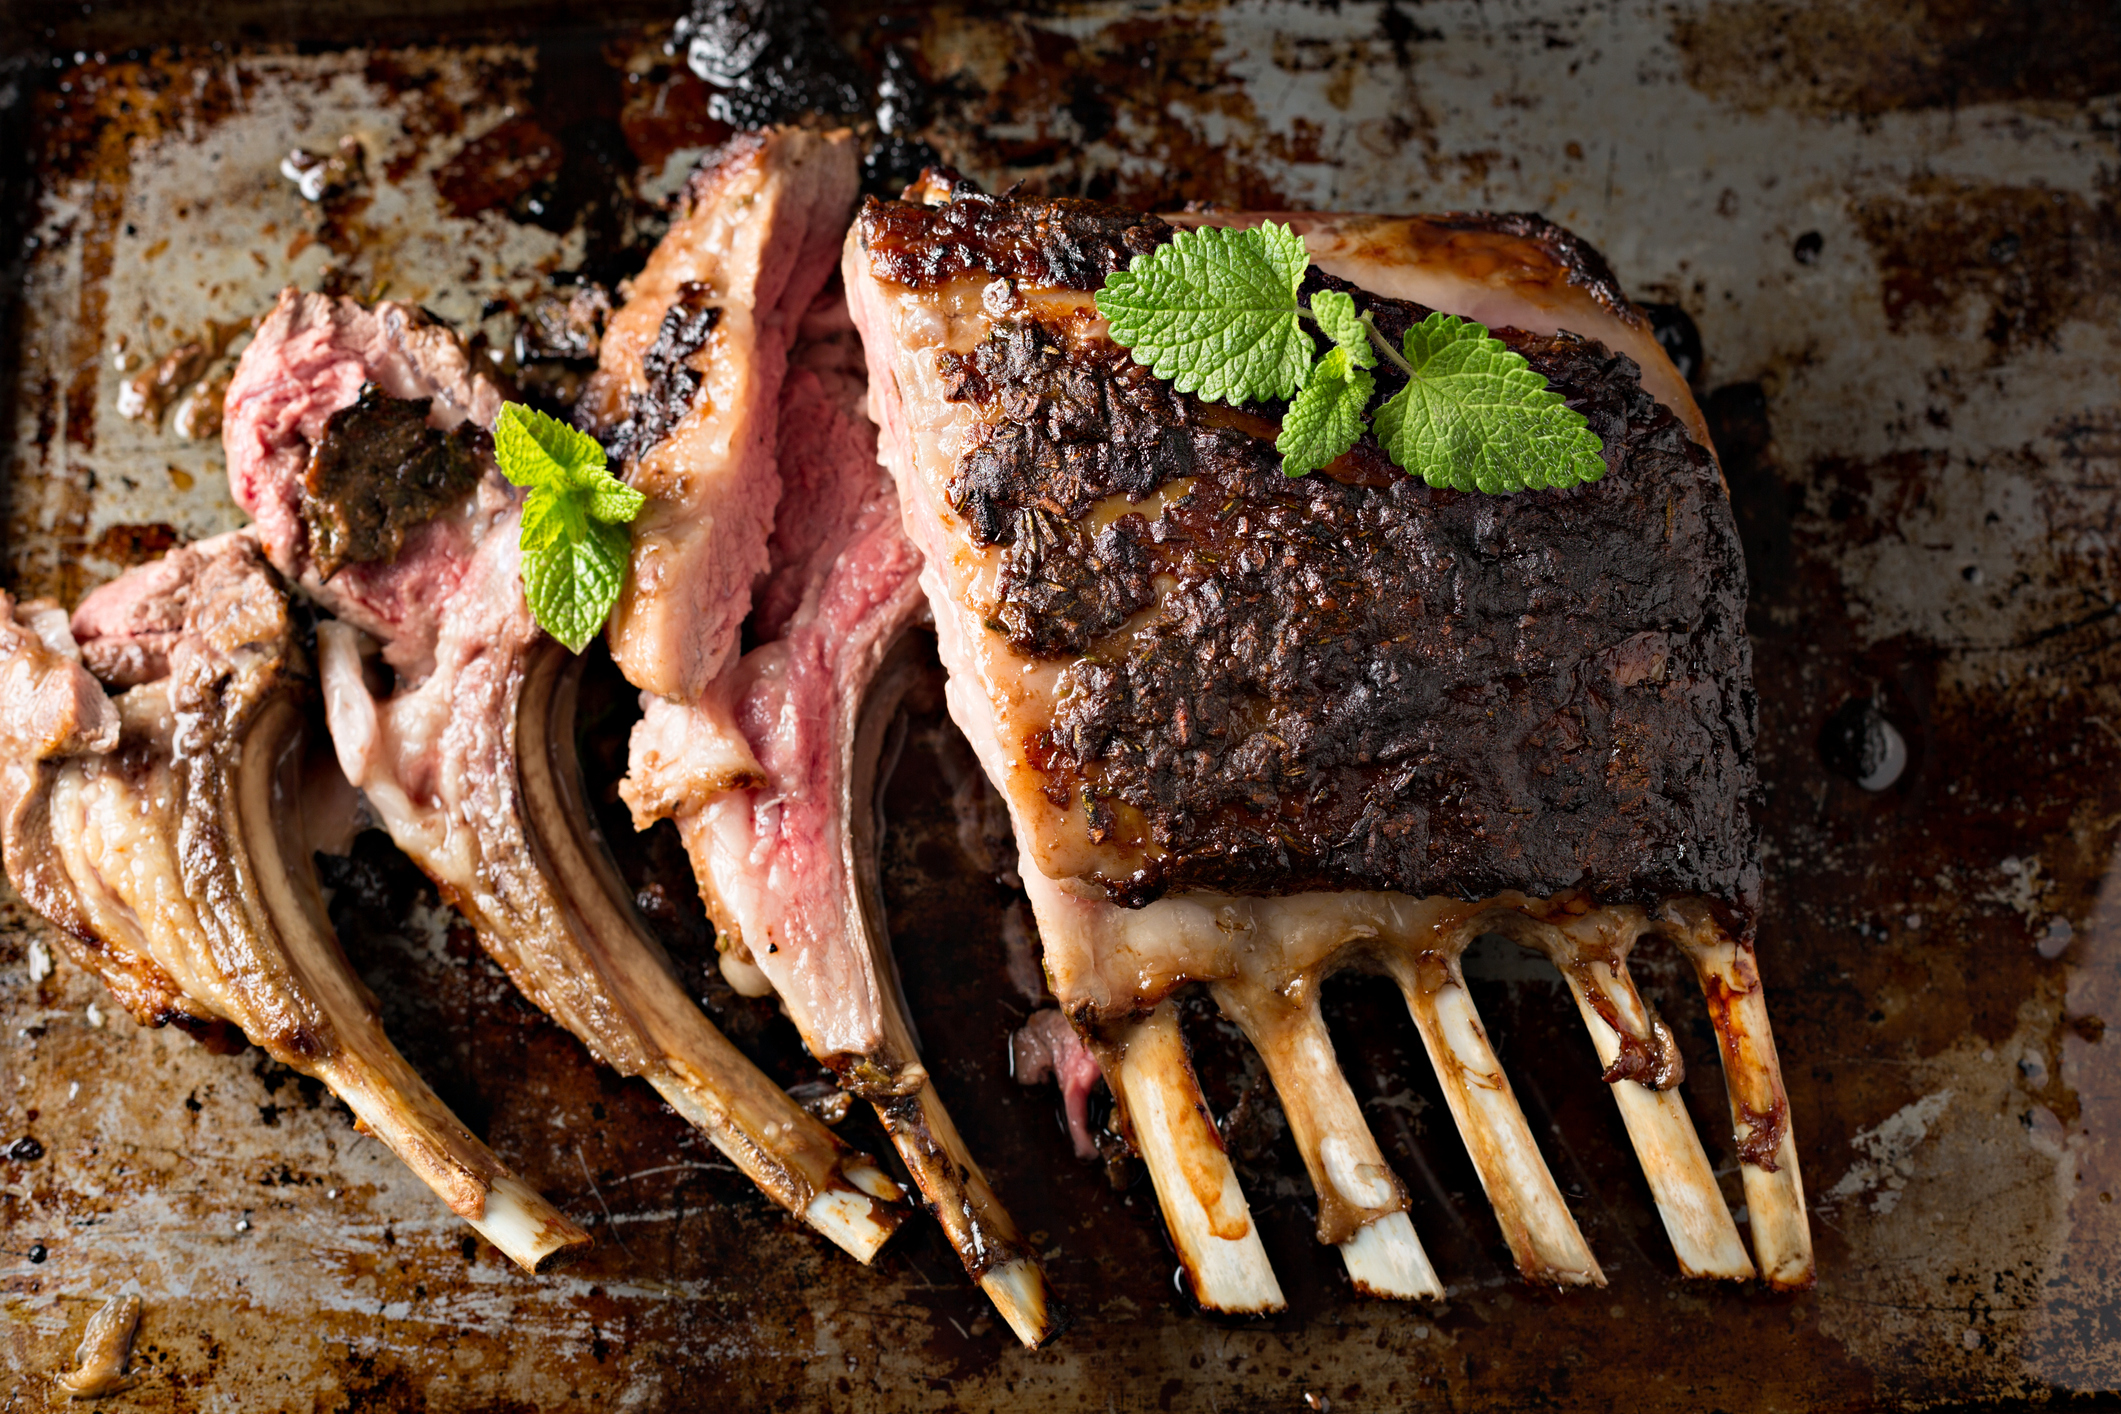
Rack of Lamb
Since we’re on the subject of meat on bones, there’s nothing better than lamb racks, cooked medium, and sliced up like little three-bite lamb lollipops!
We buy ours at Costco or Sam’s Club, and season them with salt, pepper, garlic powder, and a bit of oregano. Then we slow grill them at 250F on our pellet grill (Griller’s Gold Competition Blend is our favorite here) at home until just 125 degrees internal.
Then at the game, back on the grill, and we drizzle them with lemon juice. Keep an eye on them as lamb fat likes to ignite! Grill them until just nicely browned and about 130 degrees internal. Slice up and enjoy!
Beef Tenderloin Kebabs
Beef tenderloin, while pricy, is just so wonderful, and is easy to grill. We buy a whole beef tenderloin at either Costco or Sam’s Club.
We slice it into 1 ½” thick slices and quarter those slices to make 1-2 ounce chunks. Then thread about 3 of those on each skewer with a thick slice of sweet onion in between. Season them with just salt, pepper, and garlic powder, and slow grill them on the pellet grill (Competition Blend again here!) at 225F until just barely rare – about 115 degrees internal. That leaves room for you to then sear and heat them at the game.
At the game, these actually love a bit of direct heat to put a nice crust on them. Just be mindful that they are already nearly perfectly medium rare so you don’t want to overcook them. Nothing better than handing a hungry tailgater a stick of perfectly-cooked beef tenderloin!
The Drinks and Other Fill In items
With such great fare, you’ll want to consider having a few additional tasty items plus some great drinks. On the drinks front, obviously, consider what your audience likes, but we like to do a theme drink, such as a bourbon old fashioned, or martinis that fit the occasion, as well as having good craft beers and of course lots of water and soft drinks available.
For additional fill-in food, consider some salads like a good cole slaw, a tasty potato salad, or even a green salad. We also like to have lots of small crunchy snacks like the ones featured in the Smokey Snacks blog post from a few months back!
Let’s face it – things are expensive right now. Everything from the cost of toothpaste to gas has gone up. Unfortunately, groceries and especially less-sold grocery items like the BBQ meat cuts we know and love, have gone right up with them.
If tight budgets have you down, then you’re in the right place! We’re going to show you some simple ideas to make amazing grilled treats on a budget. All fueled of course, by Griller’s Gold Premium Hardwood BBQ pellets!
Enjoying the grill on a budget just involves making the same things you love with some twists. In this edition, we’ll do three things that “mimic” three faves, only on a budget.
We are replacing a big thick Ribeye, Wings, and Baby Back Ribs with substitutes that are just as tasty and more importantly, much less expensive than the originals.
Let’s hit it!
Ribeye on a Budget: Reverse-Seared Chuck Roast
Of all the foods to have gone sky-high, beef is probably the worst one. It’s a combo of poor demand during the pandemic that caused producers to scale back operations and then when demand returned, not being able to scale back up fast enough. Fortunately, there are signs that this is improving, but beef prices are still at a record high.
So, you’ve got a hankering for a big thick ribeye, but that cost is a way off? For about 40% of the price of a bone-in rib roast, you can get … a chuck roast! The ribeye’s tastier cousin.
I know, you’re saying “hey wait a minute … chucks can be tough as nails, they are for braising not grilling.” But we say “nay nay! Don’t knock it until you try it.” The trick to tenderness comes in three ways:
Salt – we use the “dry brine” technique to get some deeper salt penetration and deliver tenderness
Gentle cooking – we use the tried and true fave method of “reverse searing”
Careful carving – We will carefully slice and carve the meat for the optimum tenderness
Now, this all said, a chuck’s “chew” will be more like a New York strip than a filet, so just be ready for that.
Buy and Trim on a budget:
Buy the thickest chuck roast you can find – ideal thickness is 1 ½” to more than 2” thick. Look for chucks that have even marbling and ideally a minimum of hard ridges of gristle. When you get it home, trim off any hard exterior gristle lines, any silverskin, and hard bits of fat on the outside. Leave what is between the muscle sections alone until after cooking.
Dry Brining:
As you’ve probably learned, great juiciness and tenderness can come from brining. (This is typically done to turkeys and chickens.) As the salt is absorbed into the meat, it “denatures” or untangles the tangled-up protein strands in the meat.
The dry brine technique is simple.
Take the meat out of the package, put it on a plate or a pan, ideally with a rack under the meat to give it some air space, and sprinkle it generously with kosher salt. Then you leave it unwrapped in the fridge overnight. That’s it.
You’ll find that about an hour after the salt goes on, it will have all dissolved. As you check on it, you’ll see that some moisture has come to the surface of the meat, then disappears again. That’s the brining process at work.
So the day before cooking, get the salt on it and put it in the fridge. About 2 hours before cooking, take it out, give a rinse in the sink to wash off any residual brine and you’re ready for the next step!
Now, what if you didn’t plan ahead? No worries – even a 4-hour dry brine at room temp has a good effect.
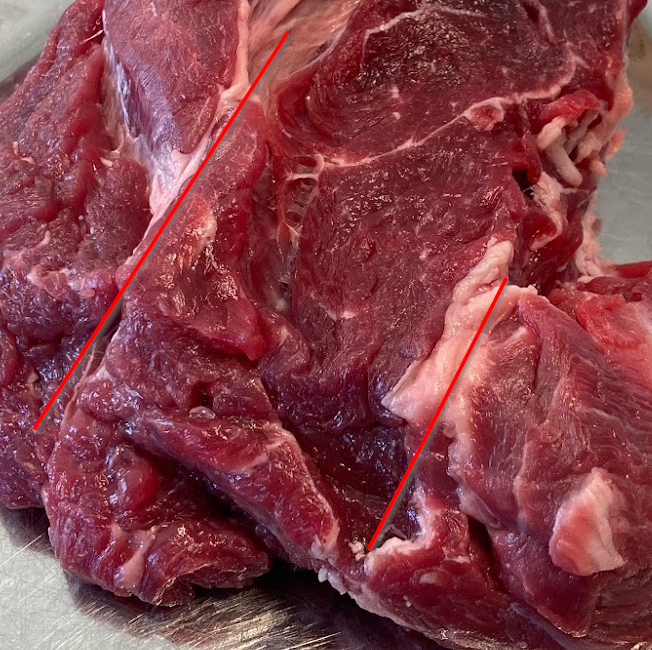
Key thing at this step – examine the meat and get to know where the muscle divisions are before you cook it. This will help you with the carving later. In this photo, you can see natural divisions between muscles marked with red lines. We’ll split it along those lines after cooking and then slice off any gristle or sinew, leaving just delicious tender meat.
Reverse Searing:
For the cooking technique, we’re going to use reverse searing. That’s the technique where you cook low and slow until just before your meat is the desired doneness, then, you rest it, and then sear it just before serving.
Here’s the steps:
(PSST…if you want a more detailed description of the Reverse Searing process then check out our other blog: Expert Technique – Reverse Searing)
Fire Up: Fire up your pellet grill to 225 degrees. If you like it extra smokey, start at 180F or use the “Smoke” or “Super Smoke” settings, depending on how your grill is equipped. For beef, we like Griller’s Gold Competition Blend or Smokeshack Blend the best. If using a charcoal or gas grill, you want low heat – make a small fire and put it to the side, or only light off one burner on your gas grill. Get it preheated well – at least 15 minutes at grilling temp.
Season, Meat on and Turning: Seasoning: We like to add just a touch more surface salt at this point, plus garlic powder and fresh ground pepper. But you do you on that one. Just remember that the meat already has a salty thing going. Thermometer: if you have a probe thermometer or other style of “insert and leave it” meat thermometer, this is a good time to use it. Depending on the thickness of your chuck, it can take anywhere from 30 minutes to 90 minutes to reach your doneness temp. We like to turn the meat every 20 minutes or so just to evenly cook it.
Targeted Doneness: While we like our meat on the rare side of medium-rare, because Chuck isn’t inherently tender like a filet or ribeye, you’ll want to go a bit more done. We like to do the reverse sear to about 130 degrees (this is where we set our probe thermo’s alarm) which is on the low side of Medium Rare (135) but the meat will carryover a bit.
Rest: When the meat hits the target temp, take it off to a platter, cover it with foil (1 layer of heavy duty, 2 layers of regular), then cover that platter with a couple of folded bath towels (we keep several old clean towels for this purpose). This creates a little rest nest for the meat. Rest at least 30 minutes, ideally an hour. This rest helps even out the heat in the meat and helps tenderize it.
Sear: 20 minutes before serving time, fire the grill back up to at least 450, or, one of our favorite methods, heat a heavy skillet, ideally cast iron over medium-high heat on the stove. Sear the meat to a beautiful brown crust – we like to turn it every 2 minutes until each side has had two “rides” on the heat. Time to carve!
Carving: So you’ve already rested the meat before, so you can carve it right when it comes off. First divide the meat along the muscle lines that you so carefully noted when you were dry brining it, then trim off any hard gristle lines or undesired fat. Each piece will likely have a gristle line along the side that connected it to the other piece. Note the red lines in the picture below, those are the gristle areas that you need to trim off. Then just carve those pieces in relatively thin slices, stacking them on a serving platter. Pour any accumulated juice over it, and if you want a “rock star” touch – melt a couple of tablespoons of salted butter and pour over the meat. Bonus points if it’s a compound butter!
This “budget” style of steak will be so good it will make you think you’re royalty! Hint: Don’t share your secret with your guests!
Chicken Thigh “Wings”
Due to the popularity of chicken wings in restaurants, and the labor-intensive process to cut them, wings are inherently much more expensive than good ‘ol chicken thighs.
Chicken thighs are thicker, meatier, and well, most would say, even tastier than the ‘ol chicken wing. Here’s a quick and easy technique to make tasty, crisp-skinned chicken thighs ready to toss with your favorite wing sauce:
Buy budget Friendly:
Simple: bone-in, skin-on chicken thighs. Ideally don’t get the ones with the back bone and meat attached (and if you do, look up on YouTube on how to remove that, then save them to make chicken soup).
Prep:
We like to rinse off the chicken after it’s out of the package then spread it on a baking rack to air dry a bit. This next step will be the kicker step: take all the thighs and dump them into a big mixing bowl, add a couple of tablespoons of baking powder (yes we said that!) sprinkled evenly over them.
Season them generously with salt and pepper, or if you like, a barbecue rub. Then toss them to distribute the baking powder and seasonings. The baking powder aids in crisping up the skin.
Fire Up:
No low and slow here, friends, heat is what you want. We like to preheat to 425 degrees for at least 20 minutes, ideally 30 minutes. For Griller’s Gold BBQ pellets, really anything works great for this – we like either Charcoal Blend or Competition Blend for chicken parts on the grill. If you’re grilling over charcoal or gas, well, get the grill good and hot, but ready to cook indirect, which means charcoal on one side, and for gas, one burner shut down.
Cook:
Put the thighs on the grill, skin side up to start, then turn them every 10 minutes until done – which should take about 30-40 minutes at 425.
Done is 185F with an instant-read thermometer pushed down to the bone in the center of the thickest piece you have on the grill.
Sauce:
We love to sauce them three different ways:
Barbecue: For this, you’ll be brushing them with sauce on the grill. When the chicken is done, brush them with your favorite BBQ sauce, flip sauce side down and brush again. Close up the grill for 2 mins, then repeat. Remove and serve.
Buffalo: For medium-hot buffalo sauce, melt ¼ cup butter then add ¼ cup Frank’s Red Hot sauce, 1 tsp brown sugar, and 1 tsp fresh minced garlic. Whisking well. Simmer for 2-3 minutes to blend flavors, whisk up well again and toss with your thighs.
Spicy/Sticky Asian: We love this one! Whisk together ⅓ cup soy sauce, ¼ cup honey, 2T canola or other vegetable oil, 1 tsp garlic powder, ½ tsp ground ginger, ½ tsp dry mustard and 1 tablespoon either Sriracha sauce or Thai Red Curry paste. Can reduce the hot stuff if desired. Toss with the thighs.
Pork Shoulder “Boneless Ribs”
Pork Shoulders and cuts like Pork Shoulder Steaks are a great way to have that satisfying pork rib flavor on a budget. “Boston Butt” roasts or Pork Shoulders (they are the same … yeah don’t ask why a shoulder is also a “butt”) come from the shoulder of the pig and because they are a worked muscle they are super flavorful. Treat them like you’re cooking ribs and you may never go back to baby backs!
budget Buy:
We like to buy whole pork shoulder roasts, either bone-in or boneless for this. If you buy bone-in, remove the bone which is a blade-like thing that is usually exposed on one edge.
Just follow it down with a boning knife to cut it free. You can also buy pork shoulder steaks which are steaks crosscut from the shoulder cut. The problem is they are usually cut too thinly. If you’re working with a butcher or have a good grocery store meat counter they can cut them for you. The ideal thickness is at least 1” thick.
Cut and Trim:
Your goal is strips of meat, not unlike “chicken fingers”. They should be about 1” thick and 2” wide and as long as you can cut them from the roast. We like to cut 1” thick slabs and then cut those into 2” wide strips. Cut off any surface fat on any of them.
Season:
A good “rib rub” is what you want here – use your favorite!
For extra flavor and moisture, first toss the “ribs” with about ½ cup of yellow prepared mustard until evenly coated. Then throw on a generous amount of rub and toss to coat evenly.
Fire Up!
Preheat your pellet grill with Griller’s Gold BBQ pellets to 250 degrees for at least 20 minutes. For this recipe, we prefer Griller’s Gold Hickory, Applewood, or Competition Blend pellets.
Cook:
Lay the strips crosswise across the grill grate. Turn them every 30 minutes. They are done when they are cooked through and very tender. The internal temp should be about 185F degrees or more – up to 205F. Cooking can take up to 3 hours.
Sauce and Sear:
Remove the “ribs” from the grill then fire the grill up to 400F. Lay the “ribs” back across the grill grate and sauce them on one side, then turn and sauce again. Let run 2 minutes, then turn and sauce again, 2 more minutes, turn and sauce again. Remove and serve!
So … they aren’t the satisfying “meat on a bone” like baby backs. But gotta say these are super tasty and if you have anyone in your family who is “bone squeamish”. This is also an excellent way to get the great taste of ribs without bones. They are also great party “finger food” as well, with no bone mess to deal with.