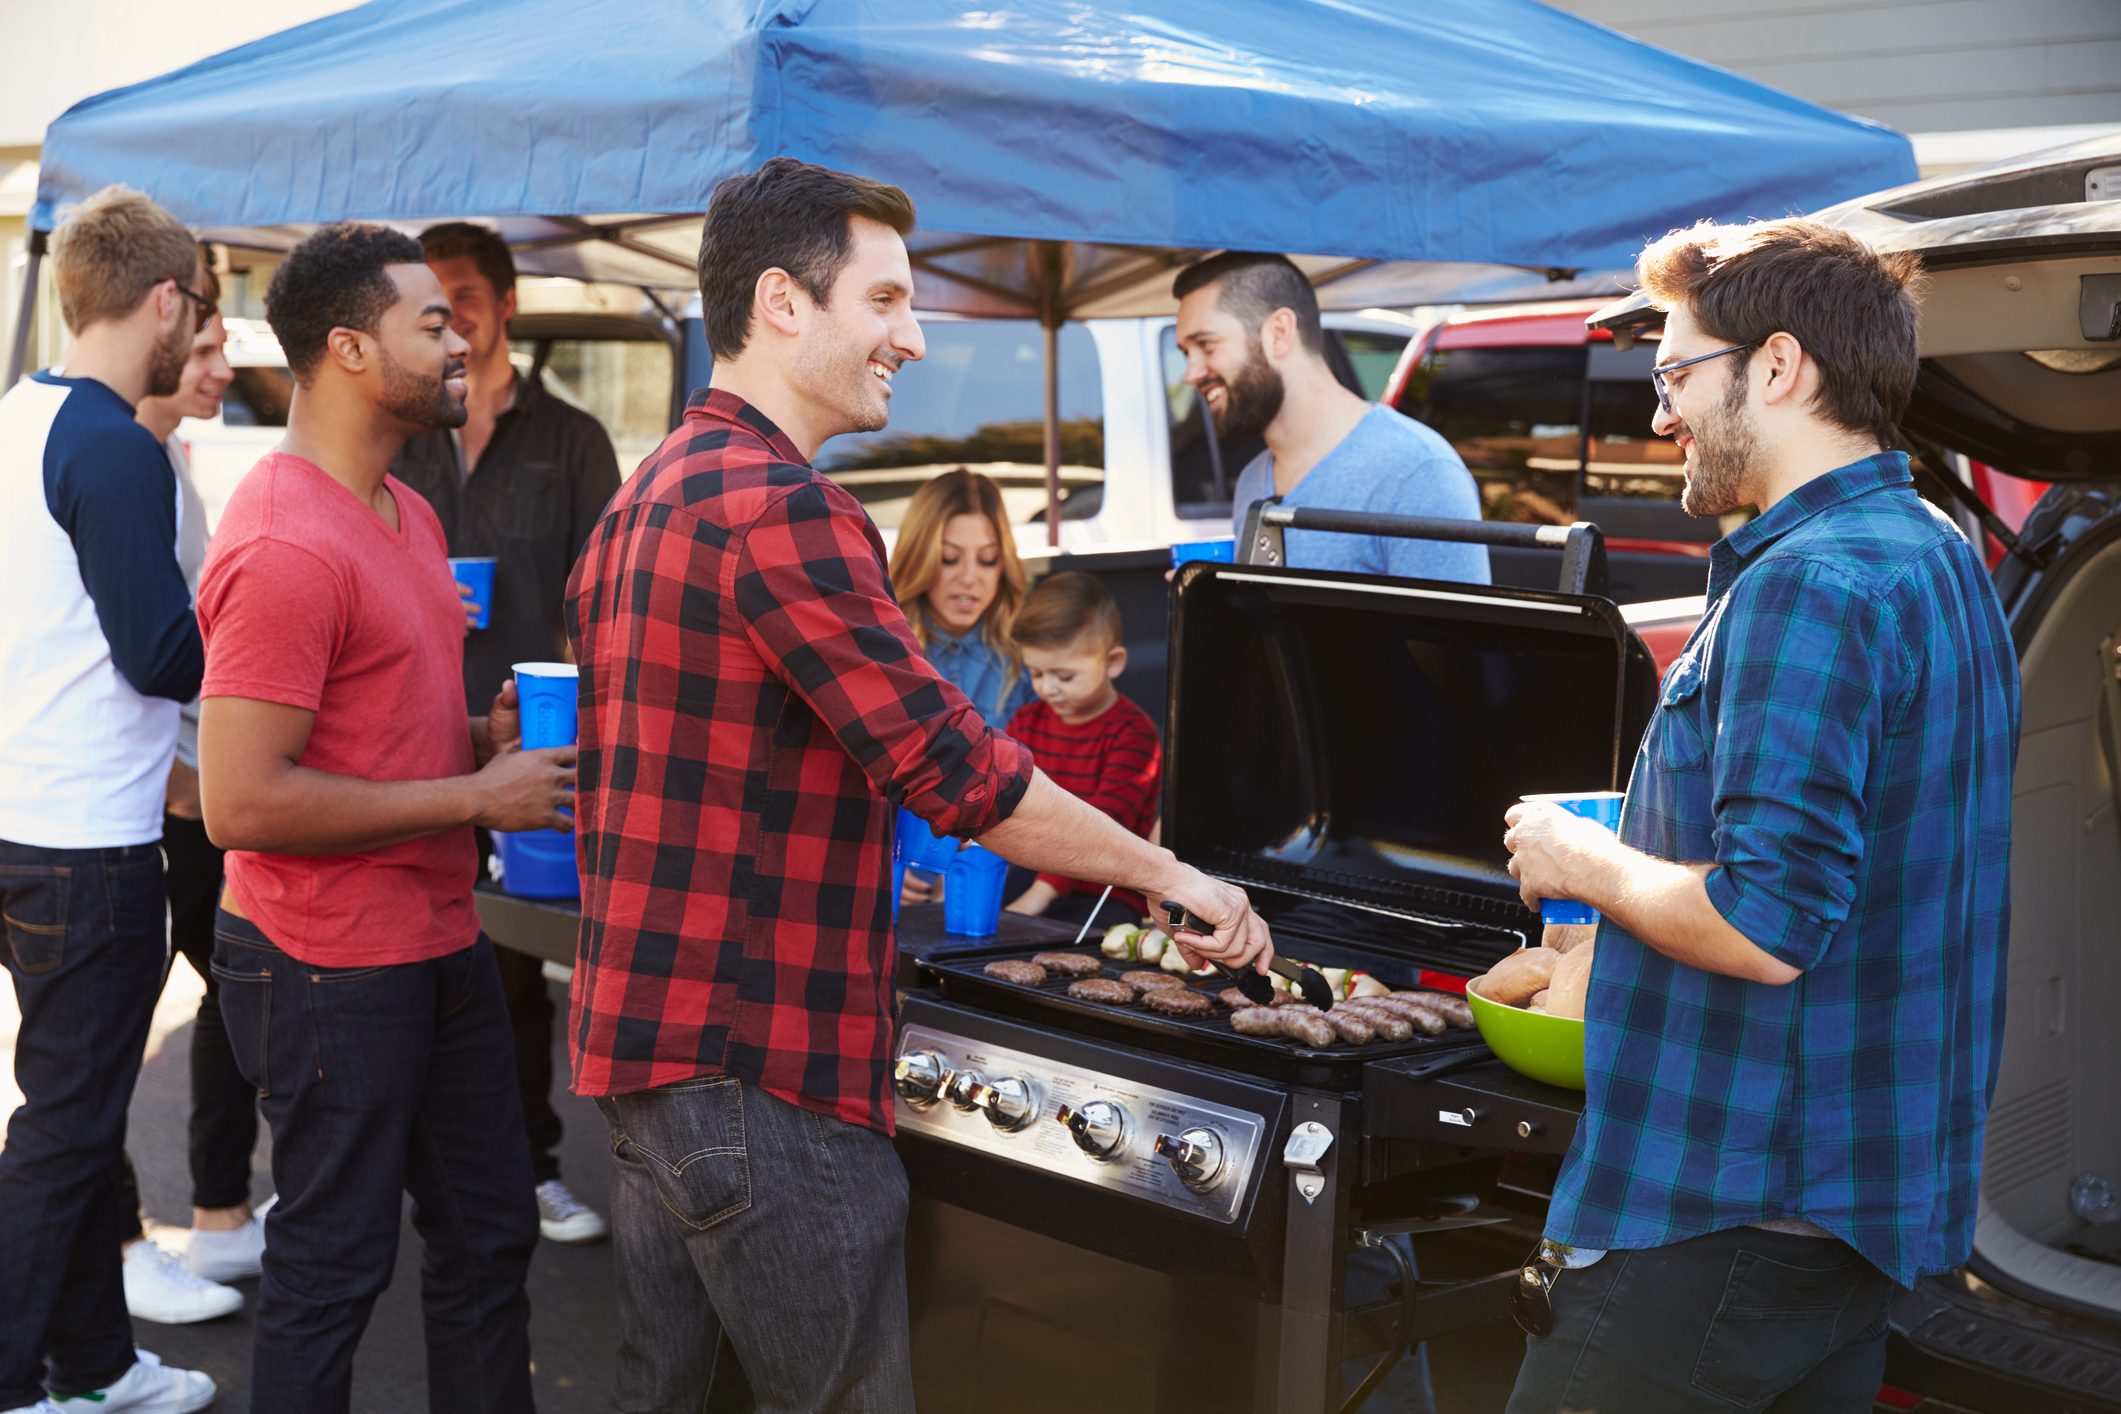
What’s more fun in the fall than to pack up the car with your tailgate setup, put on your team colors, and head to the big stadium for game day? Not much!
Nothing goes with tailgating better than grilling, so here are some ideas to up your tailgating fare using your pellet-fueled grill at home to prepare stuff for the game!
So, here’s an assumption. We know that there are some pellet-fueled portable grills out there, and good for you if that’s your setup. You can shift all of these ideas to make at the game versus make at home. But we’re assuming you have a nice big pellet-fueled grill for home and a portable gas or charcoal grill to pack for the game. Each of these recipe ideas are designed to be made at home on your Griller’s Gold Hardwood pellet-fueled grill and then reheated on your small grill at the game.
The gang at Griller’s Gold are PRO tailgaters. We’ve been going to college and NFL games for years and we have our game down. Our first rule is “No hot dogs!” Nothing wrong with a little dog, burger, or brat tailgate, but we always go for the “oh, I want what they’re making” factor when we bring our tailgate game.
Here we go…
Make a Tailgate Plan
Our tailgate crew makes a plan for each game. It lays out the main items we’re making, perhaps some special drink items, and then we fill in around the edges. We typically will have 2 or 3 appetizer items, then a big main or two. But we plan this all well in advance and make most everything at home. That way, at the game, it’s just a fast reheat on a hot portable grill and we’re eating.
For reheating all of these, it’s best to set your grill up (if you can) for indirect heating. If you are using charcoal, push the charcoal to one side to make a hot zone and a cooler zone. On a portable gas grill, if you have two burners, shut one side off. If you’re on a small charcoal grill or a single burner gas, keep the heat moderate by building a smaller fire, or turning the burner down a bit. Then make sure to keep turning/stirring the food to avoid burning it.
Appetizer/Starter Ideas
Bacon Explosion:
You want to come out of the gate strong, with something bold, tasty, and well … filled with bacon and cheese! Fortunately, there’s this amazing thing called a “Bacon Explosion!”
It goes by a few other names out there, but the gist of it is simple – it’s bacon, cheese, and if you want spice, chopped pickled jalapenos, stuffed into a log of sausage that’s rolled in a bacon lattice. For a recipe on how to construct one of these, this is a good link: http://www.bbqaddicts.com/recipes/pork/bacon-explosion/.
Our recipe diverges from theirs in that we add a generous amount of shredded cheddar and don’t put the barbecue sauce in. But, the construction techniques are solid here. To cook a bacon explosion, fire your pellet grill up (we like to use Griller’s Gold Smoke Shack Blend for this one!) to a temperature of 350F degrees. Cook it until it is 165F with a thermometer in the middle. On game day, all you’re going to do is reheat it on your grill until it’s hot all the way through. Keep it moving and turning though as you don’t want to burn off all the bacon.
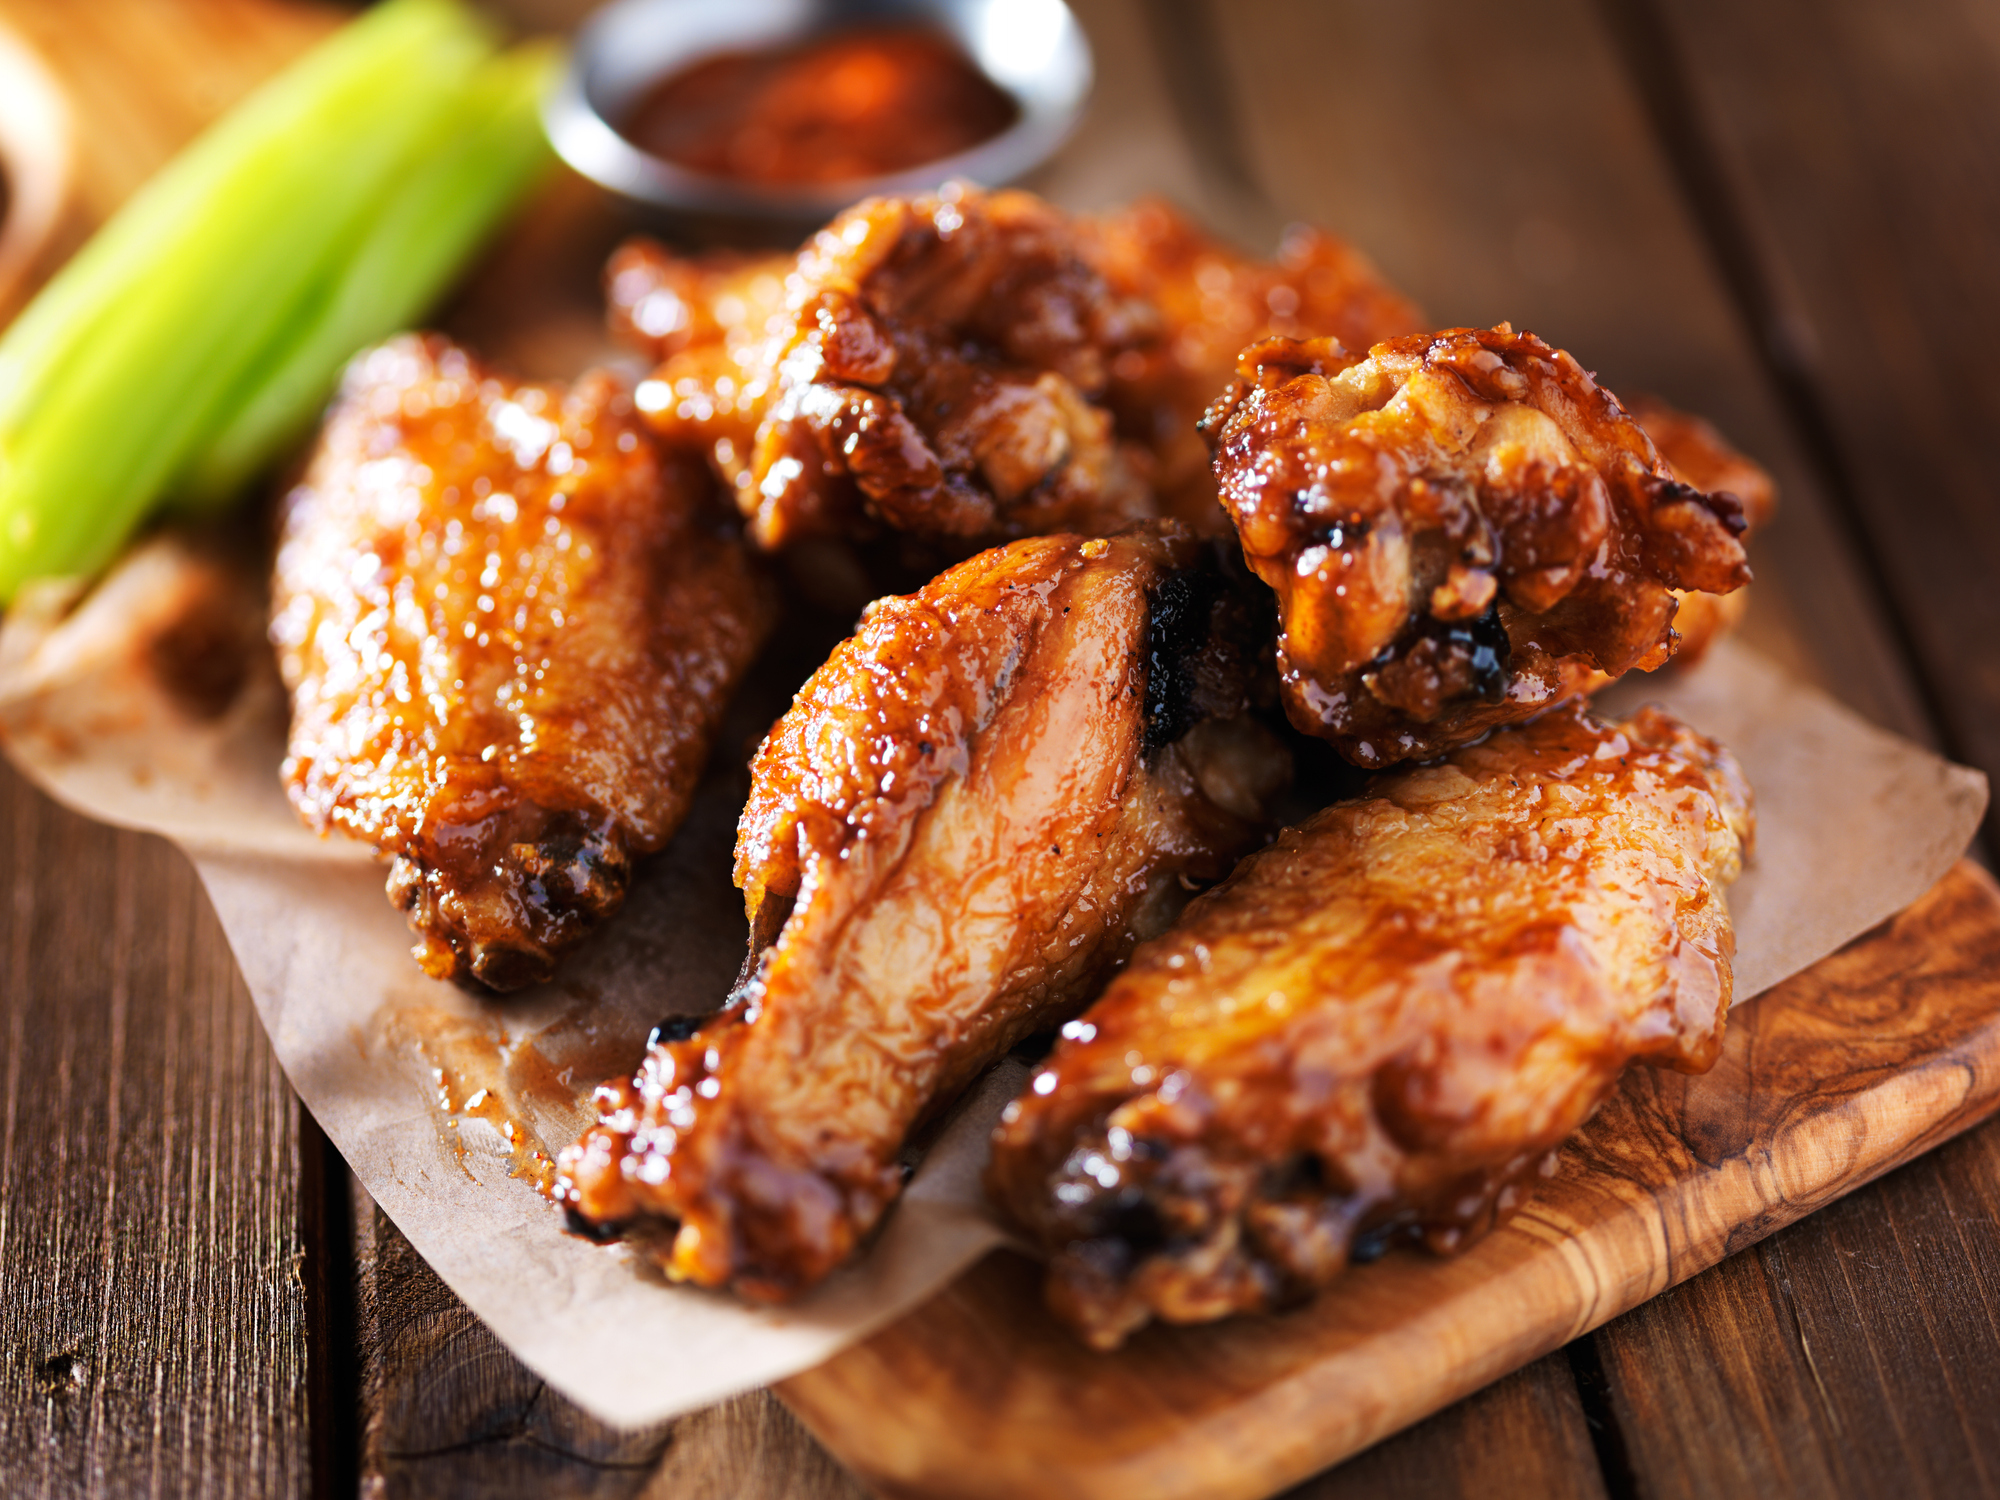
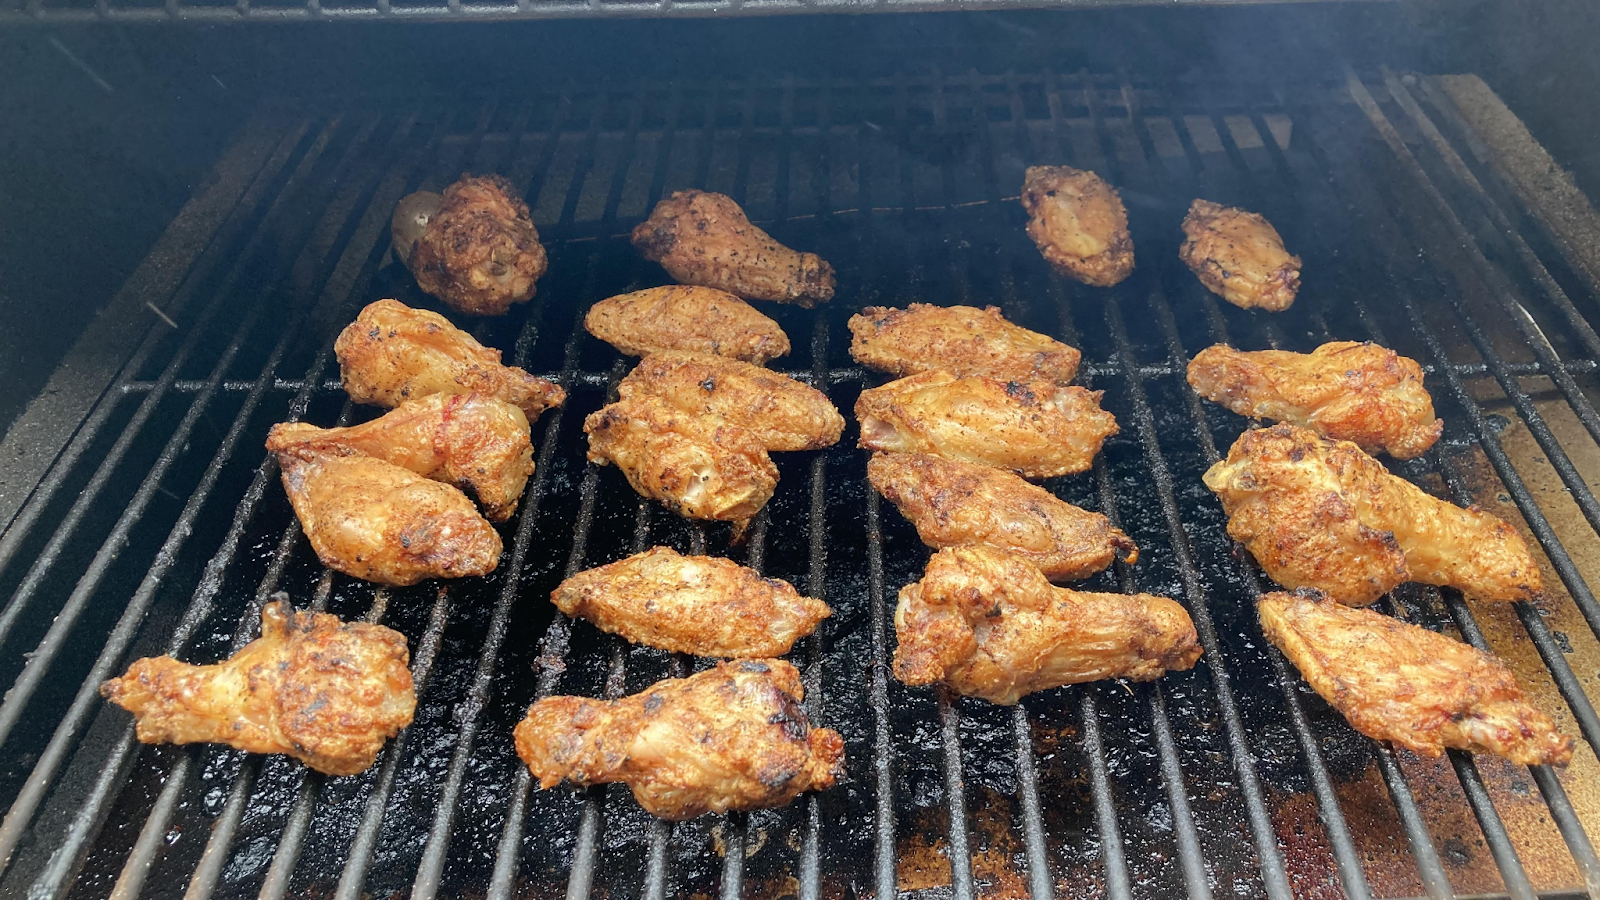
Tailgate Wings
Another great game day recipe that is easy to make ahead is good ‘ol wings. Make these ahead by seasoning them with your favorite barbecue rub, then grilling them on your pellet grill at 425F until crisp and done.
What we do for game day is hold off saucing them until we’ve reheated them on our tailgate grill, then sauce them with our favorite commercial sauces. We have great homemade sauces too, but the commercial stuff is handy for game day.
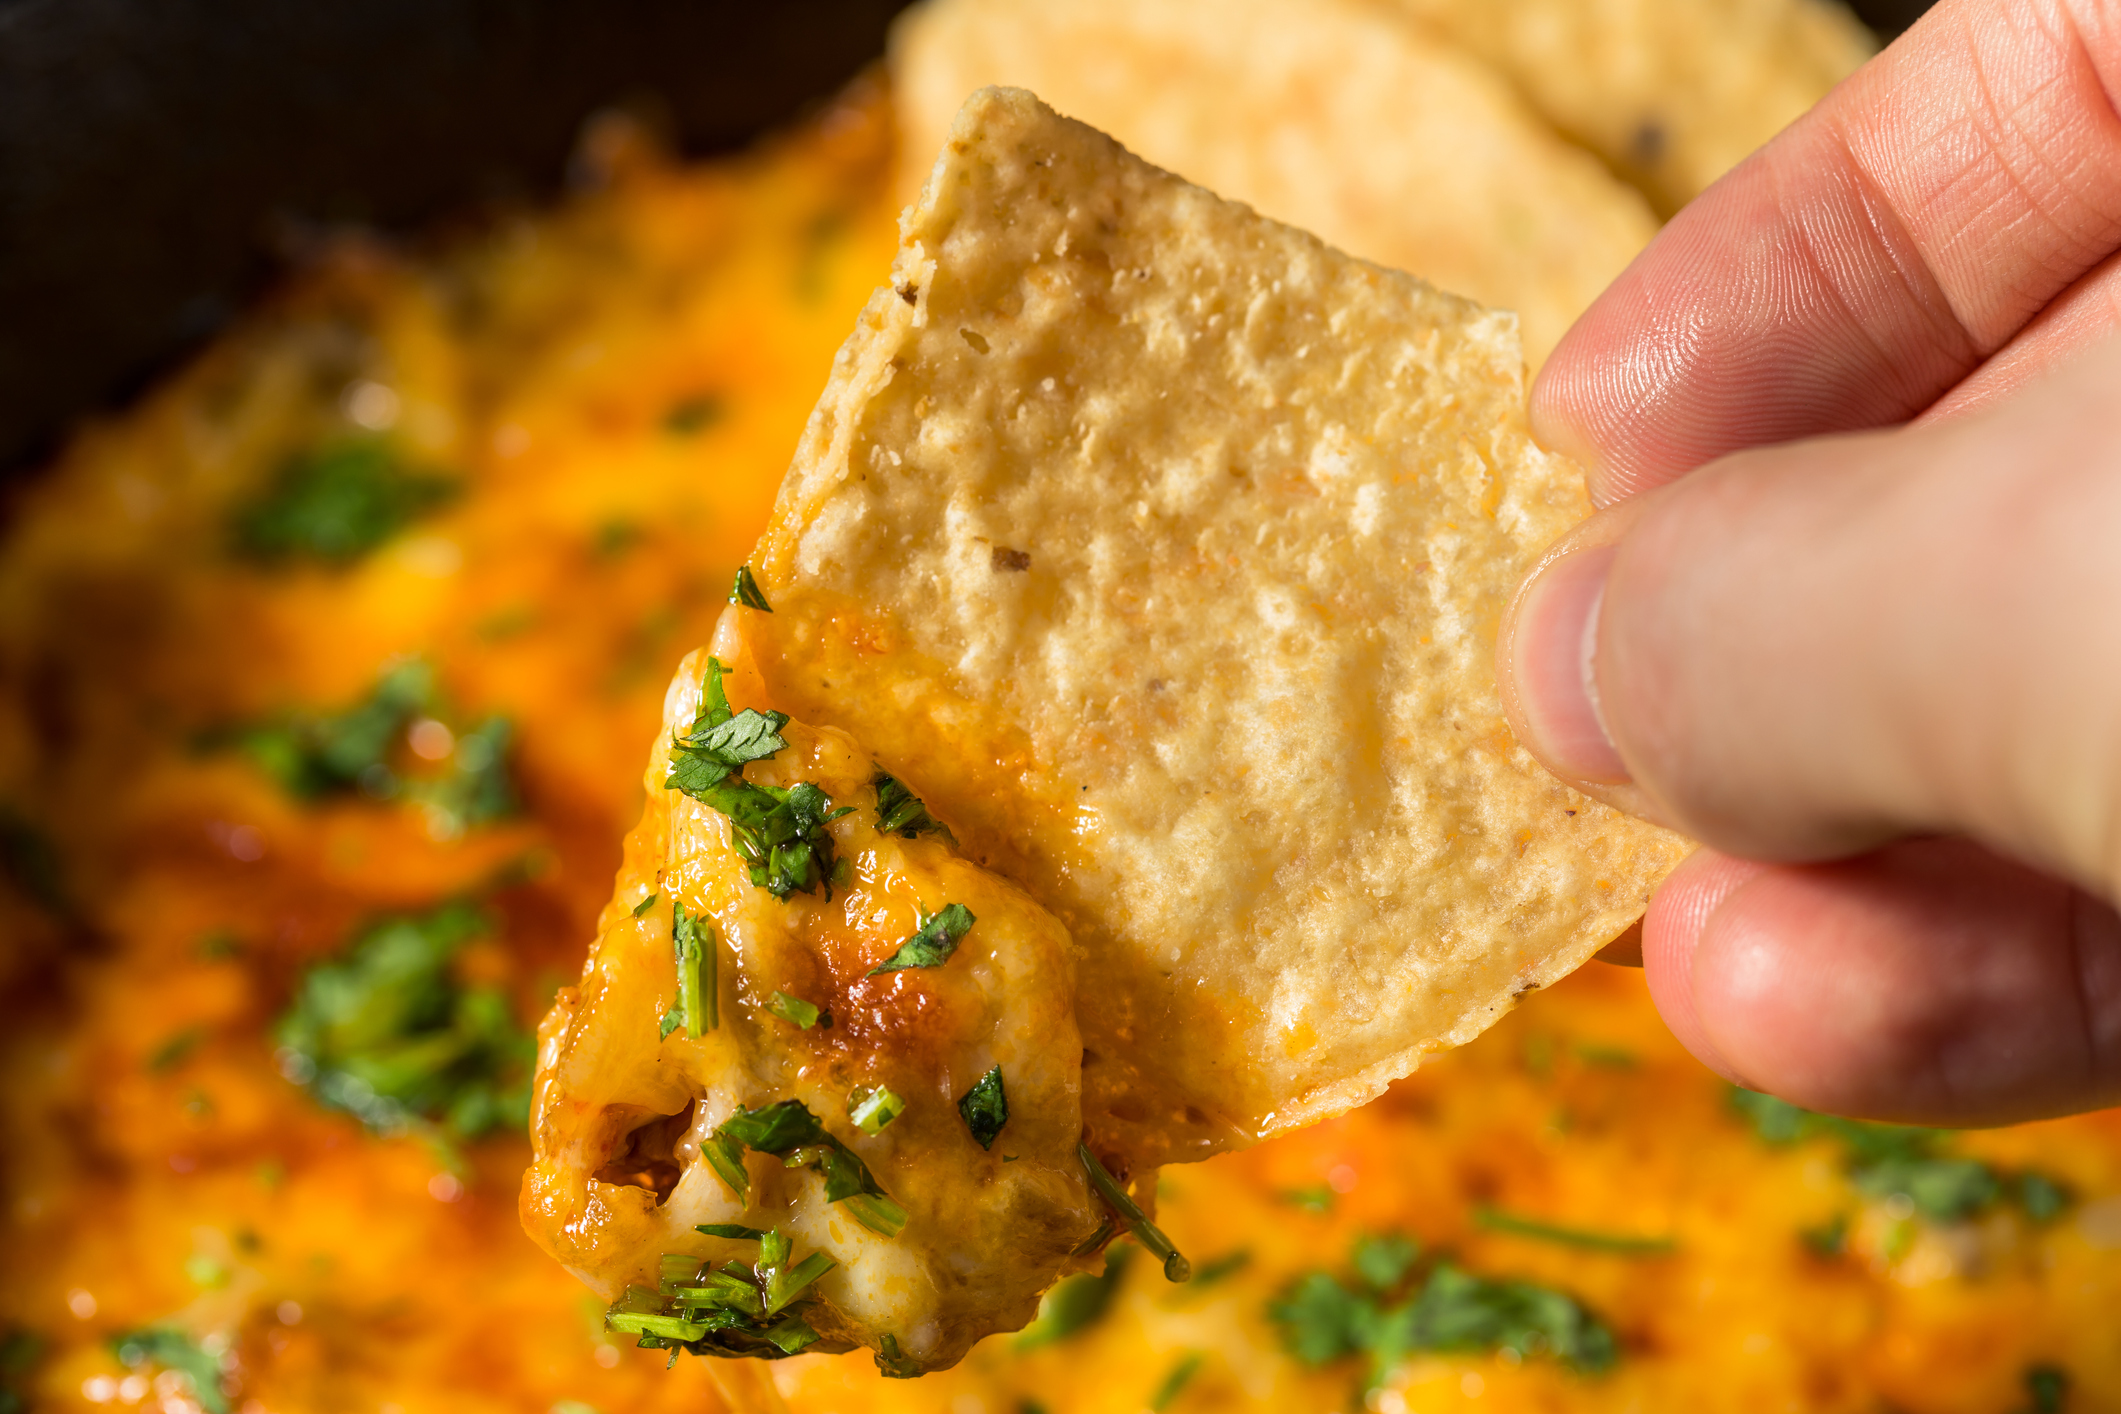
Smoked Queso
Want to raise the ‘ol “chip and dip” game? How about SMOKED QUESO? This recipe has been all the rage around the grilling and pellet grill barbecue social media forums for the last several years and for good reason – it’s amazing!
Creamy cheese base with peppers, onions, chorizo sausage, and more mixed in. So good – and way easy. Use our recipe from the Smoky Snacks blog post from a few months ago. Again, make this ahead at home and on game day, put it on the grill to reheat, stirring every couple of minutes to make sure you’re not burning it on the bottom, then serve with a generous supply of tortilla chips.
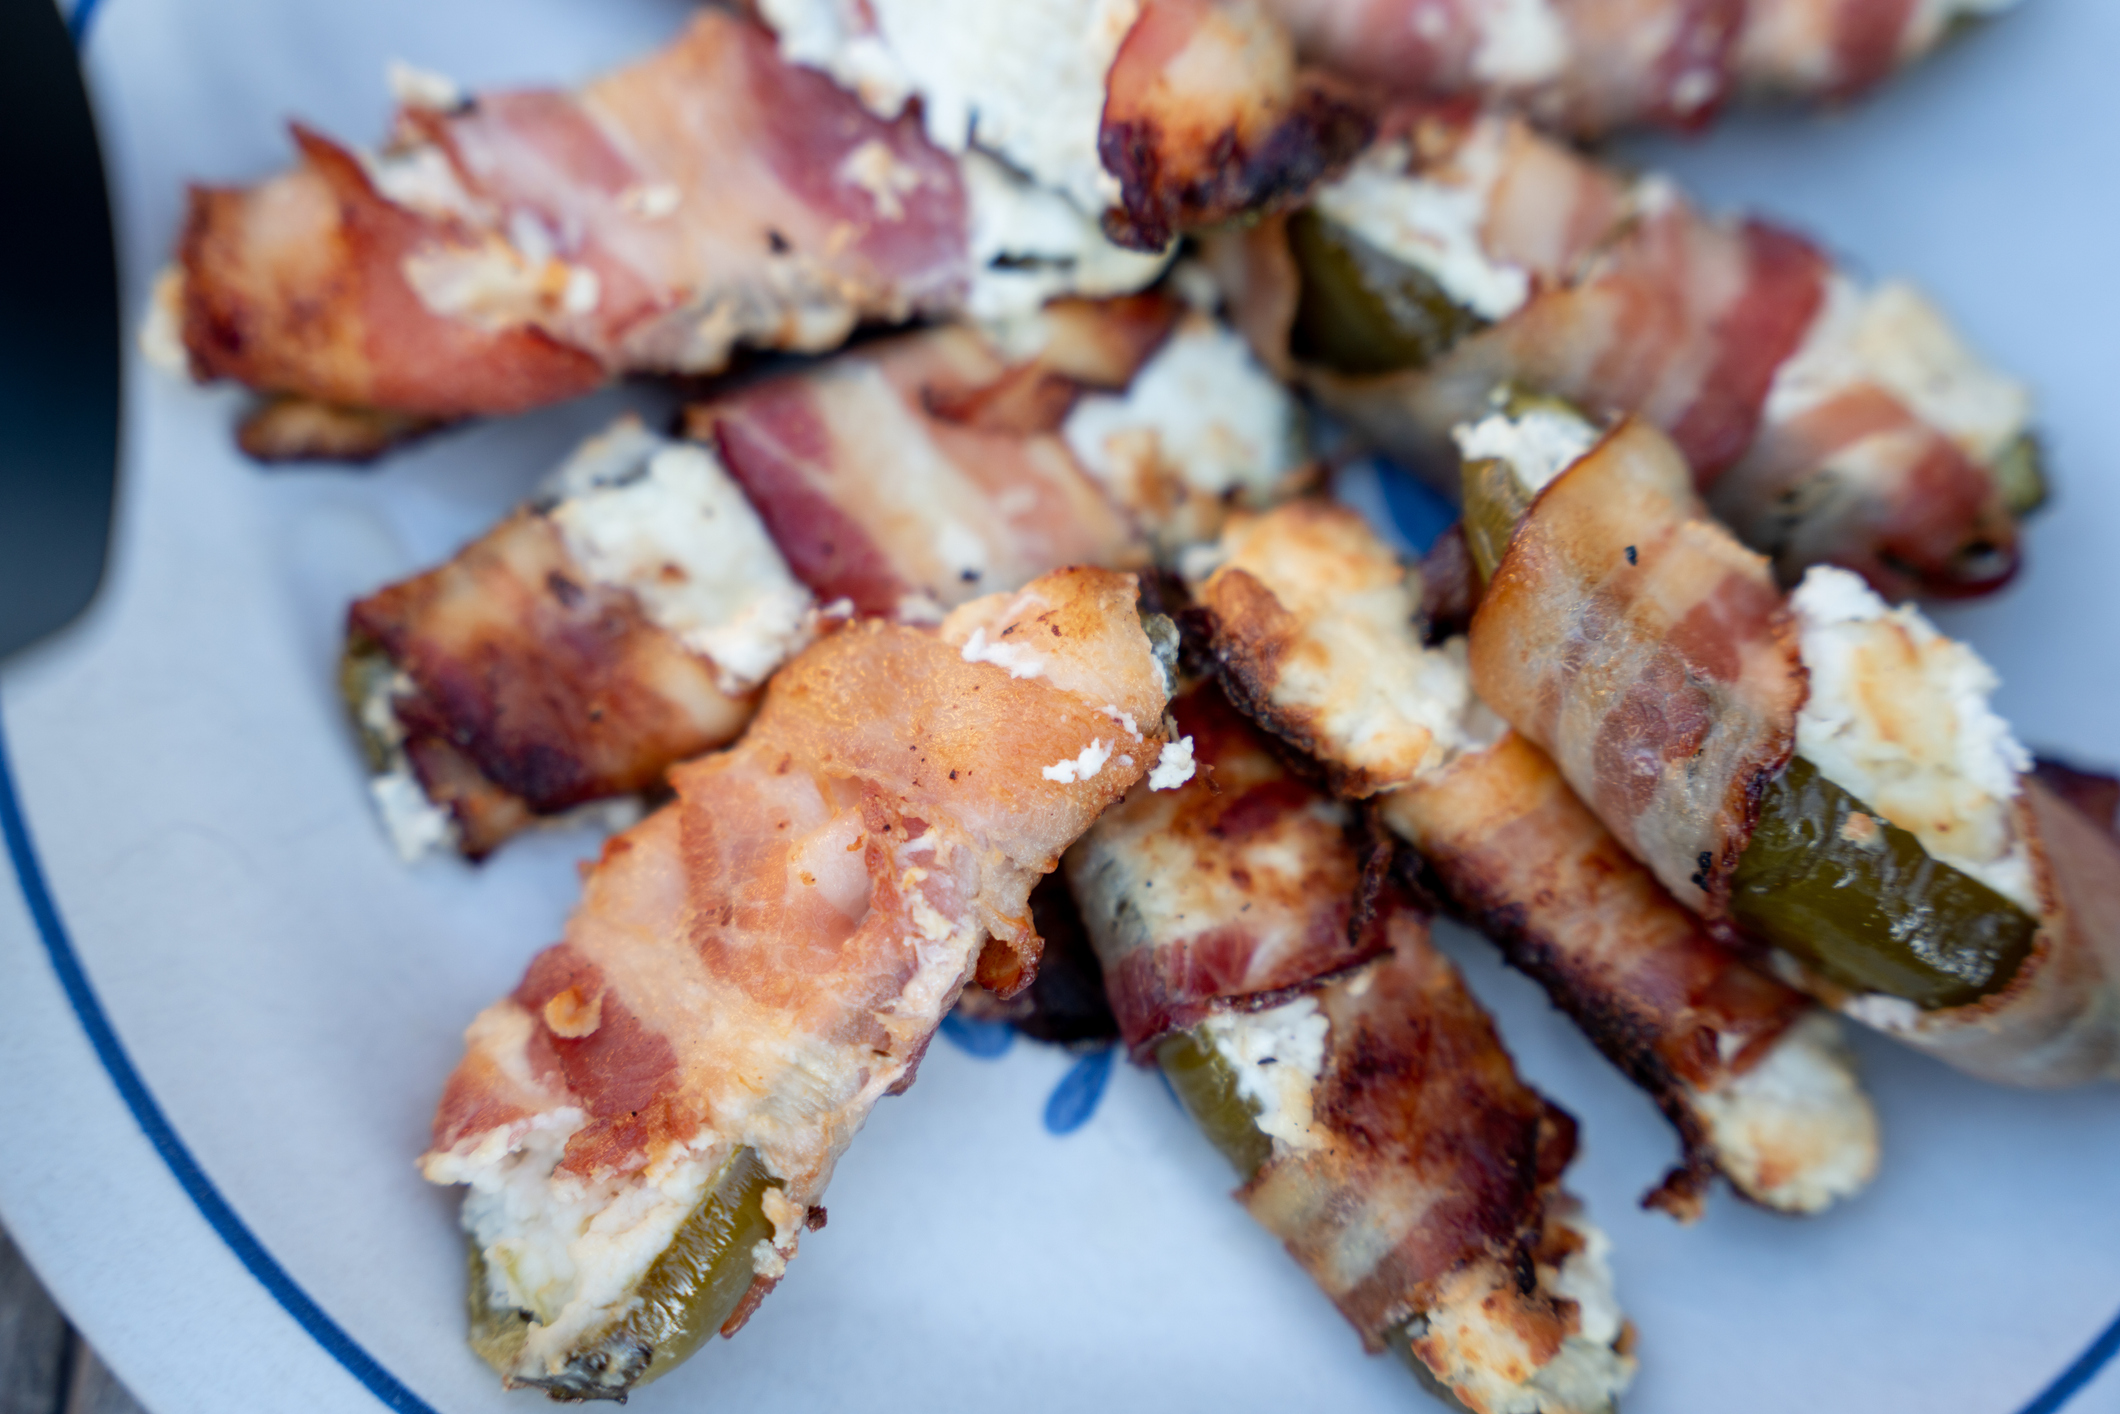
Tailgating Poppers
Finally, how about some homemade, pellet grill-smoked, bacon-wrapped Jalapeno poppers? Jalapeno, stuffed with cheese, wrapped with bacon … OMG so amazing and so easy. Just like the other apps here, make ahead on your pellet grill at home to get that wood-grilled flavor, then reheat on game day – keep them moving so you’re not burning the bacon if you don’t have an indirect heat setup.
As we said, with our tailgating crew we go for the “I want what they’re having” effect! Nothing wrong with a burger or a bratwurst at a tailgate, but … we always feel that anything worth doing is worth overdoing!
Therefore, here are three great ideas that are both “hand food” and also fantastically tasty, and deliver those all-important envious glances from nearby tailgaters. Do what we do – make a ton and share with all the tailgaters who couldn’t get outside the hot dog box.
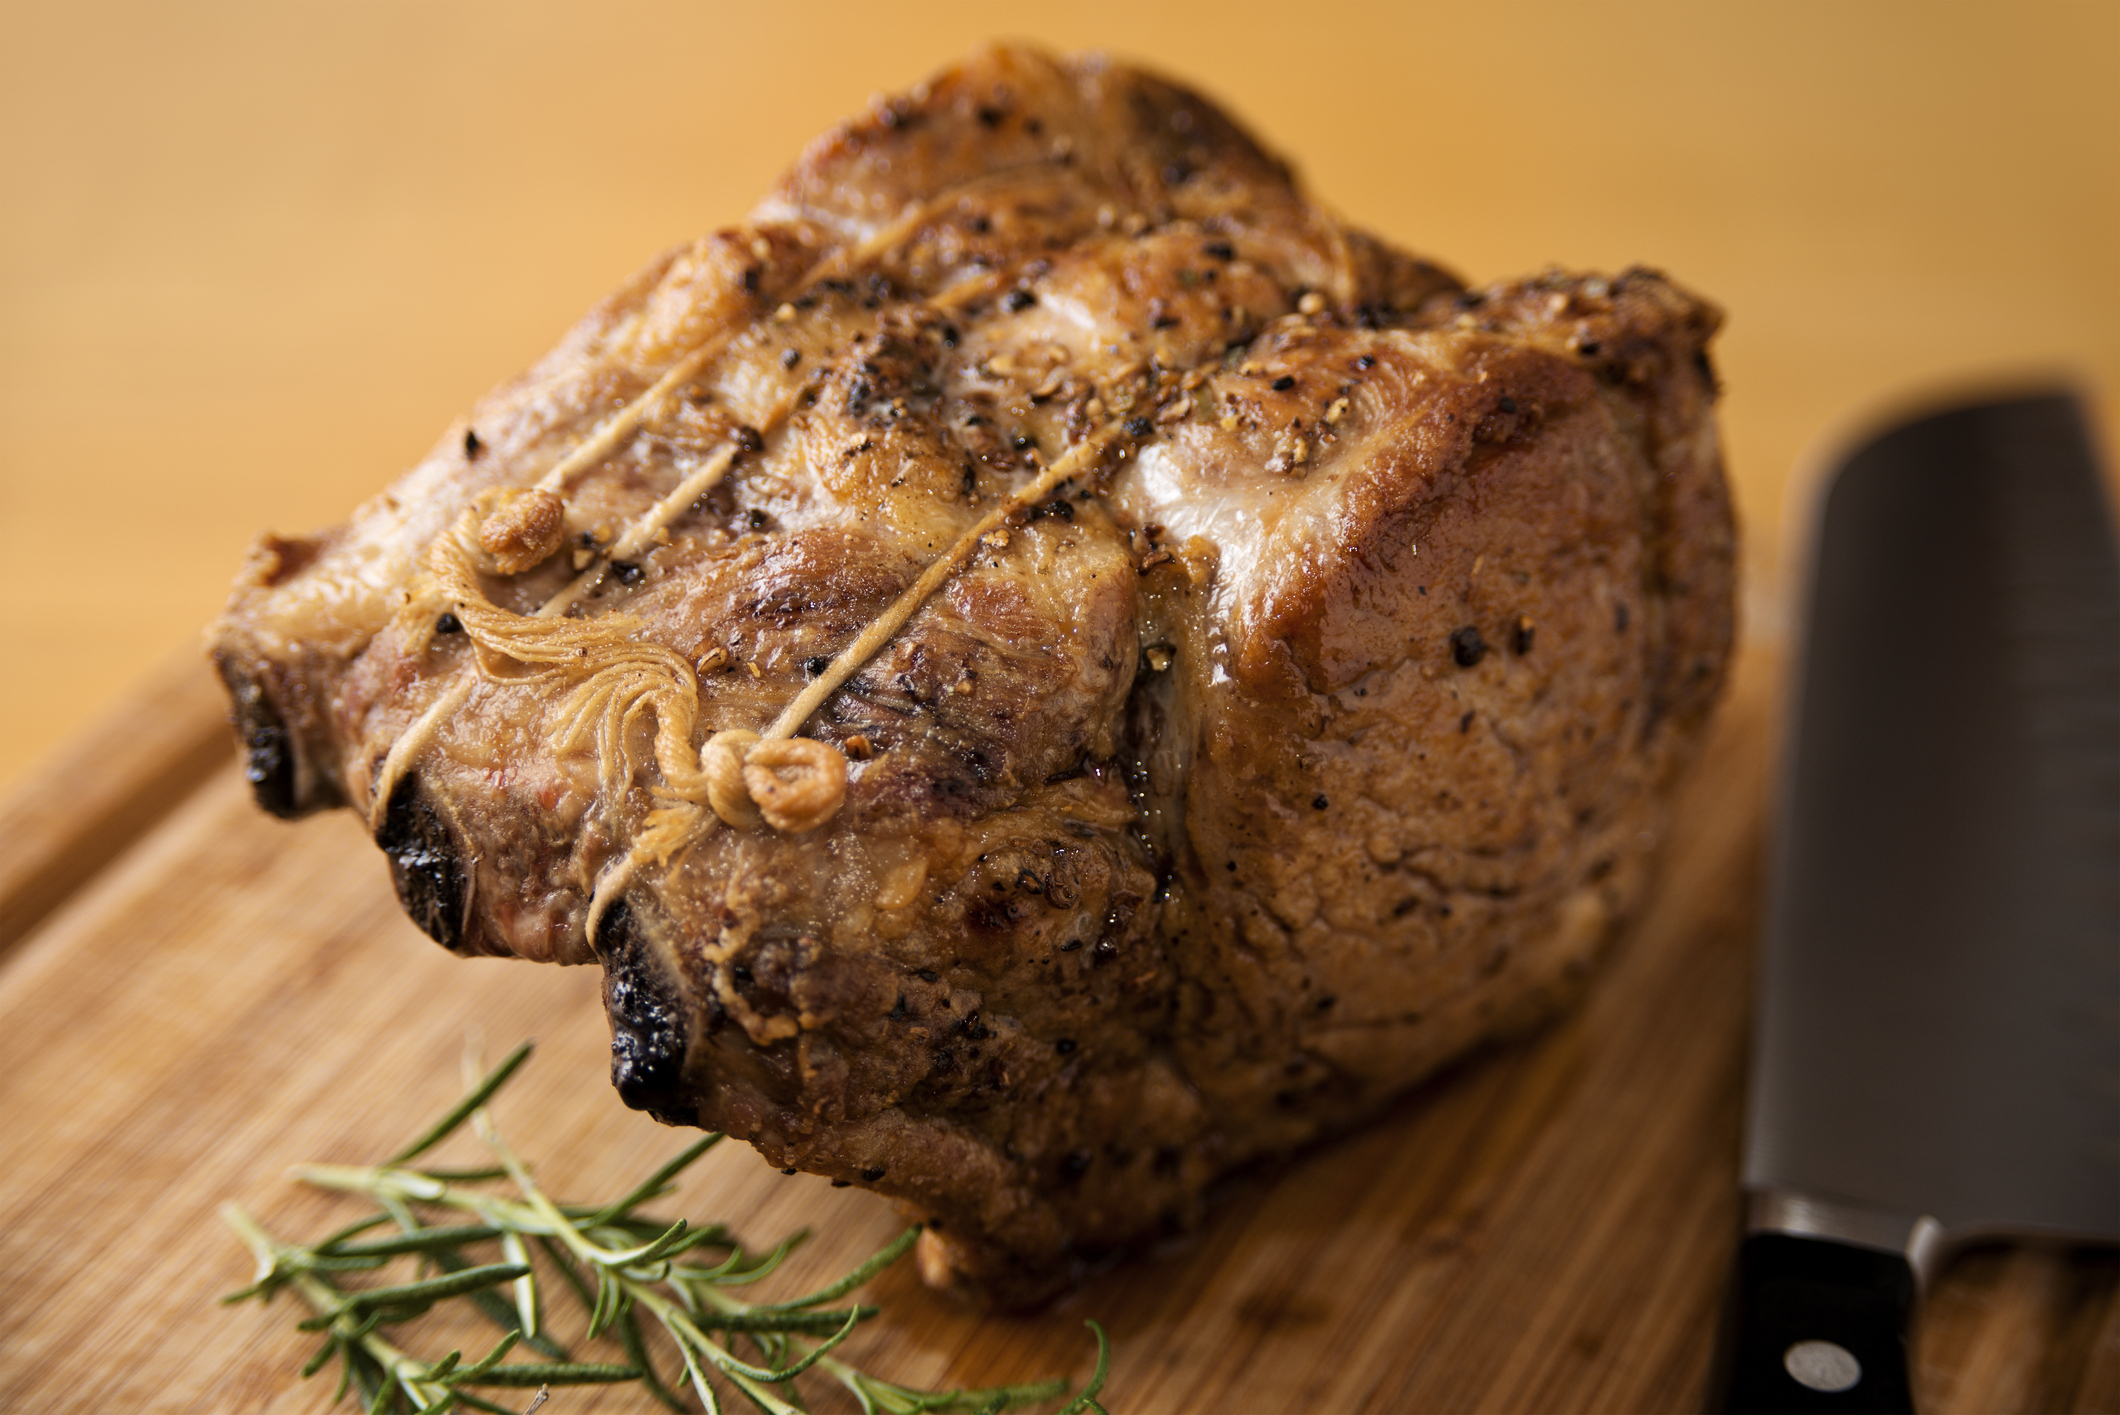
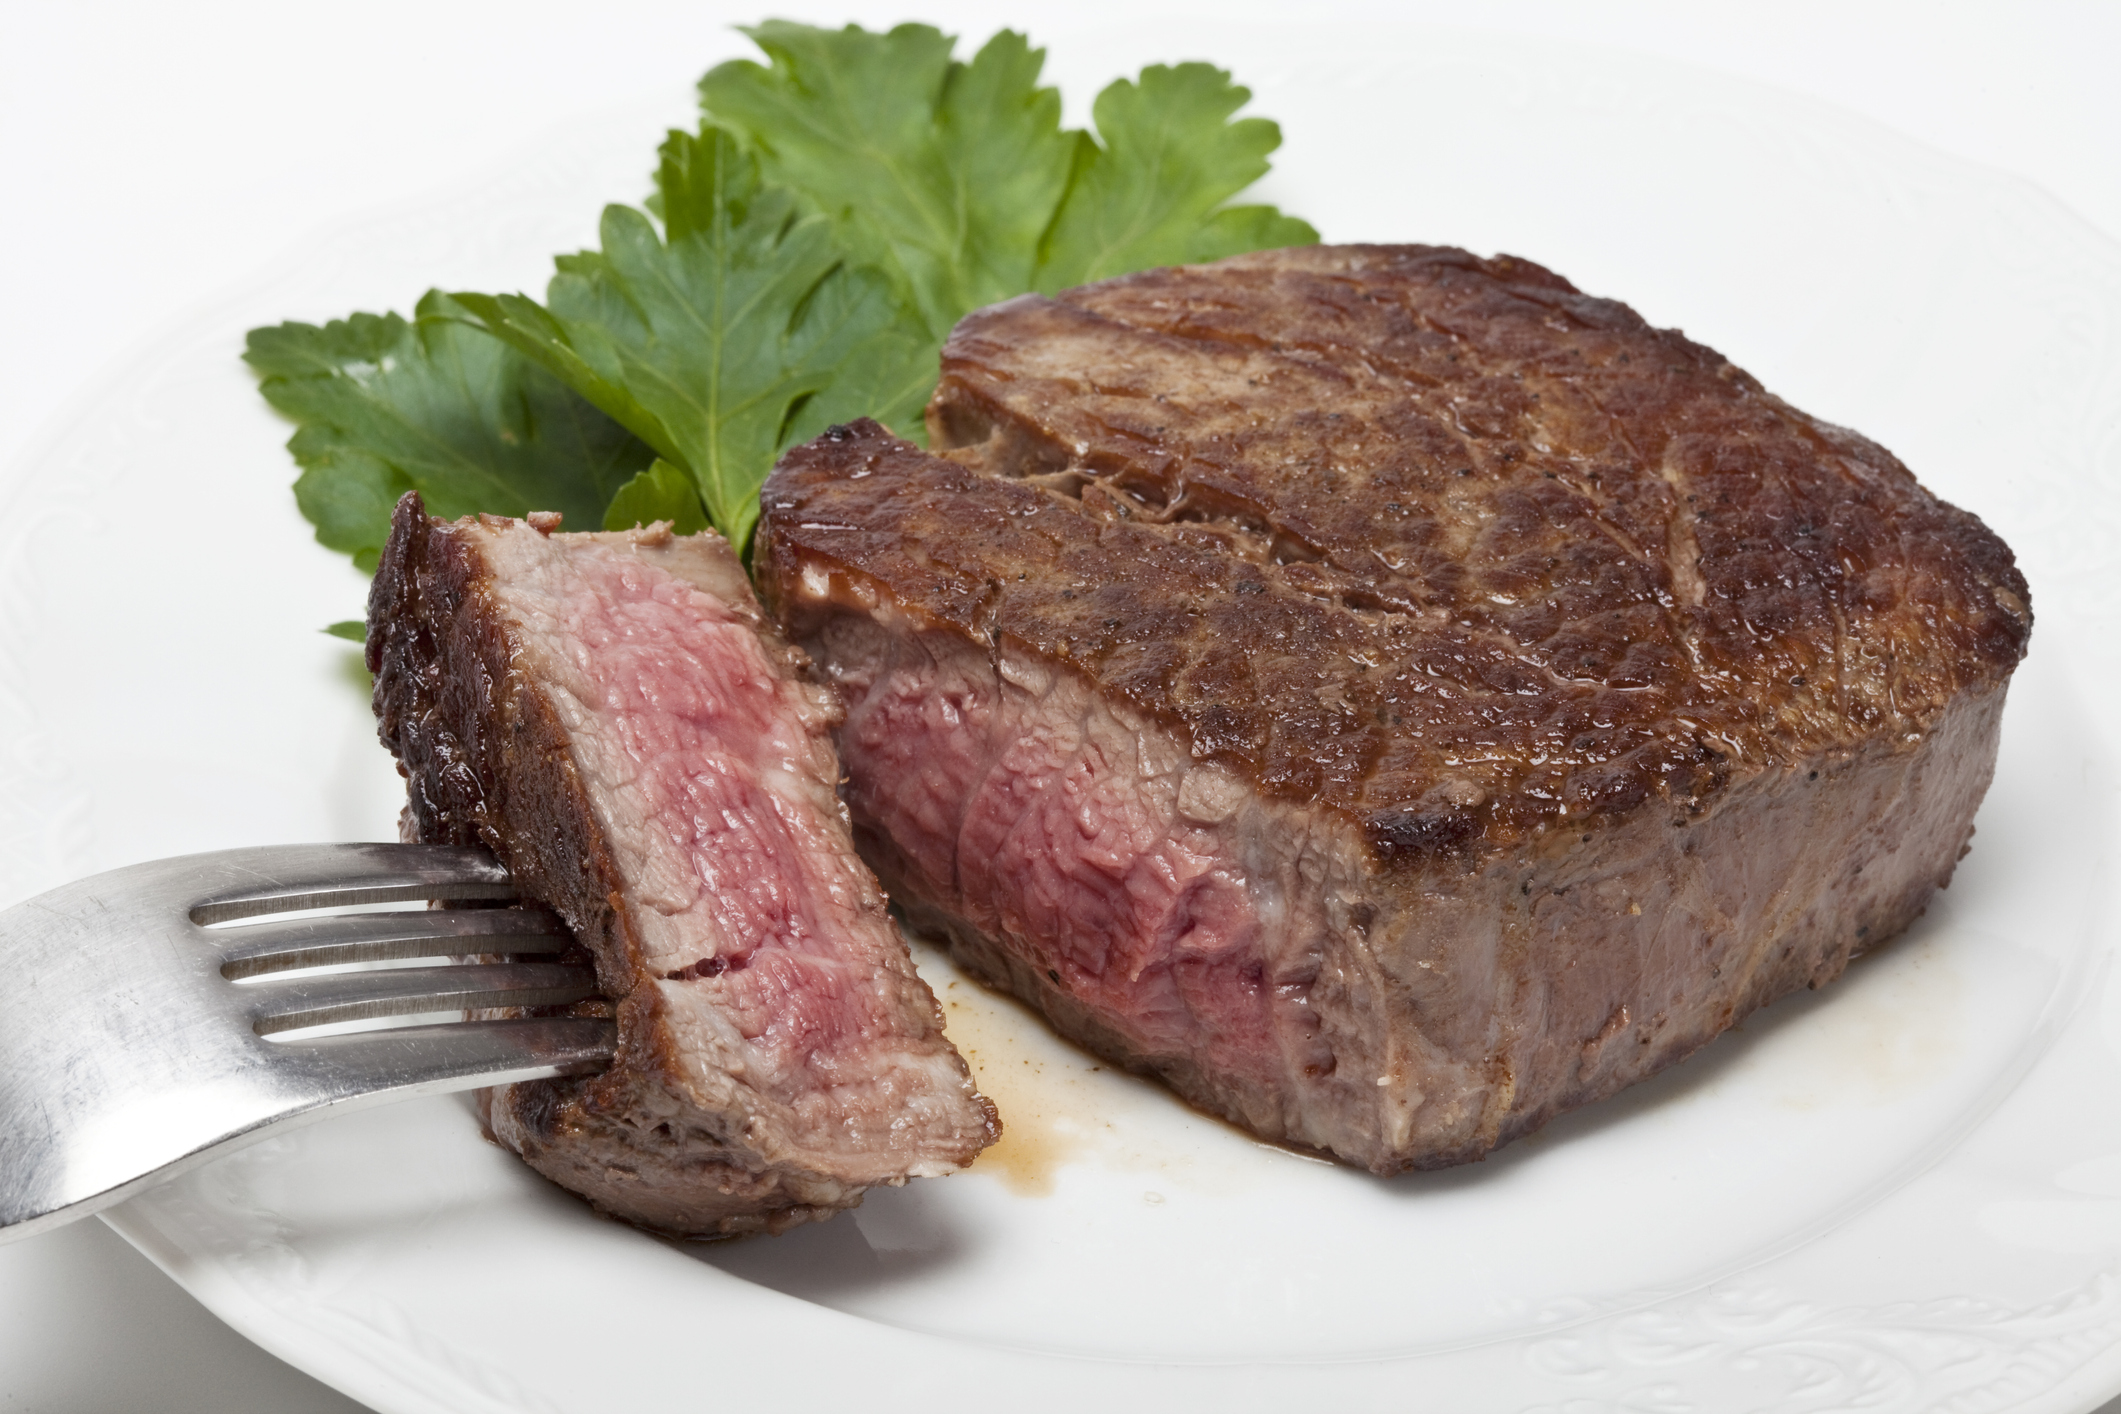
Rack of Pork
Yeah, we go there! A rack of pork is a big bone-in pork loin roast with the ribs on it. It’s used most frequently in a crown roast of pork, but we like cooking it straight (not curled up) and then slicing apart the individual rib chops so you wind up with a pork chop on a stick!
Have your butcher take the chine off it (that’s where the ribs connect to the spine), which makes a nicer presentation, and makes it easier to cut the individual chops. We like to season ours with salt, pepper, garlic powder, onion powder, and paprika, then we slow-grill it on our pellet grill (we like Griller’s Gold Fruitwood Blend, or Cherry for this recipe) at 250 degrees until 135 degrees internal. Yup, that’s a touch under done for pork, as you’ll then finish it on the grill at the game. The slow grill gives it lots of wonderful wood-grilled flavor, and if you want you can finish it with some barbecue sauce at the game. Then slice into individual chops and serve, using the bone as the stick!
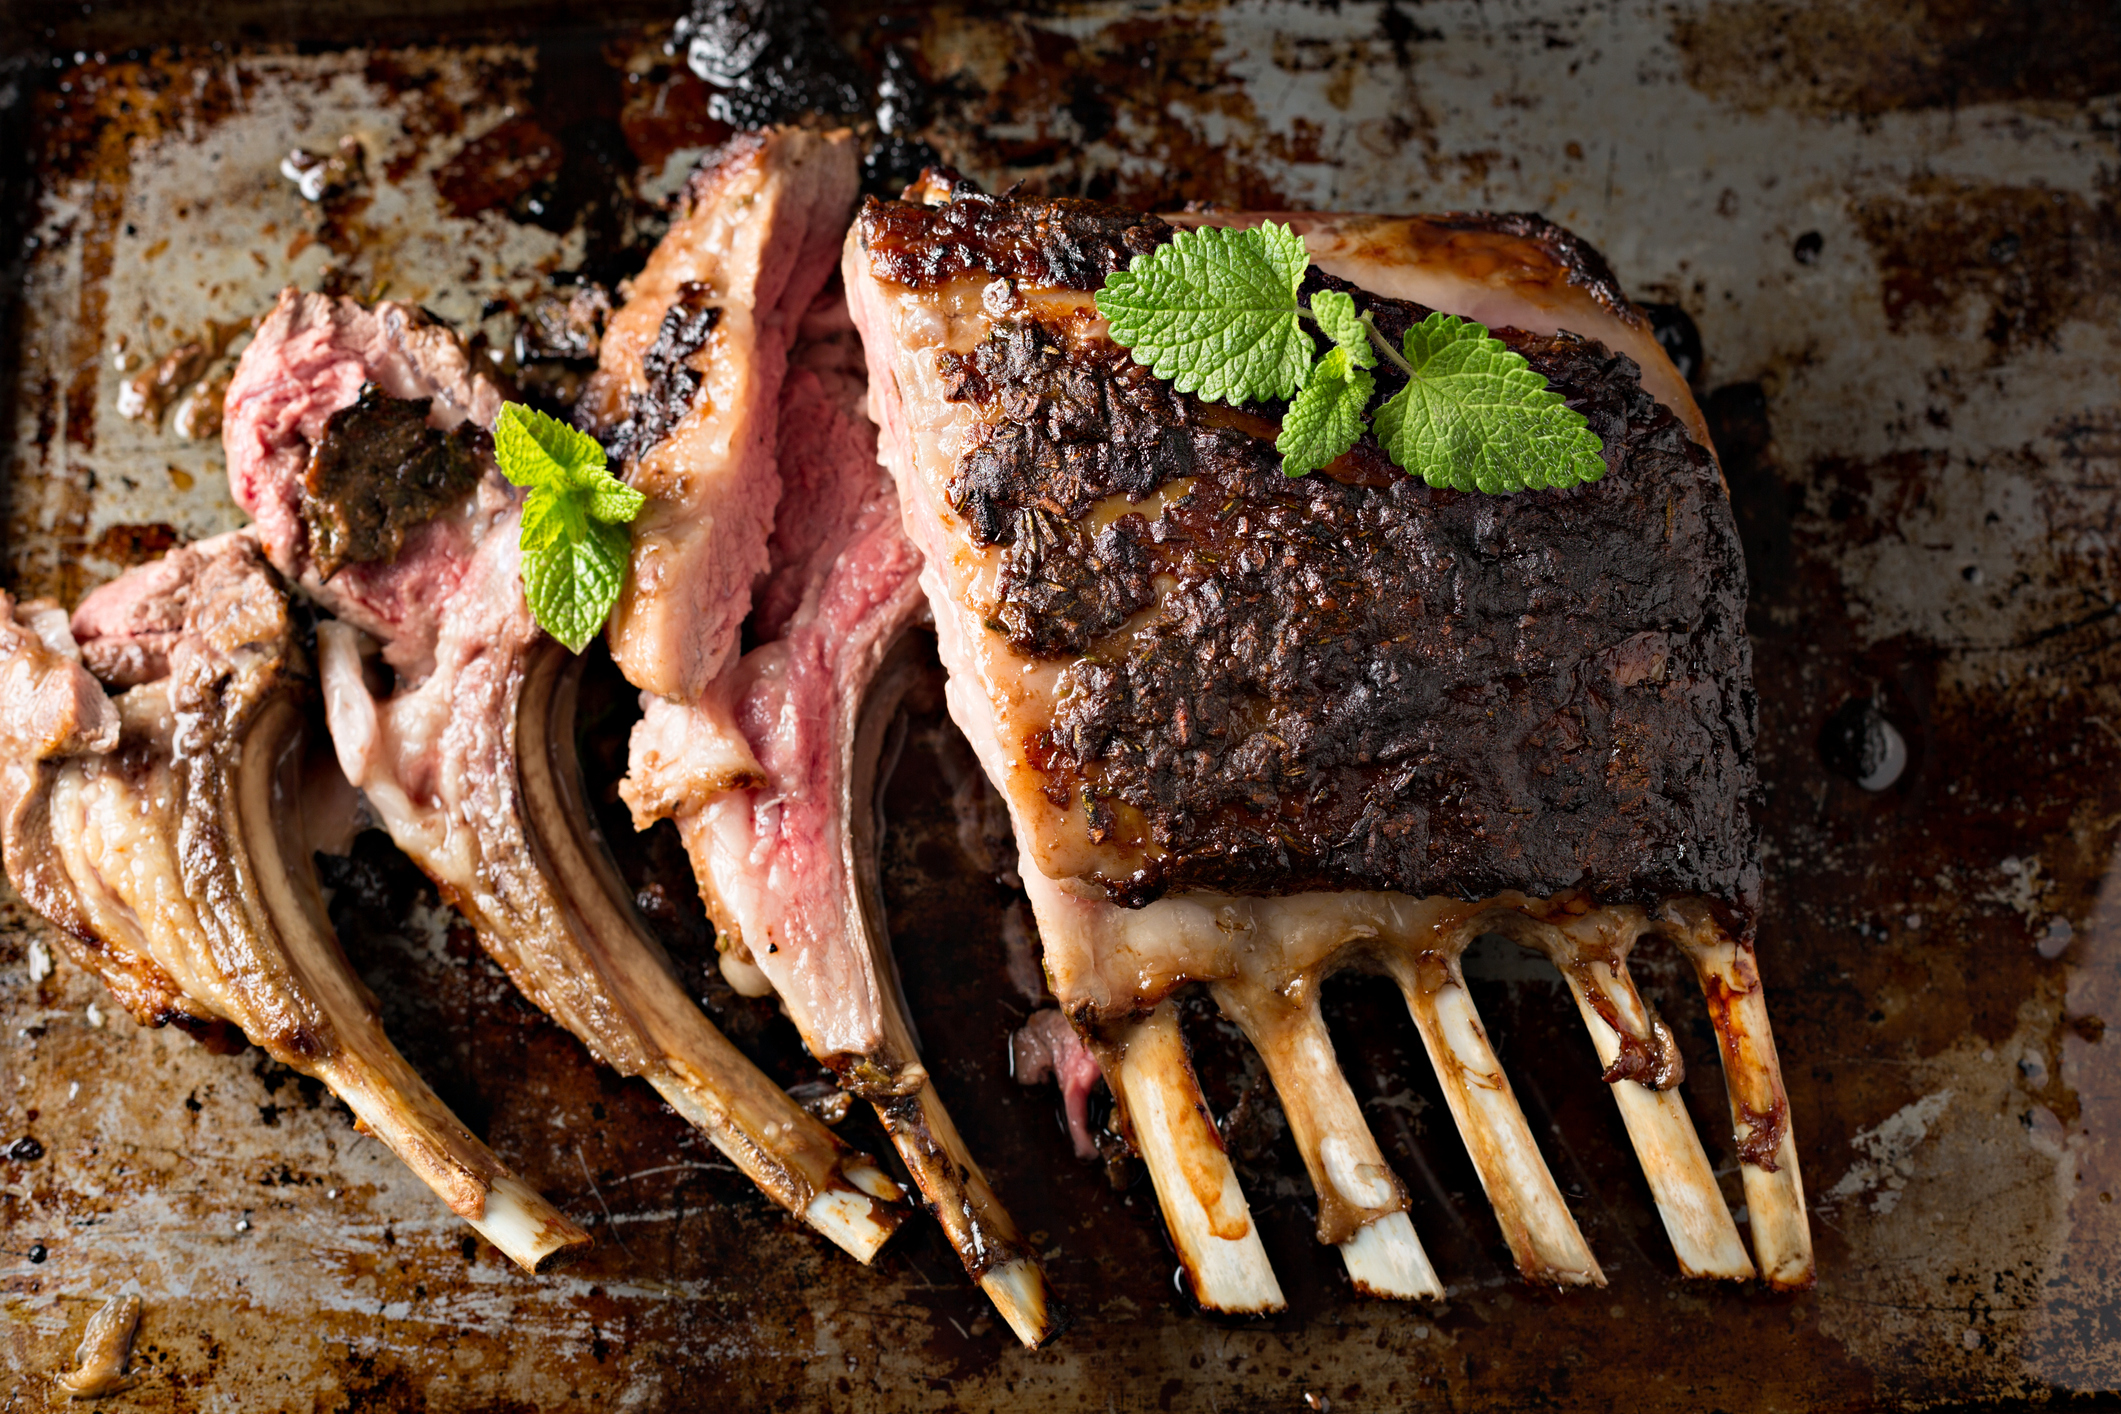
Rack of Lamb
Since we’re on the subject of meat on bones, there’s nothing better than lamb racks, cooked medium, and sliced up like little three-bite lamb lollipops!
We buy ours at Costco or Sam’s Club, and season them with salt, pepper, garlic powder, and a bit of oregano. Then we slow grill them at 250F on our pellet grill (Griller’s Gold Competition Blend is our favorite here) at home until just 125 degrees internal.
Then at the game, back on the grill, and we drizzle them with lemon juice. Keep an eye on them as lamb fat likes to ignite! Grill them until just nicely browned and about 130 degrees internal. Slice up and enjoy!
Beef Tenderloin Kebabs
Beef tenderloin, while pricy, is just so wonderful, and is easy to grill. We buy a whole beef tenderloin at either Costco or Sam’s Club.
We slice it into 1 ½” thick slices and quarter those slices to make 1-2 ounce chunks. Then thread about 3 of those on each skewer with a thick slice of sweet onion in between. Season them with just salt, pepper, and garlic powder, and slow grill them on the pellet grill (Competition Blend again here!) at 225F until just barely rare – about 115 degrees internal. That leaves room for you to then sear and heat them at the game.
At the game, these actually love a bit of direct heat to put a nice crust on them. Just be mindful that they are already nearly perfectly medium rare so you don’t want to overcook them. Nothing better than handing a hungry tailgater a stick of perfectly-cooked beef tenderloin!
The Drinks and Other Fill In items
With such great fare, you’ll want to consider having a few additional tasty items plus some great drinks. On the drinks front, obviously, consider what your audience likes, but we like to do a theme drink, such as a bourbon old fashioned, or martinis that fit the occasion, as well as having good craft beers and of course lots of water and soft drinks available.
For additional fill-in food, consider some salads like a good cole slaw, a tasty potato salad, or even a green salad. We also like to have lots of small crunchy snacks like the ones featured in the Smokey Snacks blog post from a few months back!
The days are longer. The sun is higher in the sky, the grass is greening up, and the crocus, daffodils, and tulips are starting to pop out of the ground—time for renewal and rebirth.
Spring also features the twin religious holidays of Easter and Passover. We won’t get into the religious meaning, but it’s a time when families get together to celebrate and EAT! So here are some fun things you can cook outdoors, fueled with Griller’s Gold Premium 100% Hardwood barbecue pellets!
Easter
Easter – every family has its own traditions, but we’re sure they include lots of great eats! Here are some fun ideas for you.
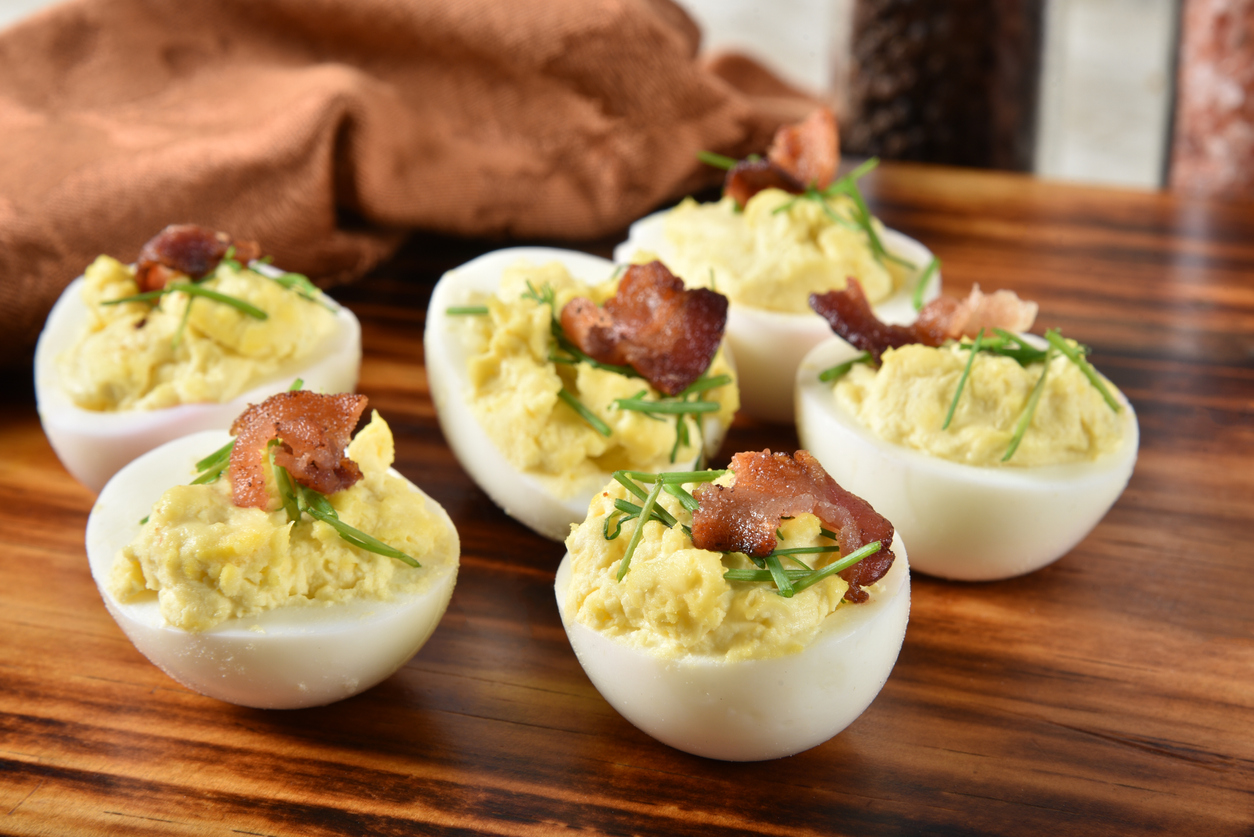
Smoked Deviled Eggs:
What’s traditional with Easter? Coloring Easter Eggs. And doing colored Easter Eggs with the kids means you’re making lots of hard-boiled eggs. Rather than having to eat egg salad for lunch the next two weeks, this is a great appetizer to use up those eggs for your family’s Easter dinner party after the kids finish hunting for them.
Most people we tell about this recipe go “huh?” with a healthy bit of skepticism, but we gotta say, this one is “don’t knock it till ya try it!”
Here we go:
Make in advance:
1 dozen or more hard-boiled eggs (again, use up those colored eggs!)
4 slices of bacon, cooked, crisp, and crumbled
Preheat your pellet grill using your favorite flavor of Griller’s Gold pellets at 180 degrees to make the smoked deviled eggs. While the grill preheats, peel your hard-boiled eggs, and when the grill is at temp, put the peeled eggs on the grill and smoke for 30 minutes.
After 30 mins, take the eggs off and cool them in the fridge for 30 minutes. After 30 minutes in the fridge, cut the eggs in half the long way and pop out the yolks into a mixing bowl. Return the egg white “shells” to the fridge to continue to cool.
For a recipe using 1 dozen hard-boiled eggs, add a half cup of mayonnaise, 2 ½ tsp of dijon mustard, ½ tsp of Worcestershire sauce, ½ tsp of hot pepper sauce, ¼ tsp of cayenne pepper, and ½ tsp of salt to the eggs in the bowl and mix – making sure to mash up the yolks well.
Arrange the egg whites on a serving platter. Scoop the egg yolk mixture into a zipper bag, squeeze the contents into one corner, press out the air and seal the bag. Cut ¼” off the corner of the bag where the eggs are and “pipe” the eggs into the cavities of the shells, distributing evenly. You can also scoop the egg yolks in with a spoon, but the bag method is easier.
Dust the tops of the eggs with a shake of paprika for color, then top each with a little crumbled bacon and perhaps some snipped chives or green onion tops.
Serve. Take a bow to the thunderous applause.
These can be made up to a couple of days in advance, just keep them sealed from the air in a container.
The Main Dishes
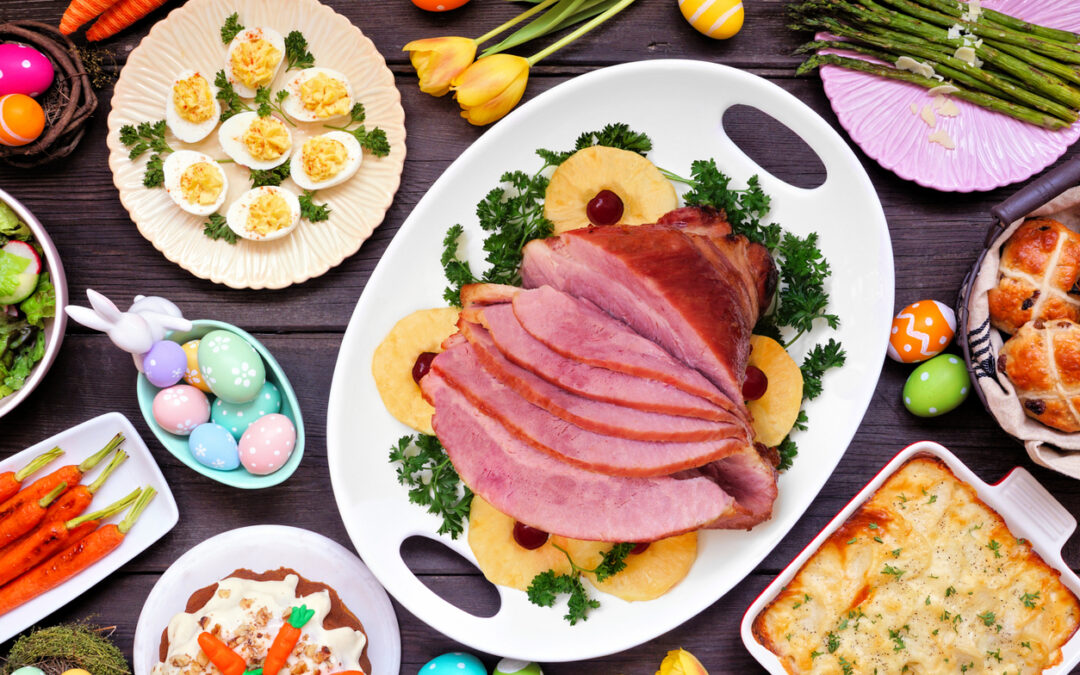
Easter dinners are often known for a couple of traditional dishes – ham and lamb. Here are two great recipes that will make your family say “Ahhh!” as they push back from the table.
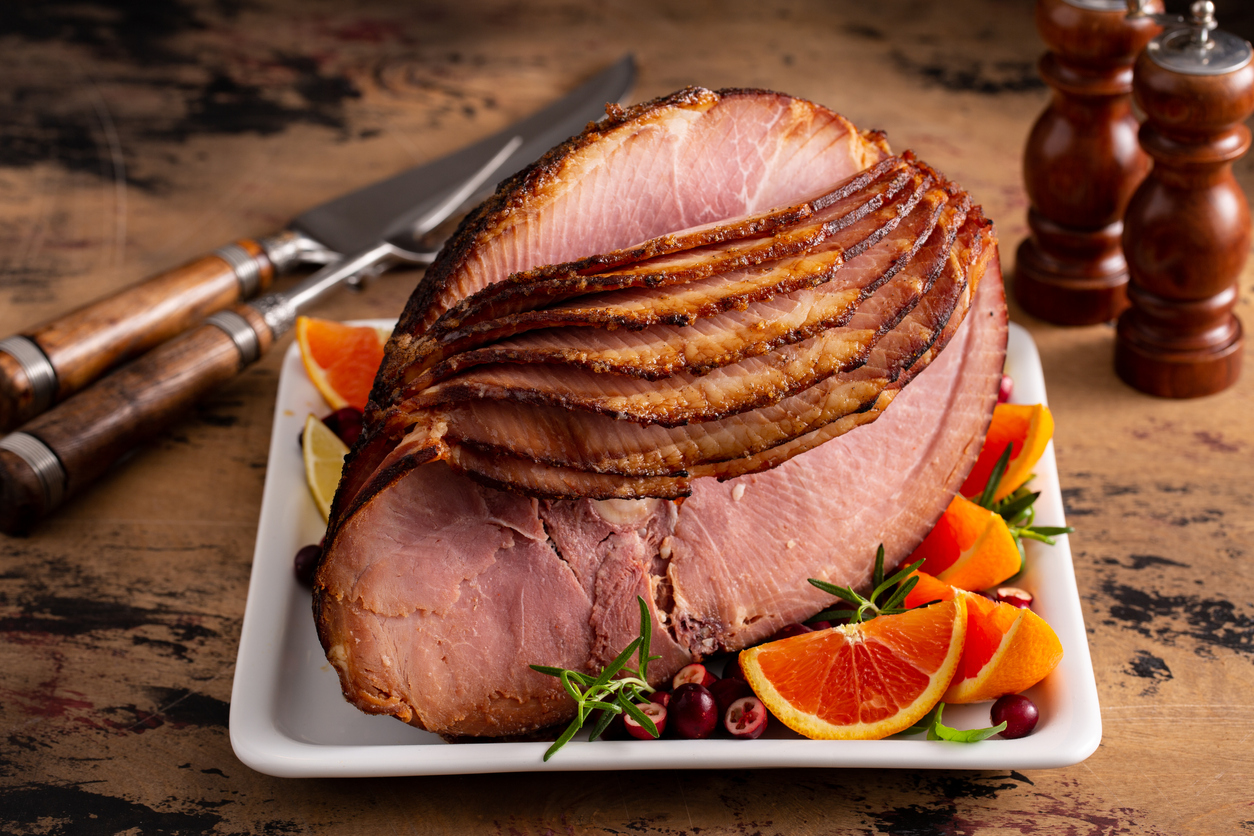
Double Smoked Spiral Cut Ham
Hams are the upper part hind leg of a pig and come in a variety of ways – boneless, bone-in, cured, smoked, etc. One of our favorites is the spiral cut ham – these beauties are typically cured, then smoked, then placed on a machine that cuts the meat on a spiral making it easy to serve.
They come fully cooked, so getting them ready to serve is just a matter of heat and eat. They recommend heating over a gentle heat, so what could be more perfect than the thermostatically controlled heat of a pellet grill set up for low and slow cooking.
Buy:
A spiral cut ham – “half” hams are most popular. They run between 6 and 9 lbs and are distinguished by the one end that is flat. A whole ham weighs anywhere from 10 to 20 lbs and is twice the size and somewhat oval-shaped. Either works for this recipe – just vary the cook time!
Remove the packaging from the ham and place the ham in a large disposable roasting pan. The ham will give up quite a bit of liquid as it heats, and you won’t want that in your grill. The cook time will vary by size, but you’re seeking an internal temperature of about 150 degrees near the bone for your ham – that will typically take 2-3 hours at 250 for a half ham. The packaging should have heating instructions that you can interpret.
Glaze:
Most hams come with a glaze mix packet. (We like to make our own!) But feel free to use theirs – just follow the directions on the package. After your ham hits the heating temp, move it inside and fire your oven up to 500 degrees (if yours only goes to 450, that’s fine).
In a medium saucepan, heat up 1 cup of brown sugar, ¼ cup of apple juice, 1 tablespoon of apple cider vinegar, 1 tablespoon of dijon mustard, ½ cup of honey, ½ tsp ground cloves, and ½ tsp ground ginger.
Bring to a gentle boil and simmer for a minute or two. Brush this all over the outside of your ham, then slide the ham into the oven. Heat at 500 for 3 or 4 minutes, then brush with more sauce and give it 3 or 4 minutes more. If it starts to burn at all, remove it quickly – you just want to caramelize the sugar on it.
Serve:
Have a long, narrow knife and a meat fork handy for guests to free up the slices of their ham. If you have any glaze leftover, mix it with a few tablespoons of the liquid from your roasting pan and serve it on the side as a sweet gravy.
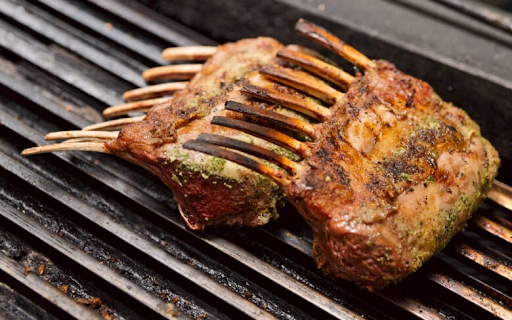
Super easy grilled Rack of Lamb
Lamb is so traditional for Easter dinner, but legs of lamb can be a bit intimidating and, frankly, tough! But a rack of lamb on a pellet grill is easy to do, usually super tender, and is done quickly.
Here’s our favorite recipe:
Buy:
We buy pre-frenched, ready-to-go lamb racks from the warehouse stores. Costco almost always has these for a pretty good price. We always buy at least one on every trip to have them in the freezer ready to go. One rack will usually feed 2-3 people. For a hungry crew, have one rack for every 2 people.
Marinate:
For two lamb racks, mix up ½ cup extra virgin olive oil (canola works too) with the juice of 1 lemon, 2 tablespoons of dijon mustard, ½ tsp dried thyme (or 1 tbs fresh), and 1 tsp dried rosemary, crushed or 2 tbs fresh, finely chopped, plus about 1 tsp salt and 1 tsp freshly ground pepper. Spread the marinade on the lamb on the meaty side and the ends, and marinate for about an hour.
Cook:
Preheat your pellet grill using your favorite Griller’s Gold pellet flavor (we like Competition Blend or Smokehouse Blend for this recipe) to 250 degrees F. If you have one, put a probe thermometer in the lamb racks and set the alarm for 125 degrees.
We like our lamb bright pink, medium, so adjust accordingly. It will take the lamb racks about 30-45 minutes to get to that temperature. When they do, remove and cover with foil and a towel to retain the heat and boost the grill temperature to 400 degrees.
Return the lamb racks to the grill (and stay by the grill for this – lamb fat is notoriously flammable! If a ton of smoke starts coming from the grill, check for fire!) put them fat side down and sear for 2 minutes. Keep turning every 2 minutes until the internal temperature is between 135 and 140 degrees.
Bring them in, cut them into individual “lamb lollipops,” and serve!
Passover
Passover is the holiday that celebrates the Jews escaping the slavery of the Pharoah in Egypt. Jewish people have a standing joke about Jewish holidays that goes “They were persecuting us. We prevailed! Let’s eat!” and Passover is no exception! Here’s one of our favorite recipes:
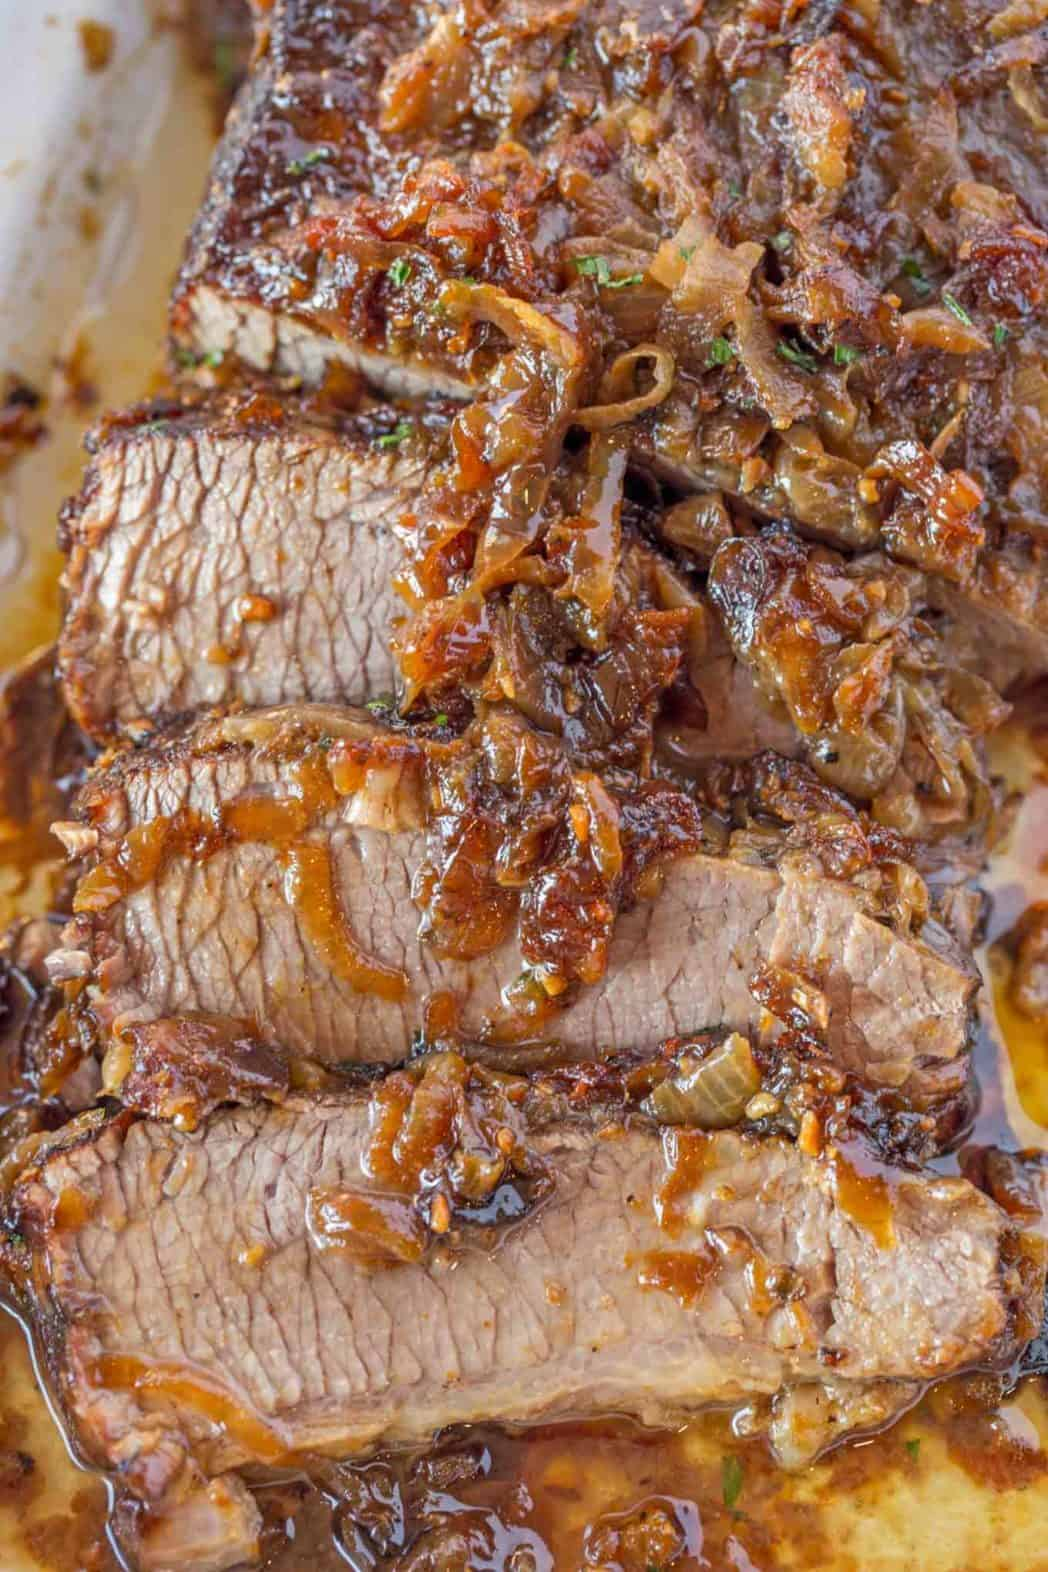
Smoked Passover Brisket:
A traditional Passover dinner dish is a braised beef brisket. These are usually slowly braised with a savory liquid, often smothered with onions, and cooked until the meat is pull-apart tender. This recipe takes that traditional preparation and kicks it up a notch by starting the cooking out on the pellet smoker to kiss it with some tasty smoke flavor prior to finishing in the oven. This is super easy and fun to make.
A Kosher note: You can decide whether you use kosher ingredients for your family based on your own traditions and observance. This recipe is kosher-style which is to say it follows basic kosher rules but does not specify kosher products.
Buy and Trim:
We like to use a brisket flat for this recipe – which is also known as a “first cut” brisket. It’s the flatter lower muscle. We like to trim the fat cap of these to about ¼” thick and trim back the thin edges to the point where the meat is at least ¾ thick – save that trim. It makes amazing burgers!
Seasoning:
For this style of brisket, rather than our usual BBQ rub, we first like to wet the meat with some Worcestershire sauce, then season it liberally with salt, pepper, and garlic salt – that’s it!
Smoke:
Fire up your pellet smoker for very low and slow – 180 degrees. For this one, our favorite pellet is Griller’s Gold Premium Wood BBQ Pellets SmokeShack Blend, but really, all of them are suitable. Put the brisket on, and set a timer for 2 ½ hours. If your grill has a “max smoke” or “super smoke” setting, use it. This is about the ONLY recipe you’ll see from us where we cook using time versus temp! All you’re doing is infusing the meat with smoke flavor.
Roast:
Take your brisket off the grill and put it in a big roasting pan.
Preheat your oven to 300 degrees.
Mix up a braising liquid consisting of 2 1/2 cups of beef broth, 1 cup of red wine, 1 cup of prepared Chili sauce (see Kosher note above), and ½ cup of dark brown sugar. Pour over the beef, then slice up at least two large, sweet onions into thin slices and bury the meat in the onion slices. This is one of those “more the merrier” things!
Cover the meat tightly with foil (or if your roaster has a lid). Put the meat in the oven and cook it for between 2 and 3 hours – the meat is done when it is at least 200F degrees internal and pulls apart easily at the edges. Remove from heat to a large platter, cover with foil and a towel to retain the heat, and rest at least 20 minutes – that will firm the meat up for slicing. Slice crossways to the grain in nice thin slices and serve with the onions and the liquid in the pan as gravy.
By the way … you don’t have to be Jewish to enjoy this delicious brisket!
So there ya go! Three amazing main dishes and one killer appetizer. From our families at Griller’s Gold to yours, wishing you happy springtime wishes and warm memories of these holidays!
Ah, “March Madness” – ostensibly that, of course, refers to the big college basketball championship series and its exciting “gotta win to advance” format. But when we think of March Madness, we think of the weather getting more springlike and our MAD desire to get out there and GRILL SOME STUFF! Right?
So, this post is about how we combine those two – here’s some March Madness-worthy bites you can make right on your grill using Griller’s Gold Premium 100% Hardwood pellets to give everything that tasty wood-grilled flavor!
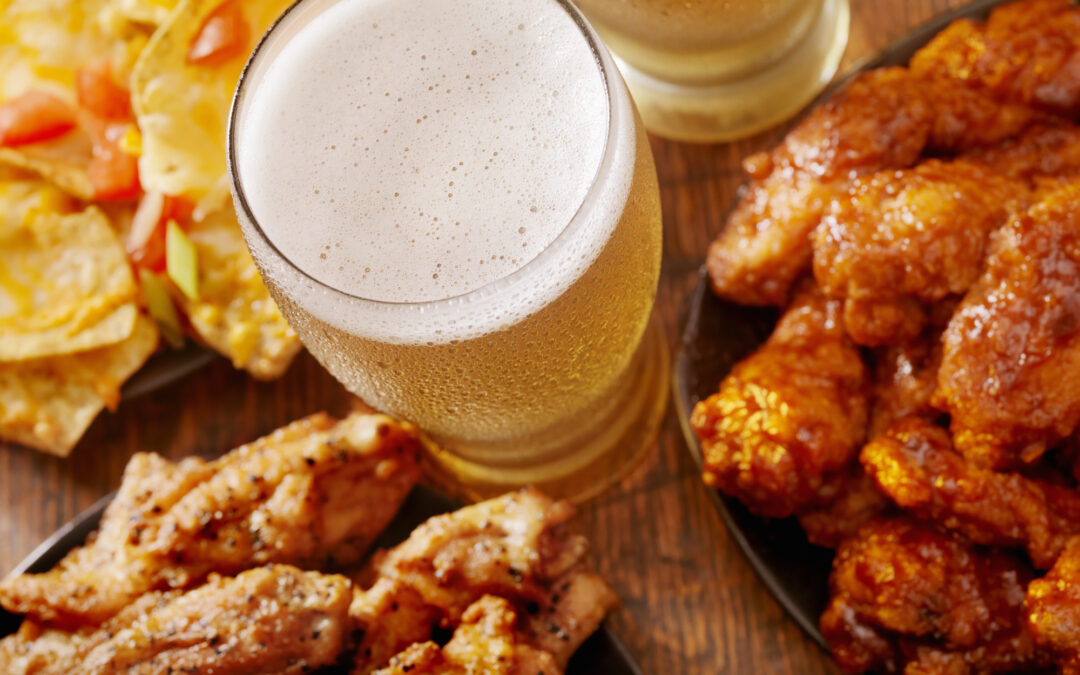
If you’re like us, you’re camped out in front of the big screen watching sports, you need to have some good snacks, and some good beverages handy – good friends also make it more fun. We’ll revisit some of the snack items we’ve written about before AND give you three great recipes for classic “watching sports munchies.”
smoked Chicken Wings Three Ways
Seriously, is there a more perfect food than a chicken wing? There are three or four good bites of tasty meat, usually either fried, grilled, or baked, and tossed with some yummy sauces. So we’re going to take you through how to get great wing results on your pellet grill and some outstanding sauce ideas to go with them.
Expert Wing Tips
Buy: We like to buy our wings at Costco or Sam’s Club in the big bags of frozen raw wings. Be sure to purchase raw – you want end-to-end control of the product. If buying fresh wings at the grocery store or butcher shop, by all means, go for that – we like the flats and drumettes separated, and no tips, but whole wings can be cooked this way as well.
Prep and Season: Thaw your wings and drain them, then spread them on a rack over a sheet baking pan and let them dry at room temp for about 30 minutes – this step helps the skin get crispier. For 4 lbs of wings (about 30 pieces in total, split between drumettes and flats), mix:
1 ½ Tablespoons of baking powder (yes, this helps the wings crisp up as they cook)
1 ½ Tablespoons of a seasoning mix of your choice – we like Lawry’s Seasoned Salt, but Morton’s Season-All, or just about any other seasoning mix works. If you want to go old school, mix up 1 tsp each of salt, pepper, and sugar and ½ tsp each of garlic powder, onion powder, and paprika.
Toss the wings in this seasoning mixture in a large bowl to evenly coat the wings. Spread them back out on your rack and let rest another 30 minutes. Meanwhile, preheat your pellet grill to 425F degrees. Yup, we’re comin’ in hot!
Cook: Put the wings on the pellet grill, spreading out evenly, so there’s a touch of air space between them – it’s the convection air that makes these crisp up. Cook for about 30-40 minutes at 425F degrees, turning every 10-15 minutes – you’re looking for 180 degrees at the bone of one of the thicker drummettes.
A note for non- pellet grill owners: This recipe works great on a charcoal or gas grill as well – just cook the wings over indirect heat (so shut off a burner, or bank your coals to one side). And if you want great wood-grilled flavor, prepare a “cigar” of Griller’s Gold pellets by taking a cup or so of the pellets and rolling them in a sheet of aluminum foil. Twist off the ends and poke several holes in the foil with a skewer. Place directly on the coals or your “flavor bars” over the lit burners on your gas grill. Use the same heat – 425F degrees.
wing Sauces X3!
We promised three sauces, and these are easy, so here you go:
Classic Buffalo
Ingredients
1 stick of butter
1 cup of Frank’s Red Hot Sauce
1 T of Brown Sugar
1 T Minced Garlic
Melt 1 stick of butter and whisk up with 1 cup of Frank’s Red Hot sauce. Place back on low heat until it bubbles a bit, then whisk in 1T brown sugar and 1T minced garlic (Ok yeah, technically this is garlic Buffalo, but don’t bust us. It’s fantastic!). Toss with the wings hot off the grill and serve. Don’t forget the ranch or blue cheese dressing for dipping!
Korean Sticky Heat
This one is so yummy – hot/sweet umami bomb!
Ingredients
1/2 cup soy sauce
1/4 cup honey
1/4 cup ketchup
2 T Canola Oil
1 T Goshujang or Sambal Oleek
2 cloves of garlic mashed (or 1 tsp minced garlic)
1 1/2 tsps of ginger paster puree
1/2 tsp Asian Fish Sauce
1/2 tsp Asian sesame oil
In a saucepan over medium heat, mix ½ cup soy sauce (we like the low sodium variety), ¼ cup honey, ¼ cup ketchup, 2 tablespoons canola oil, 1 tablespoon Gochujang or Sambal Oleek – both of these are Asian chili pastes that add heat and flavor, 2 cloves of garlic mashed (or 1 tsp minced garlic), 1 ½ teaspoons of ginger paste/puree, ½ teaspoon Asian fish sauce, ½ teaspoon Asian sesame oil.
Let simmer for a few minutes to blend flavors, then toss with the wings. Extra napkins and maybe some wet wipes for the sticky hands on this one!
Garlic Parm
This recipe is so simple but so good.
Ingredients
1 stick of butter
2 tsp minced garlic
1 tsp seasoning salt
3-4 T of grated parmesan cheese
Melt one stick of butter to bubbling, add 2 tsp minced garlic and simmer for a minute or two to “bloom” the garlic. Add 1 tsp seasoning salt, then remove from heat. Toss the wings in the butter and garlic mixture, add 3-4 tablespoons of grated parmesan cheese, and toss well. Serve!
By the way, if you decide to make the wings in the oven or deep fryer, of course, these sauces will work well there, too!
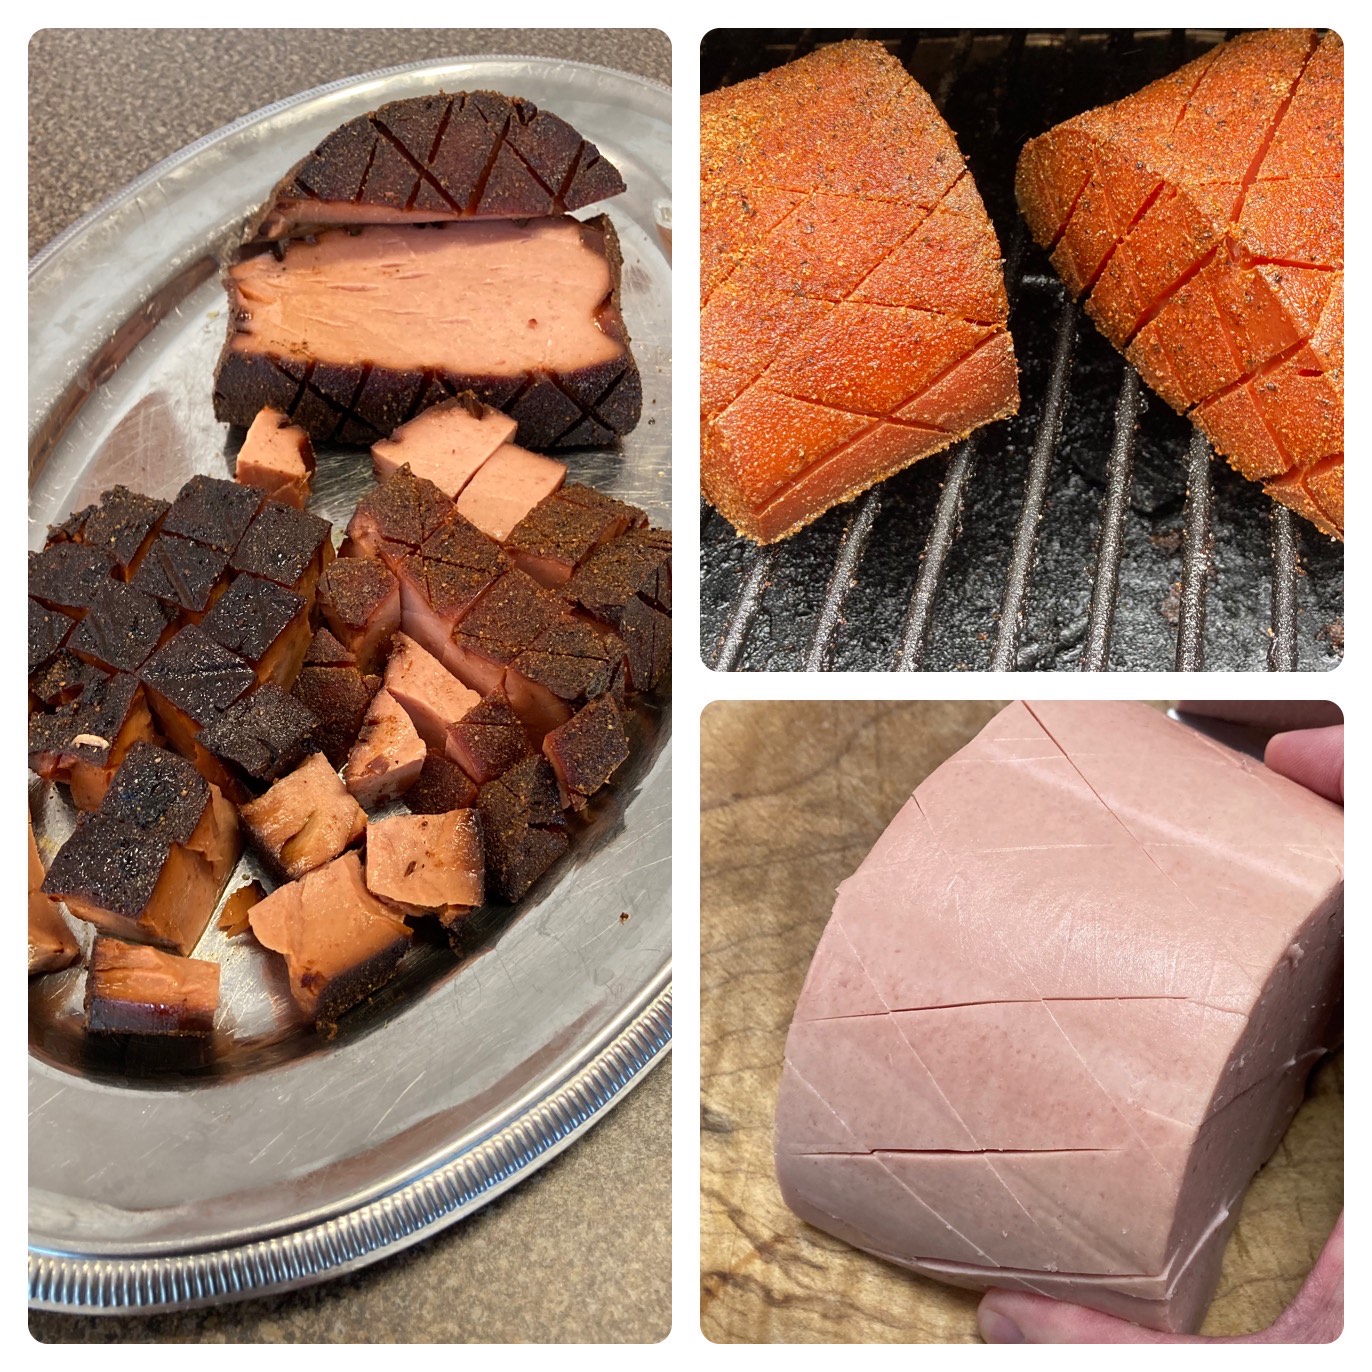
smoked BBQ Baloney!
Yeah, we said that. You may know this recipe by a few other names like “Redneck Ribeye” and “Poor Man’s Prime Rib,” but what it is, is simply delicious! And ridiculously easy to do.
BUY: Go to your local grocery’s deli counter and ask for a 4 to 6-inch piece of their slicing bologna (or baloney if you prefer) whole – people call this a baloney “chub.” You don’t want it sliced! They might look at you funny but roll with it! We have found that the Eckrich brand works really well but just buy whatever you like.
PREP: Fire up your pellet grill with Griller’s Gold pellets of any kind and preheat to 250 degrees F. Take your “chub” and split it in half so that you have two “half-moon” shaped pieces, then using a sharp knife, cut a ¼” or so deep crosshatch pattern into the round surfaces of it. Slather it with yellow mustard (just good ol’ hot dog mustard is fine) to give your rub something to stick to, then cover it well with your favorite barbecue rub.
COOK: Onto the pellet grill it goes – we like to smoke it for 3-4 hours at 250. There really is no “done” point on this – it’s ready when you decide to pull it off and eat it!
SERVE: Cut the BBQ Baloney into bite-sized cubes, making sure that each cube has a bite of bark on the outside. It’s a bit of a geometry puzzle, but we’re sure you’ll figure it out!
Lay them out on a platter with some toothpicks. We also like to offer a few dipping sauces – BBQ sauce, some spicy, grainy mustard, maybe a hot sauce! And this is way good with the leftover Korean Sticky wing sauce above.
NEXT LEVEL: These are fantastic when made into sticky burnt ends – just mix ¾ of a cup of your favorite barbecue sauce with ¼ cup of honey. Toss together with the cubed-up baloney and then put in a foil pan (if using the grill) or baking dish (if indoors) and bake at 325~350F degrees for 20 minutes to caramelize the sauce.
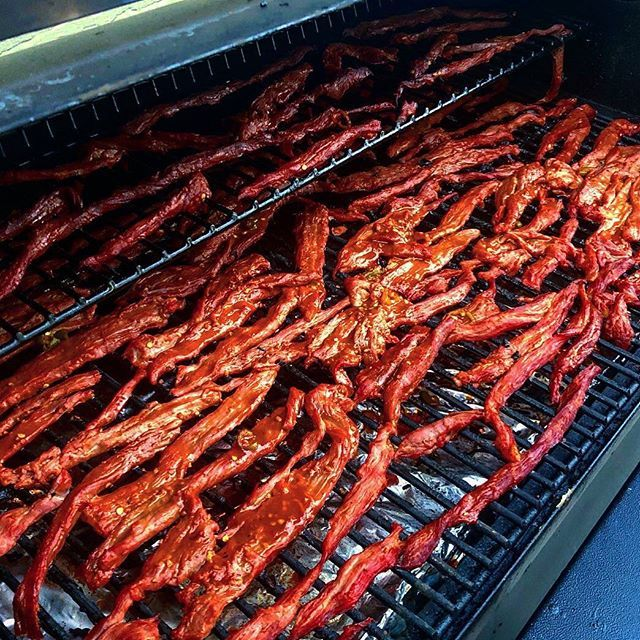
Beef Jerky, smoked the easy way!
Beef Jerky is SO easy when you have a thermostatically controlled pellet grill – and you get that fantastic wood flavor from those Griller’s Gold 100% Hardwood pellets. Usually, when we make this recipe, we make it from scratch, but this is a faster recipe that uses some commercial products to get the job done. Now that said, this does require an overnight step and a relatively lengthy cook but, well worth the reward!
BUY: 2-3 lbs of beef flank steak
PREP: Remove the beef from the package and lay it out in a single layer on a platter, plate, or baking sheet. Next, put the pan into the freezer for about 20 minutes to make it easier to cut the meat up.
After the freezer rest, cut the steak into serving-sized strips with the grain of the meat. Marinate overnight in a good-quality Asian teriyaki-style sauce. Our favorite is Soy-Vey Very Teriyaki, but feel free to use your favorite.
COOK: Preheat your pellet grill to 180 degrees for 15 minutes. Place the strips of meat on the grill crossways to the grid bars (don’t want them to fall through!), close the lid, and go away for 2 ½ hours. At 2 ½ hours, go check them – you’re looking for well-dried strips of beef that still have a bit of tenderness on the bite. They will be a bit sticky. This cook usually takes us between 3 and 4 hours.
Remove from the grill, cool to room temp and serve. Don’t be surprised if your friends snarf them all up! Save any leftovers (IF there are any!) in a zip lock bag in the fridge for up to a week.
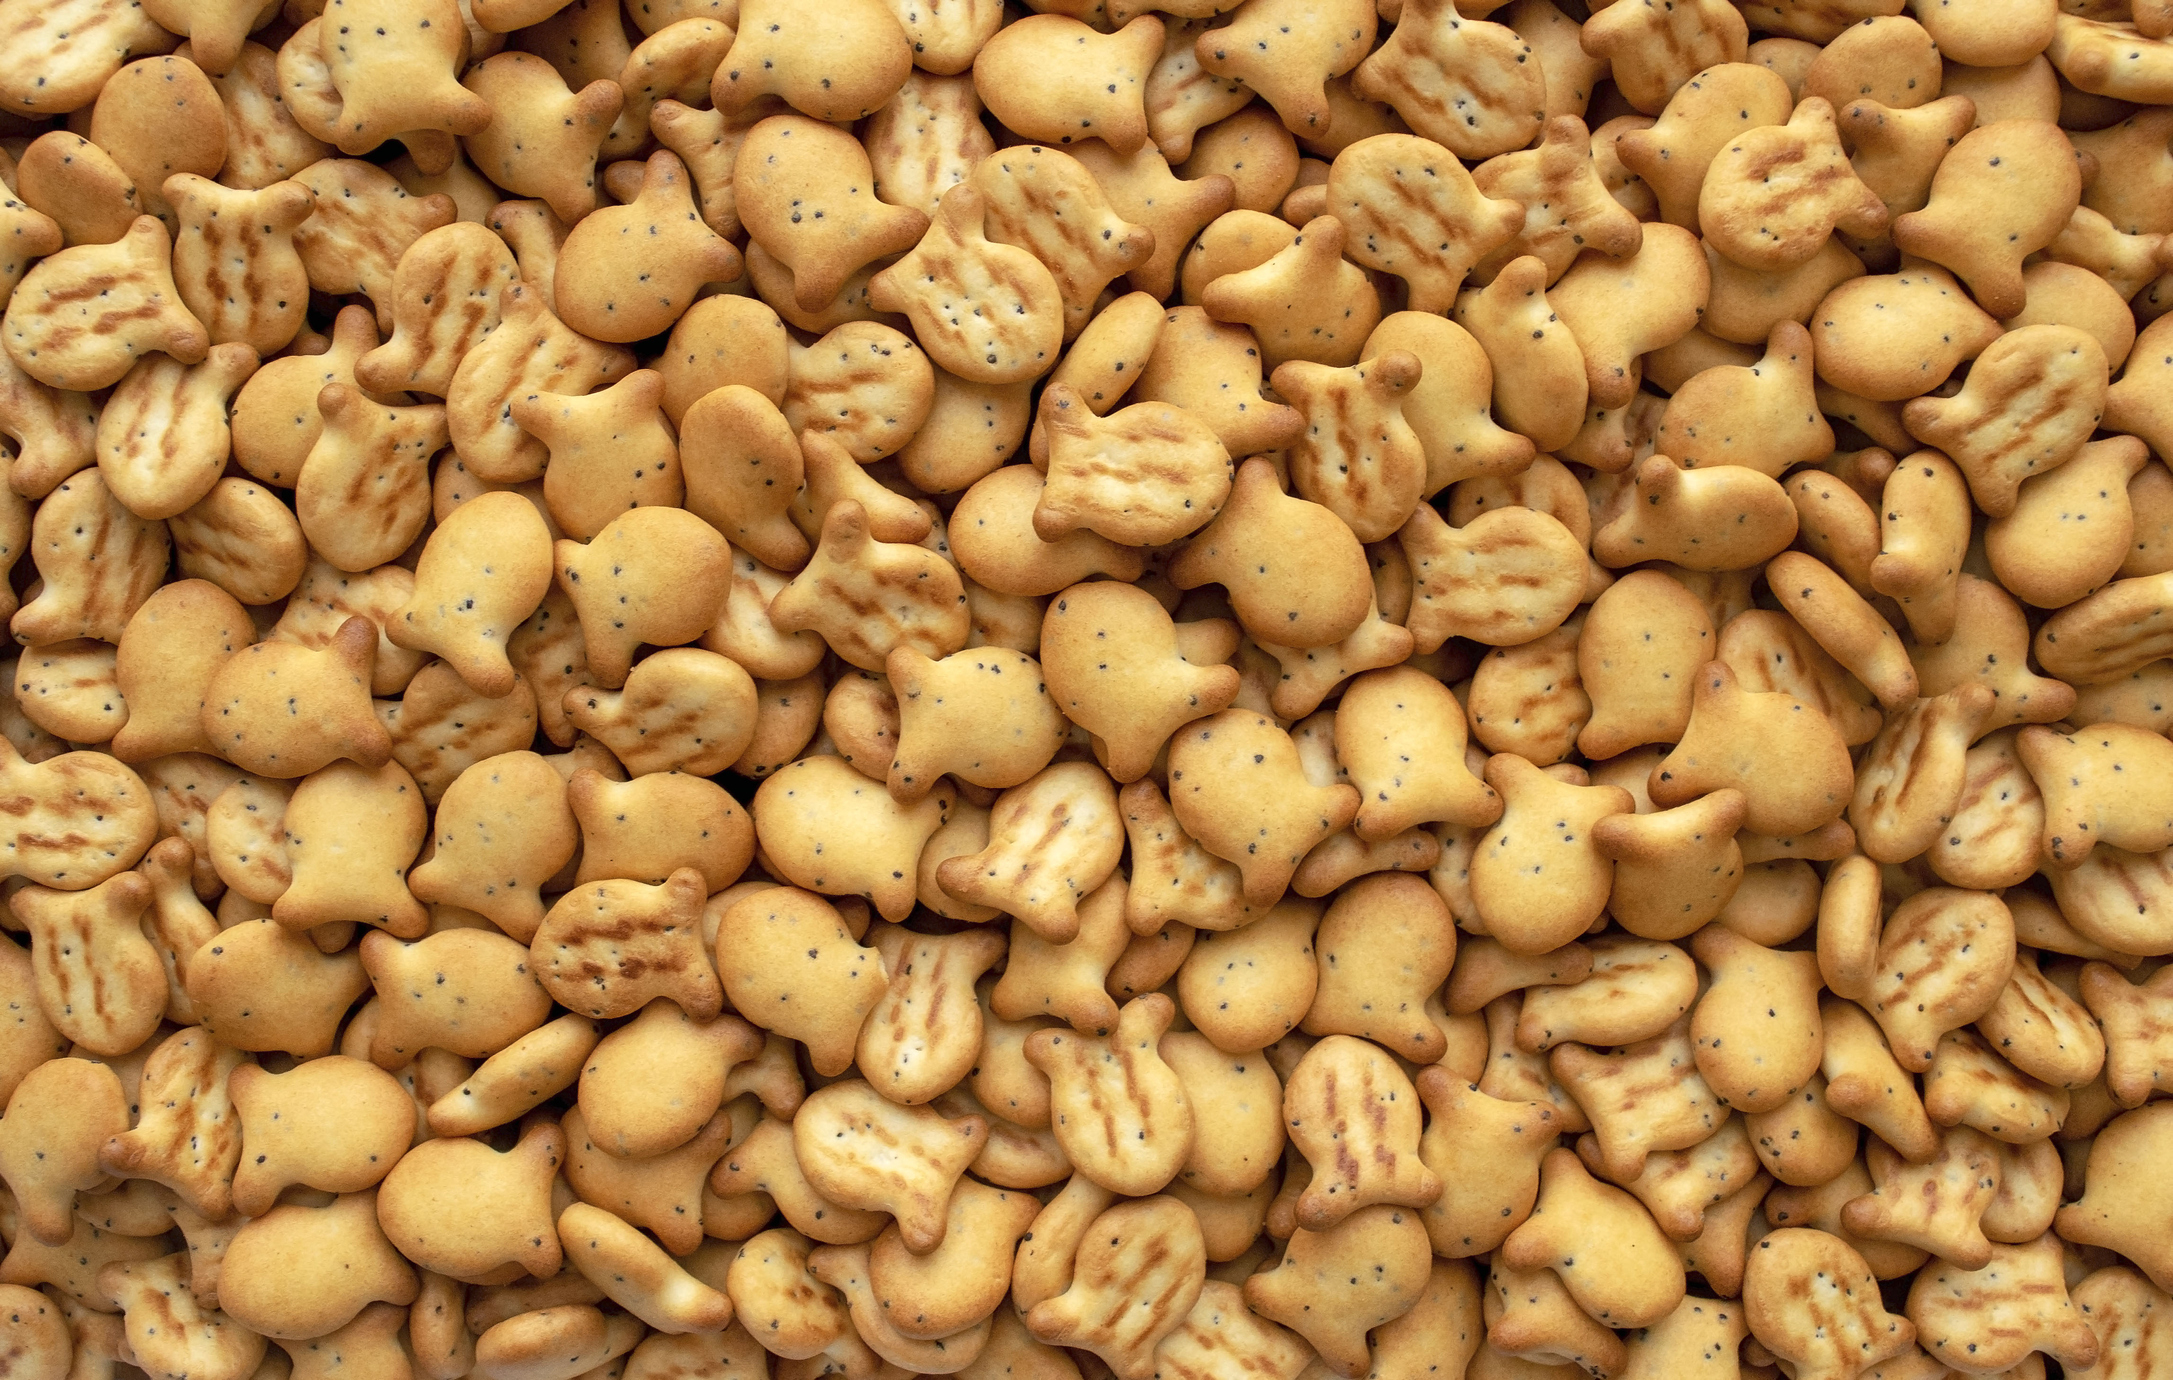
This is a super easy smoker recipe! Toss one bag of Goldfish crackers or a regular-sized box of cheese crackers with a ¼ cup of cooking oil mixed with 1 tablespoon of Worcestershire sauce, 1 teaspoon each of garlic powder, onion powder, and paprika. If you want heat, add ¼ t of cayenne pepper.
Spread in a foil pan and put in the smoker for an hour, stirring every 15 minutes. Temperatures are ok from 180 to 250 on these as well. Absolutely delicious!
Smoked Nacho Cheese Tortilla Chips
These are even easier! Spread a bag of nacho cheese flavored tortilla chips out on a sheet pan and slide them into your pellet smoker at 180 degrees – let them go 1 hour, stirring every 15 minutes.
You’ll never eat another “straight from the bag” nacho cheese tortilla chip again. It also works great with potato chips, especially cheese flavored.
Smoked Queso Dip
This kind of dip has been quite the rage of late in the BBQ social media forums and it’s quick and easy to prepare, too.
There are a thousand different recipes for this online.
Here’s the one we’ve found to be the best combo of easy and tasty:
Taco Meat or Chorizo smoked Queso Dip
Using a prepared taco seasoning and ground beef, prepare 1 lb. of taco meat to the instructions on the package. You can also substitute crumbled chorizo sausage, browned and drained. For this recipe, use a ½ pound of the taco meat or browned chorizo.
1 can Rotel tomato/chile pepper mixture
1 cup diced raw onion
1/2 cup diced pickled jalapenos (can be omitted if desired)
20 ounces of Velveeta cheese cut in 1” cubes (note – regular cheese like cheddar will not melt evenly enough for this, you need the pasteurized process cheese to work right)
⅔ cup of sour cream
Mix together the prepared taco meat, the Rotel, onion, and jalapenos or chiles and spread out in a foil pan, then scatter the cubed cheese over the top. Smoke for 45 minutes at 250 degrees, stirring every 15 minutes, then stir in the sour cream and smoke 15 minutes more. Serve hot with tortilla chips and enjoy!
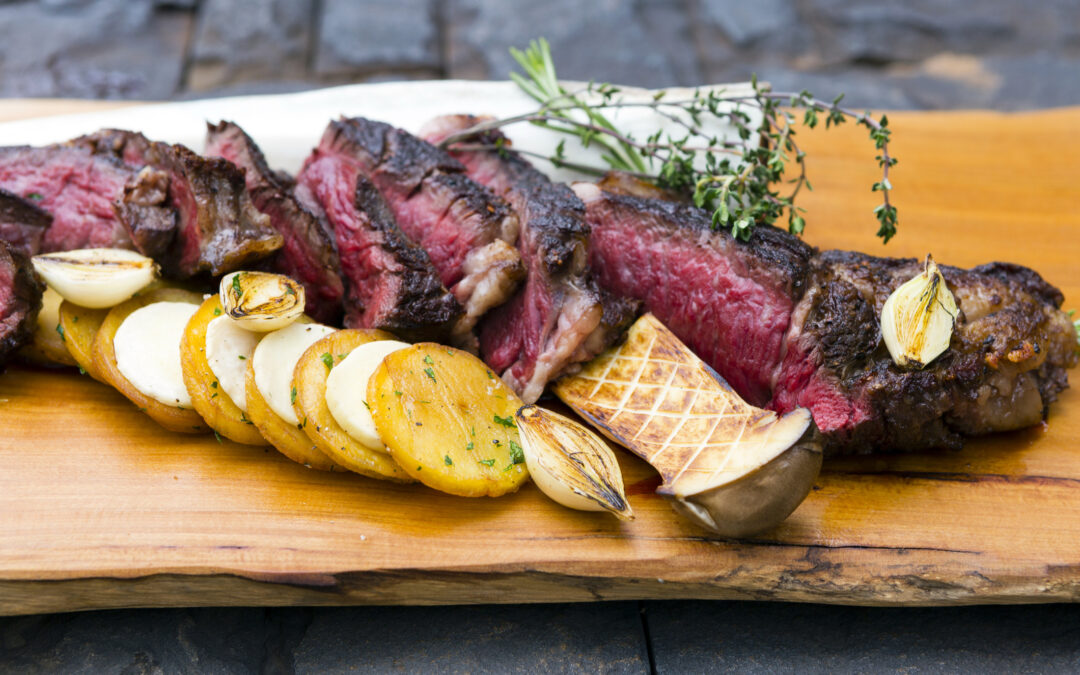
Anyone who has cooked a decent amount of time may know the basic technique of searing a cut of meat, fish, or poultry. The way to seal the outside, color it, and give it flavor – then cook it until done.
It’s a simple technique – and probably the way we all first learned to do the two-zone grilling. Cold meat on hot fire, a couple minutes on each side to “seal it” and brown it, and then move it to a cooler part of the grill to slow down the cooking and allow control of the heat to perfection.
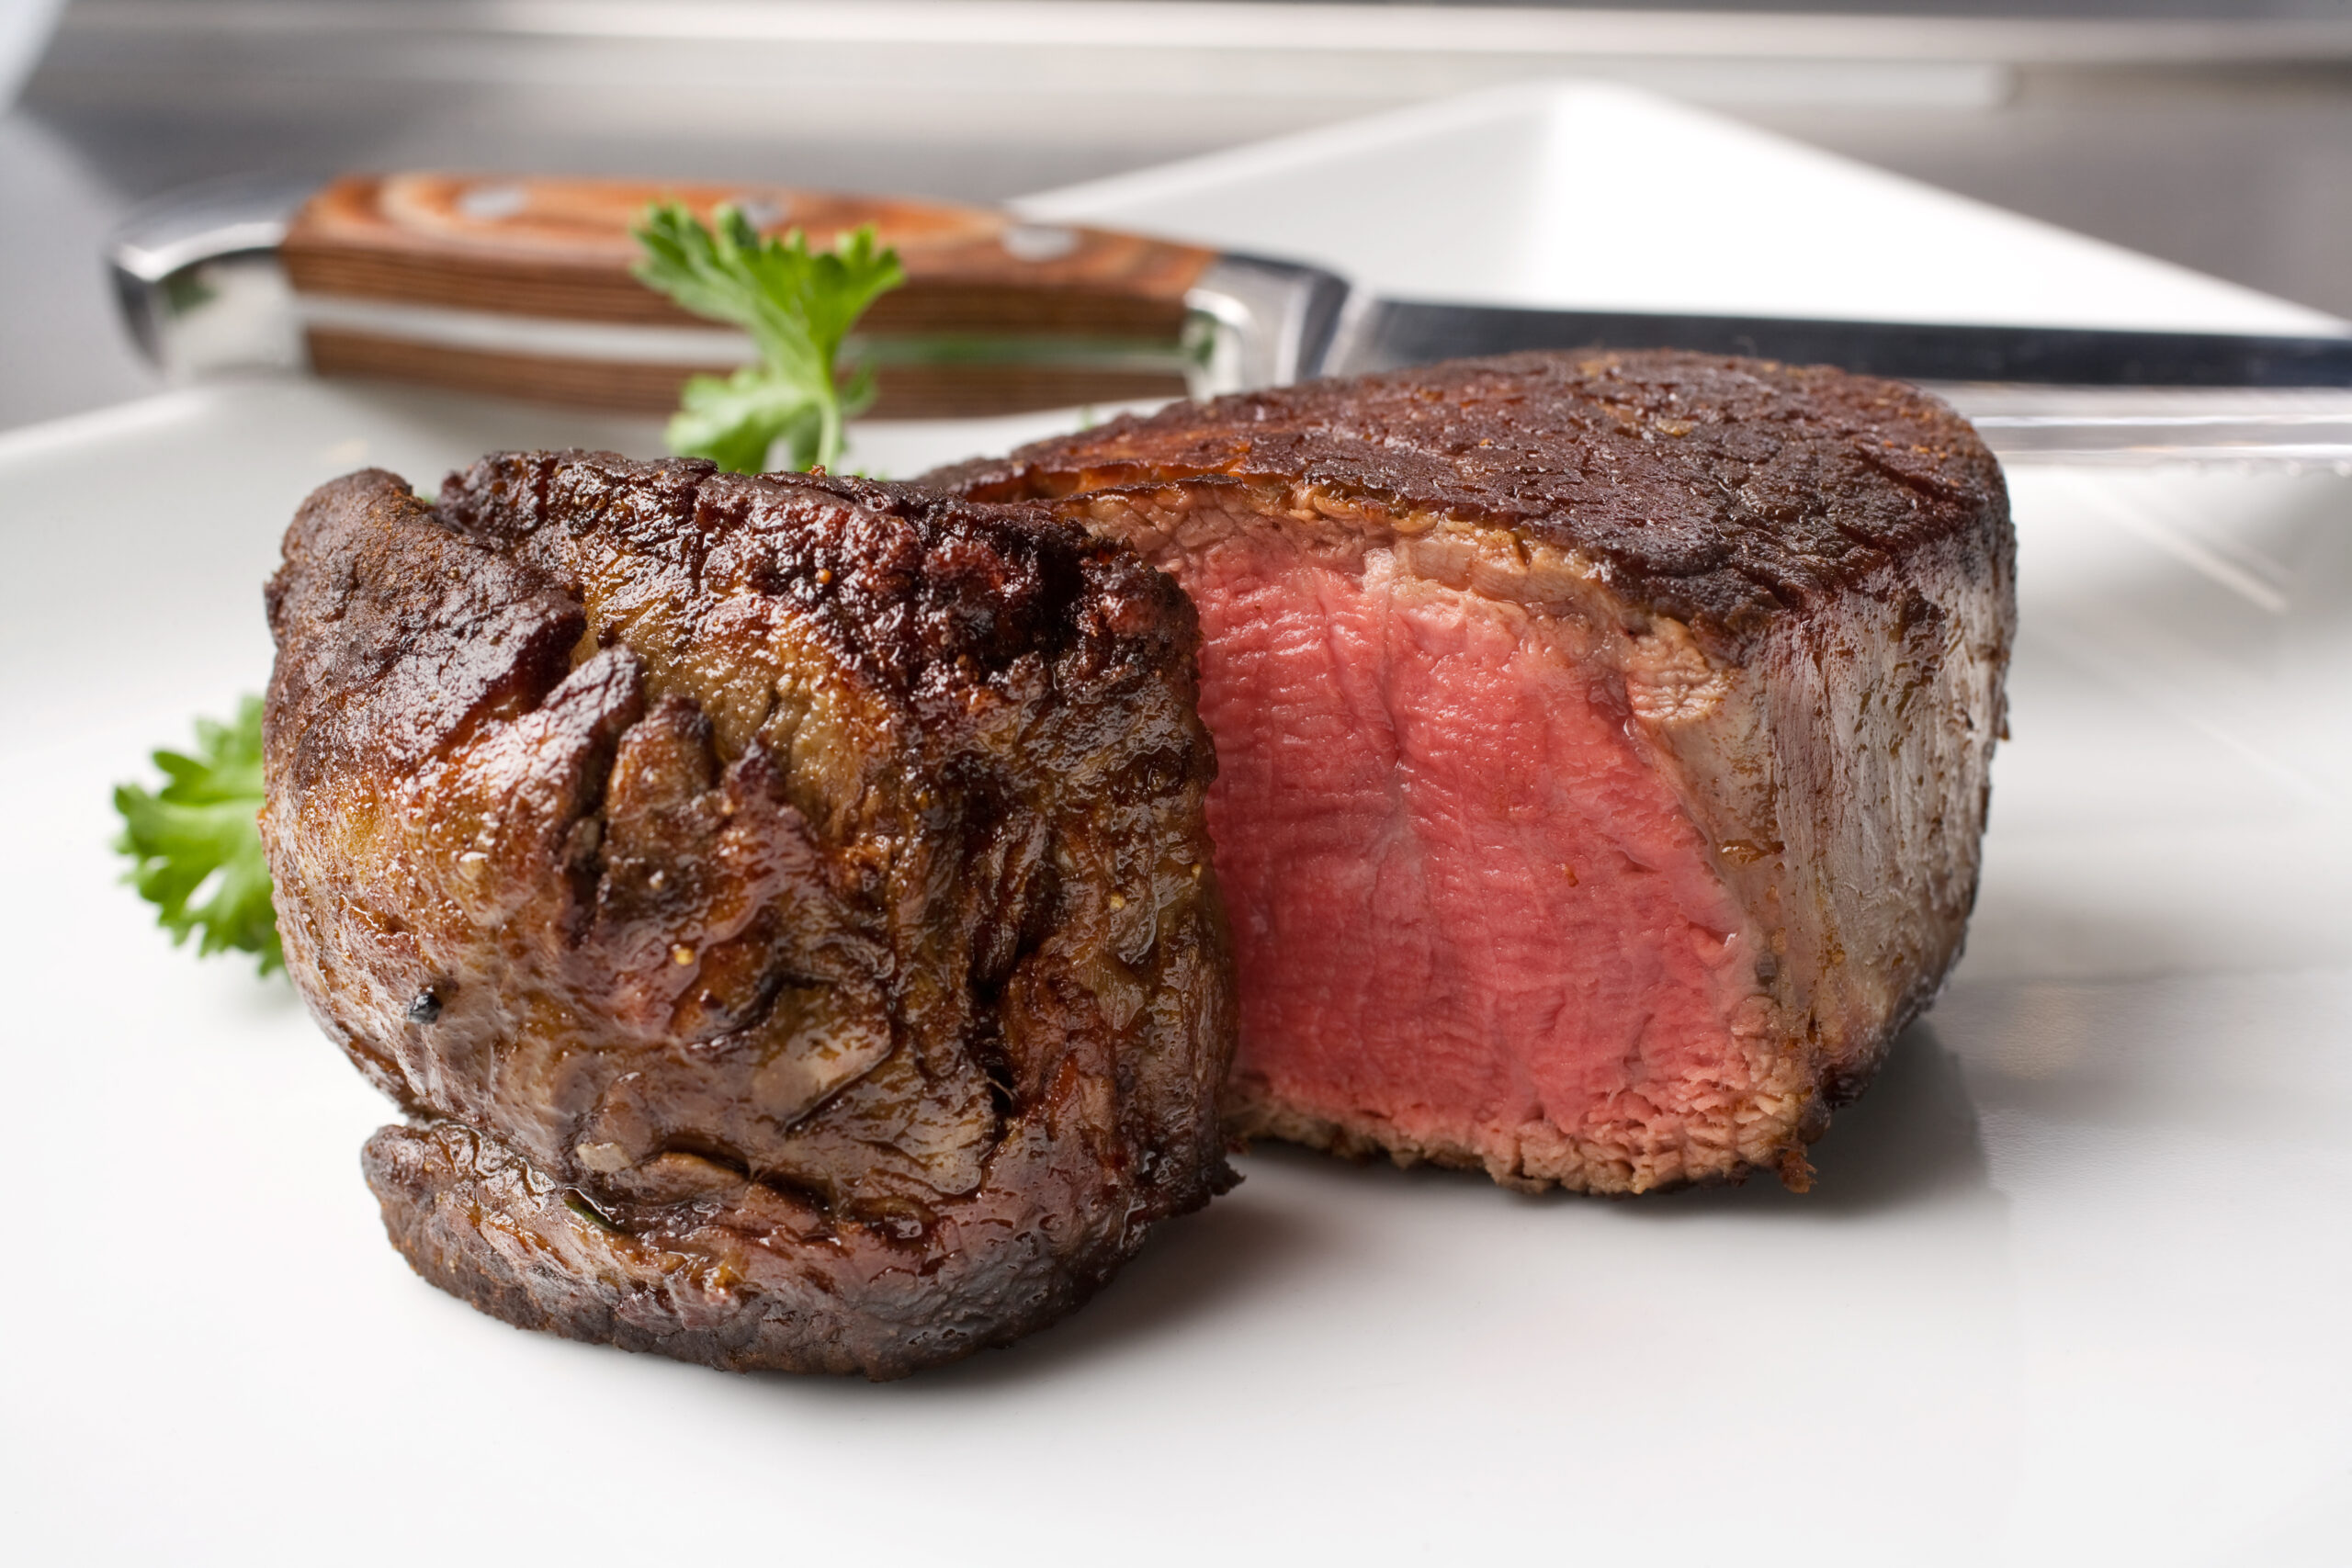
The problem with the sear-first method, is that you wind up with meat that has a nice pleasing crust on the outside, but when you slice it open, you’ve got a pretty deep overcooked “gray zone” and the only part of your cut of meat that’s perfectly done is the deep center, like shown below.
If you like your steaks medium-well to well done, that’s probably not something you care about. But if you like it from rare to medium, don’t you wish there were a better way?
There is a better way
The better way is “reverse sear” and it’s a simple concept when you break it down. All you’re doing is reversing the process – you cook slowly over indirect/more gentle heat, then when the meat is ALMOST done, you crank the heat up or move your meat over the direct heat source, give it a fast sear, and boom, you’re done!
The result is nothing less than spectacular – you still get your crust, but your “perfect zone” is basically edge-to-edge. It looks like this:
Doesn’t that look AMAZING?
First, You may ask…
So the first question people may ask is if searing overcooks the meat, should we skip that step?”
Oh, no, no, no, NO!
Some cooking science here – that searing and the pleasing browning on the outside is called the Maillard reaction, and yeah, that’s a fancy French term. The science is pretty simple – it’s the caramelization reaction of proteins with carbohydrates. Toasting bread is actually a Maillard reaction and of course, is delicious.
So yeah, we’re going to sear it. But only when it’s just about ready to serve.
There’s also one great advantage of reverse searing, and that’s timing. If you’re like us, you like being a guest at your own dinner parties – rather than being tied to the grill. With reverse searing, you can “pause” the action because you only sear right when you’re about to serve! You can hold the meat up to an hour prior to serving as long as you have it covered up.
Expert Tip:
One key thing about reverse searing – you’ll need to be able to measure the temperature of your meat.
Remote probe barbecue thermometers are ideal for this, as are the “onboard” probes that some grills come with (just know how accurate yours is before you trust that $75 prime cowboy ribeye to it!). And of course, instant reading thermometers work great for this. If you’re a “by touch” barbecuer, this may not be the technique for you. Learn more about bluetooth thermometers here.
So, how do I reverse sear, and what should I reverse sear?
Well, as luck would have it, chances are if you’re reading this blog, you own a pellet grill, and pellet grills are tailor-made to make it easy to reverse sear because they have thermostatic control. And, as luck would also have it, pellet grills, especially when fired up with Griller’s Gold 100% premium BBQ pellets also give your food a delicious wood-fired grill flavor. You’ve got the perfect combo for reverse sear glory!
What to Reverse Sear:
Reverse sear works best with thicker cuts of meat – think 1 ½” or more in thickness. And honestly, the thicker the better.
In terms of which meats, we’ve found that this works best with pork, beef, and lamb, as well as game meats like venison, elk, and exotic meat like ostrich. Because you need to thoroughly cook poultry, this is not a recommended technique for chicken, turkey, and the like. Also, fish don’t do great with this technique either.
Using a pellet grill, performing this technique couldn’t be easier.
Start with your nice, thick piece of meat – a pork loin roast, a 2 ½” thick ribeye steak, thick New York strips, Picanha, lamb racks, leg of lamb, etc. You’ll season it and whatnot (see below for Reverse Seared Ultimate Ribeye Steaks). Fire up your pellet grill with your favorite Griller’s Gold pellets (we love Smokeshack Blend for cuts of meat like this!) and let it preheat at least 15-20 minutes at 250 degrees.
Put your meat on the grill, and close the lid. For the best, most even results, you’ll need to periodically turn the meat, since the heat from pellet grills radiates upwards – how often will depend on how thick your meat is.
We like to turn big chops, steaks, and lamb racks about every 10 minutes. For 3” or thicker pork loins or things like legs of lamb or smaller beef roasts, we turn them about every 15 minutes. And for something like a prime rib, if it’s bone-in, we don’t turn it, and if it is boneless, we turn every 15 minutes or so.
You’re cooking until your meat is just short – 5 to 10 degrees – of the ideal doneness temperature.
Here’s a quick temperature chart as a guideline.
Doneness Level
Final Internal Temp
Reverse Sear Temp
Very Rare
120F
113F
Rare
125F
118F
Medium Rare
130-140F
123F-132F
Medium
141-150F
132F-142F
Pork
145F
135F
How long does this take?
The answer is “well, it depends!” and it does – on the thickness of your meat, whether it’s cold and windy outside, etc.
Some rules of thumb though – we find 2 ½” thick ribeyes take about 40 minutes to reach about 120 degrees (we like our steaks on the rare side of medium-rare), a 3-4” thick pork loin will take more than an hour to get to 138, and lamb racks (which we like just short of medium) take about 45 minutes to get to 130F. But again, you have to cook by temperature here, not by time, and not by feel.
When your meat hits the desired temp, take it off, put it on a pre-warmed platter (doesn’t have to be hot, but shouldn’t be ice cold either), put foil over the meat, and then we like to cover it with a doubled towel. We want that meat to rest but also to stay cuddly warm while you get ready to sear.
Now…we sear!
Whether you stay on your pellet grill for searing depends on if your pellet grill will hit a good searing temperature (at least 450 degrees) and if you have a good searing surface.
We have found that pellet grills, with their indirect heat nature, do a better searing job if you use something like a cast-iron skillet, a cast iron griddle, or, our favorite searing surface, GrillGrates searing grates. Those will concentrate the grill’s heat and deliver a better, darker crust for your meat.
Many pellet grillers don’t like to crank the heat that high on their pellet grills – if that’s you, then you have a lot of options – preheat a cast-iron skillet in a 450-500F oven and sear it there, fire up your gas grill and sear it there, and if you’re a real purist (and especially if you’re already fired up and cooking other things on it) … nothing beats a good charcoal sear.
Expert Searing Tips:
The searing is easy – with few good hints:
Only start searing when you’re within 15 minutes of wanting to sit down to dinner. We like to have everything ready to serve, then we start searing. We want to serve hot off the sear.
When using a grate like GrillGrates, your standard pellet grill’s grates, or the grates on a gas grill, keep turning the meat every 2 minutes and each time you do, turn it ¼ turn as you flip it. That will get you those nice cross-hatched grill marks.
If you’re using a cast iron skillet, whether on your pellet grill or inside the oven, again turn frequently but also don’t be afraid to press down on your meat a bit to ensure the surface really flattens against that hot metal.
If you’re using the “cast iron in the oven” method, return the pan to the oven in between turns.
Generally speaking it will take a pellet grill about 15 minutes or so to go from 250 to 450 or 500 degrees. If you’re in a hurry, do this in the oven with the cast iron skillet – and just have it preheated and ready to go.
Fats and oils – if you’re doing a cast iron reverse sear, dip thickly folded up pad of paper towel (or a cotton kitchen towel) in some cooking oil, and give the surface of the pan a fast wipe – you want a bit of oil but not so much that it will catch fire. There WILL be smoke, so be sure to have your vent fan running if you have one.
When is it done?
Well, of course, you can check the temp, which is what we do. But a good rule of thumb is pretty simple – between 5 and 8 minutes total time – you’re looking for a nice dark surface and beautiful appearance.
And because your meat is already rested, you’re ready to serve right off the grill or out of the pan.
As promised, here’s our recipe for ultimate reverse-seared Ribeye Steaks:
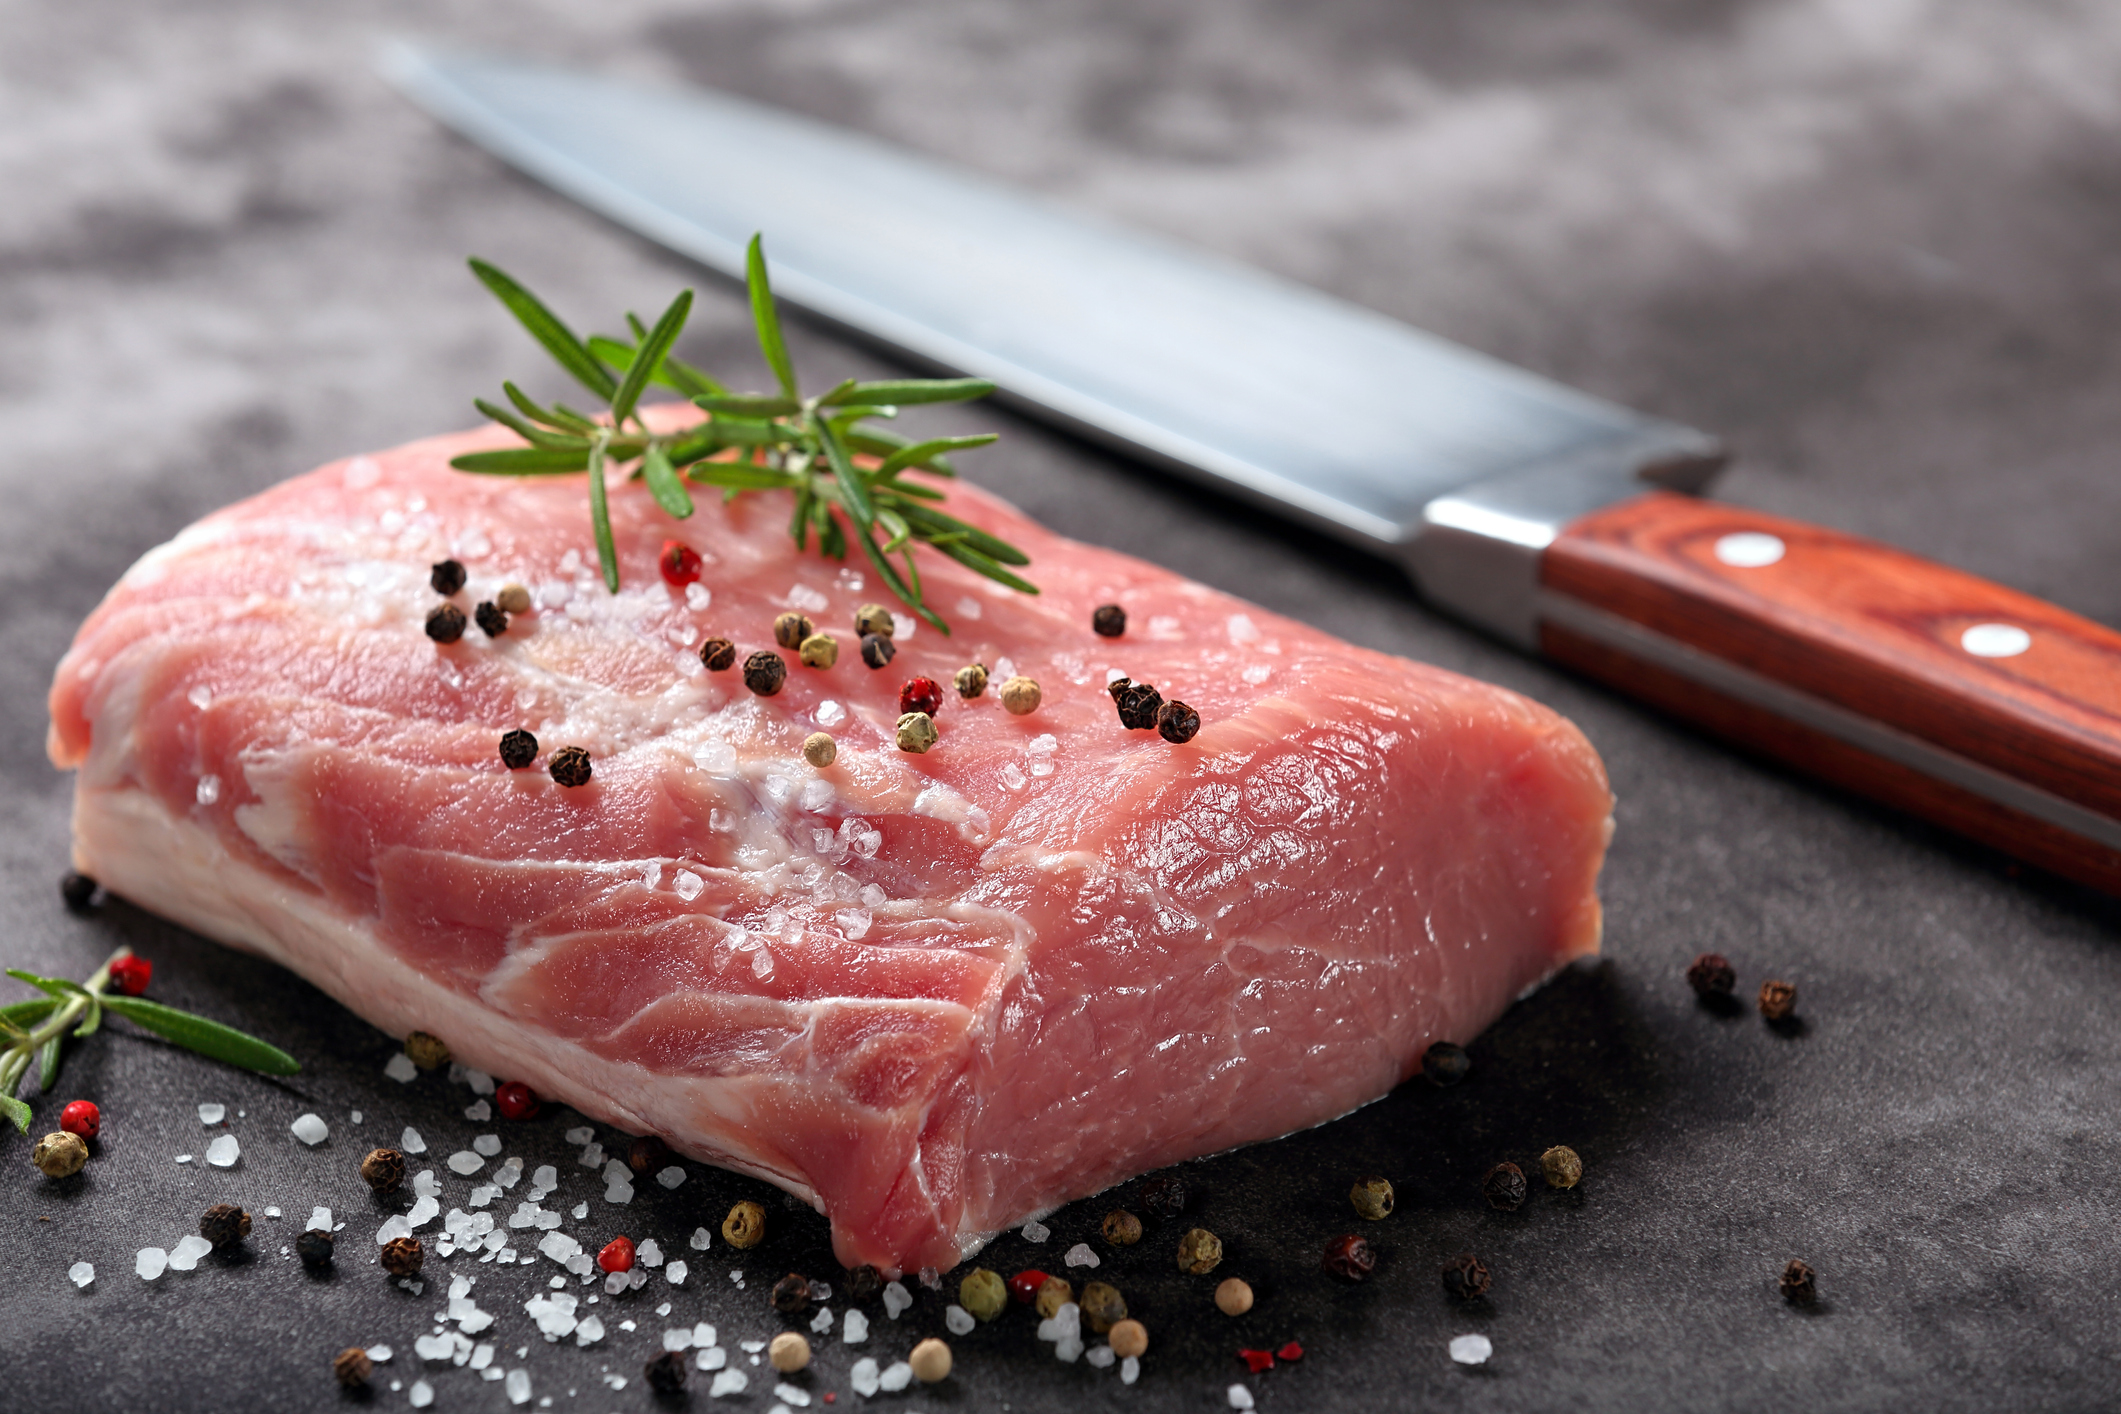
Buy: Bone-in or Boneless Ribeye steaks, at least 2” thick, 2 ½ inches is best. Buy the best you can afford – choice or prime grade works great for this.
Trim: Trim the edges of any large amounts of hard, white fat. Ribeyes will generally have a pocket of it between the cap and the center meat and that’s fine. That’s flavor!
Seasoning: Our secret method is to “dry brine” the steaks 24 hours before cooking. Take them out of the package, put them on a rack on a large baking sheet, give them a generous coating of coarse-grained kosher or sea salt and then put them in the fridge unwrapped overnight.
Take them out about 1 hour prior to cooking and let them rest on the counter (but make sure the dog won’t get them! Ask us how we know!). Then just before cooking, we like to rub them with a tablespoon or so of Worcestershire sauce per steak, then sprinkle on a generous hit of freshly ground pepper and a shake of granulated garlic powder.
Cook using the reverse sear method outlined above.
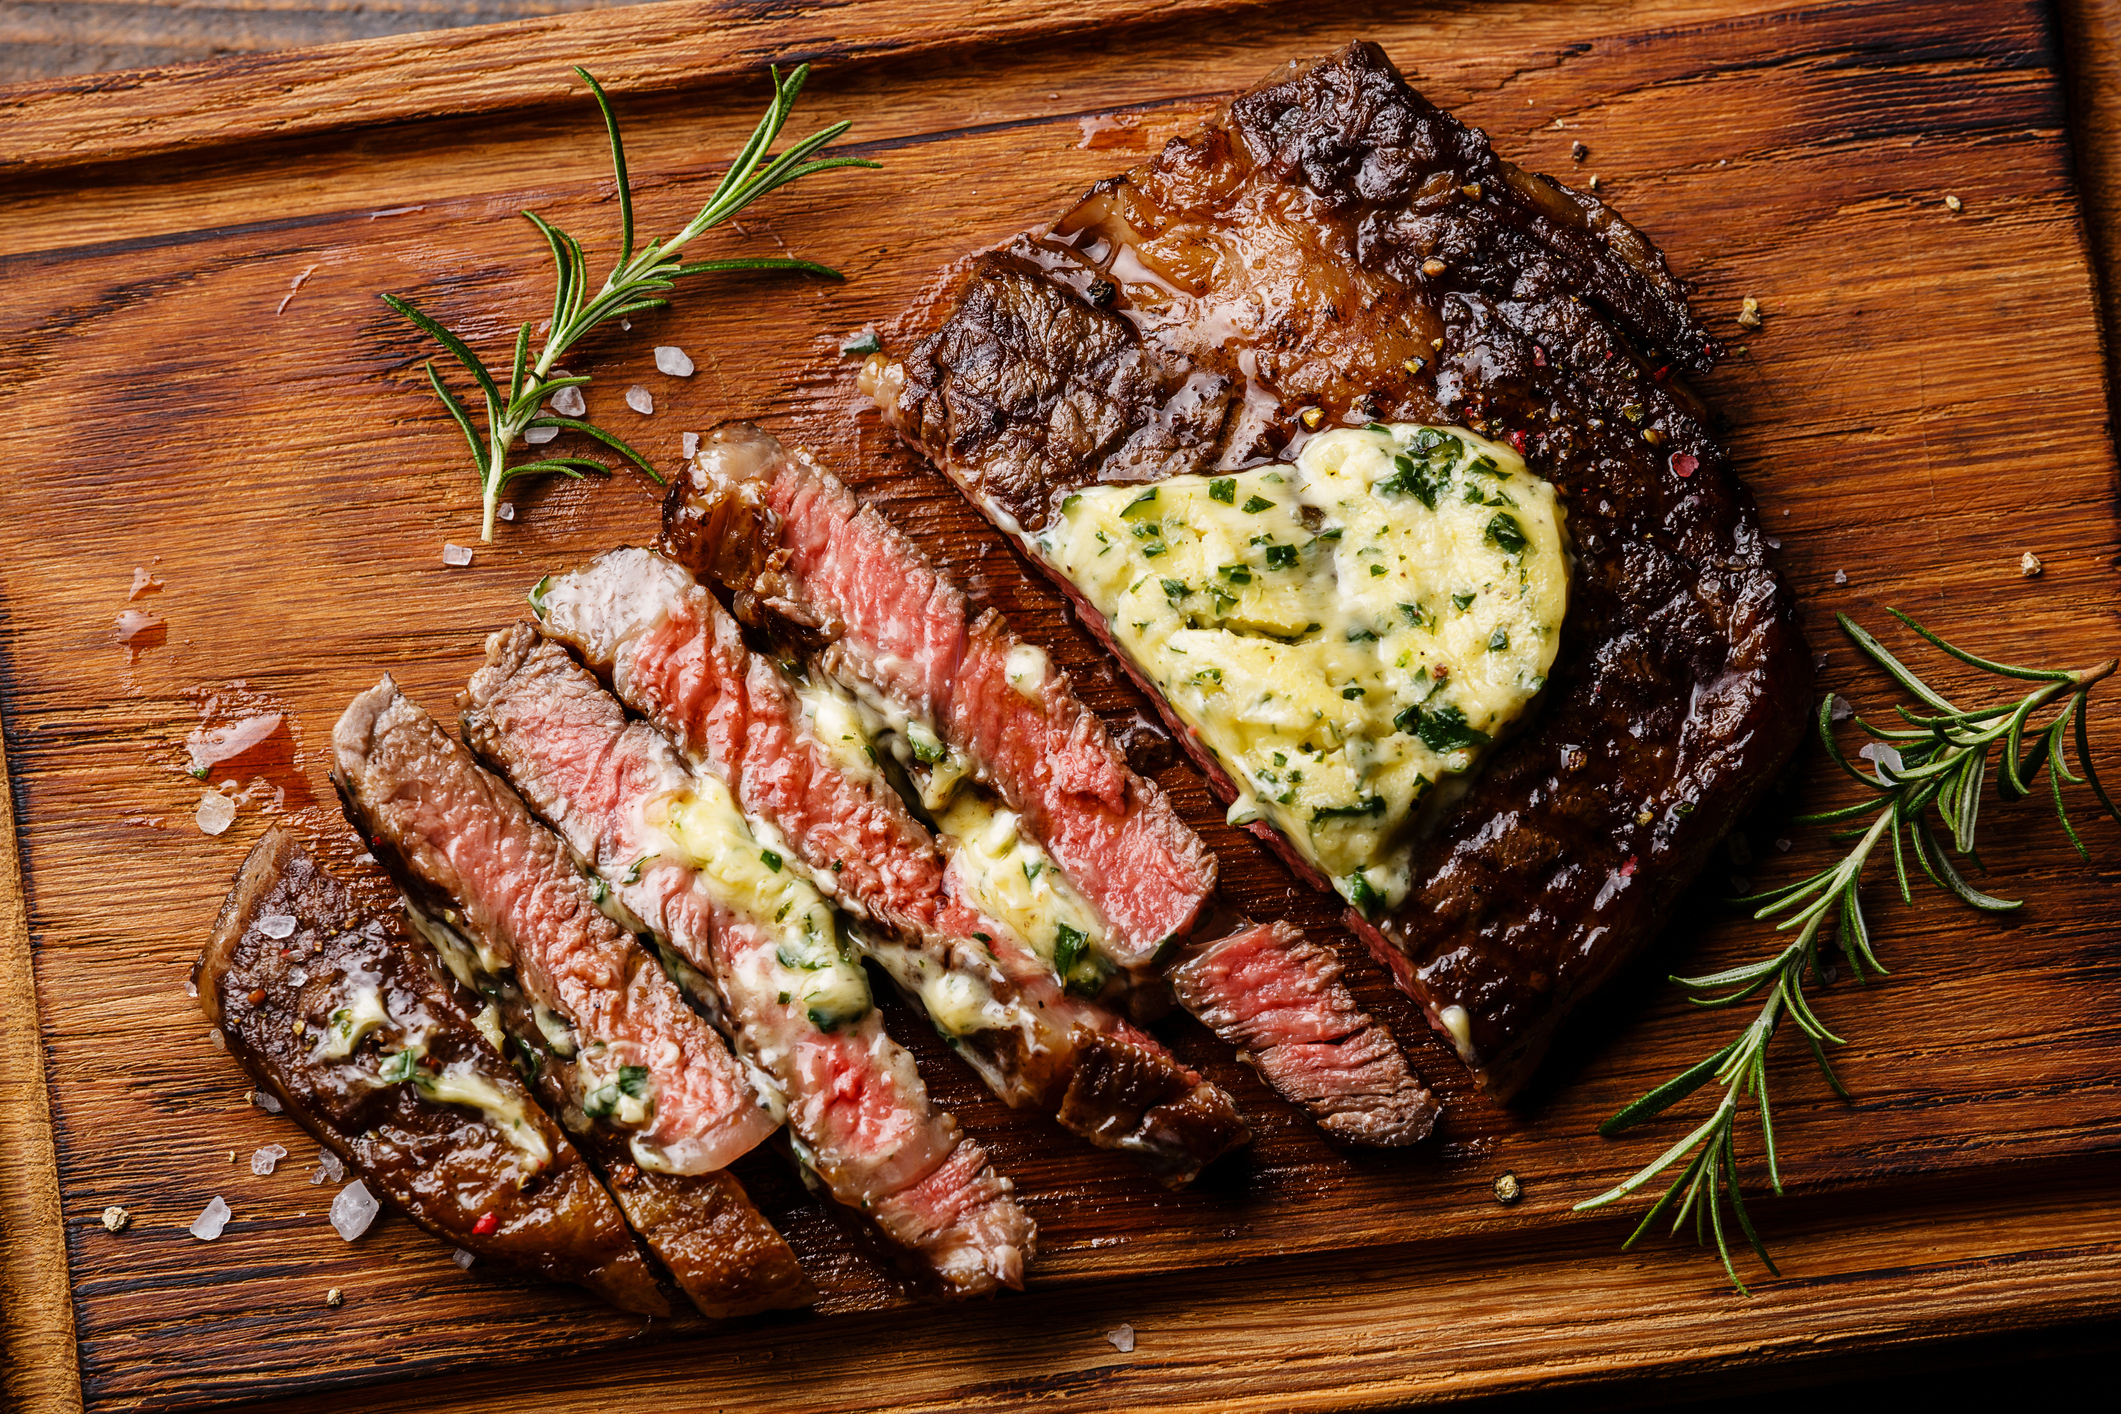
Compound Butter: While the steaks cook, prepare a compound butter using a stick of softened butter, 2 cloves of fresh garlic – minced or pressed, 1 ½ t fresh thyme leaves (or ½ tsp dried), and ½ tsp freshly ground pepper. Mix up well and set aside.
Sear using one of the sear methods above.
As it comes off the grill or out of the pan, top each steak with a generous spoonful of the compound butter and let it melt over it.
Then slice across the short dimension of the steak in ¼ inch thick slices and serve! For sides consider creamed spinach, roasted mushrooms, and gratin potatoes for an ultimate steakhouse feast!
And that’s it! Now you’re ready to be a pro reverse sear chef!
Most people when they think of using their wood pellet grill smoker only think in terms of classic barbecue fare – smoked meats, typical sides, etc. But that hot chamber with its wafting and tasty smoke can also be used to make some delicious snacks. Like anything done in the smoker – all it takes is time, some tasty seasonings and the heat and smoke from your smoker, fueled of course, by Griller’s Gold natural hardwood pellets.
Dry Smoke is Key for Smoky Snacks
One thing to keep in mind on these recipes – these are all designed for DRY smoke – if your smoker has a water pan in it, don’t fill it. That may make heat control more difficult, but thankfully these recipes are not very temperature sensitive. Additionally, these are great “extra space” recipes in your smoker – if you’re doing a long smoke of something and you have some room, put one of these in and make some extra treats – again, provided that you’re doing a dry smoke like on a pellet grill fired with Griller’s Gold pellets.
Also, note the recipes below don’t have a recommended type of Griller’s Gold pellet – that’s because all the flavors will be good with these – just use what you have on hand or what you’re using already in your smoker.
Here’s a few ideas that will be a hit at your next party – all of them are very easy and completely delicious!
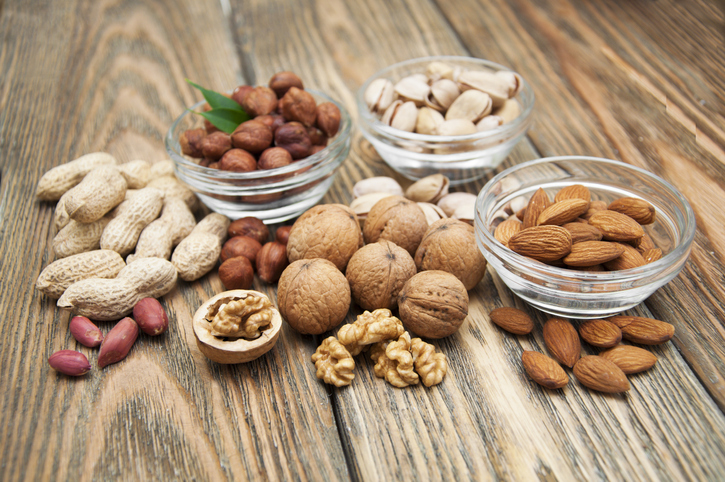
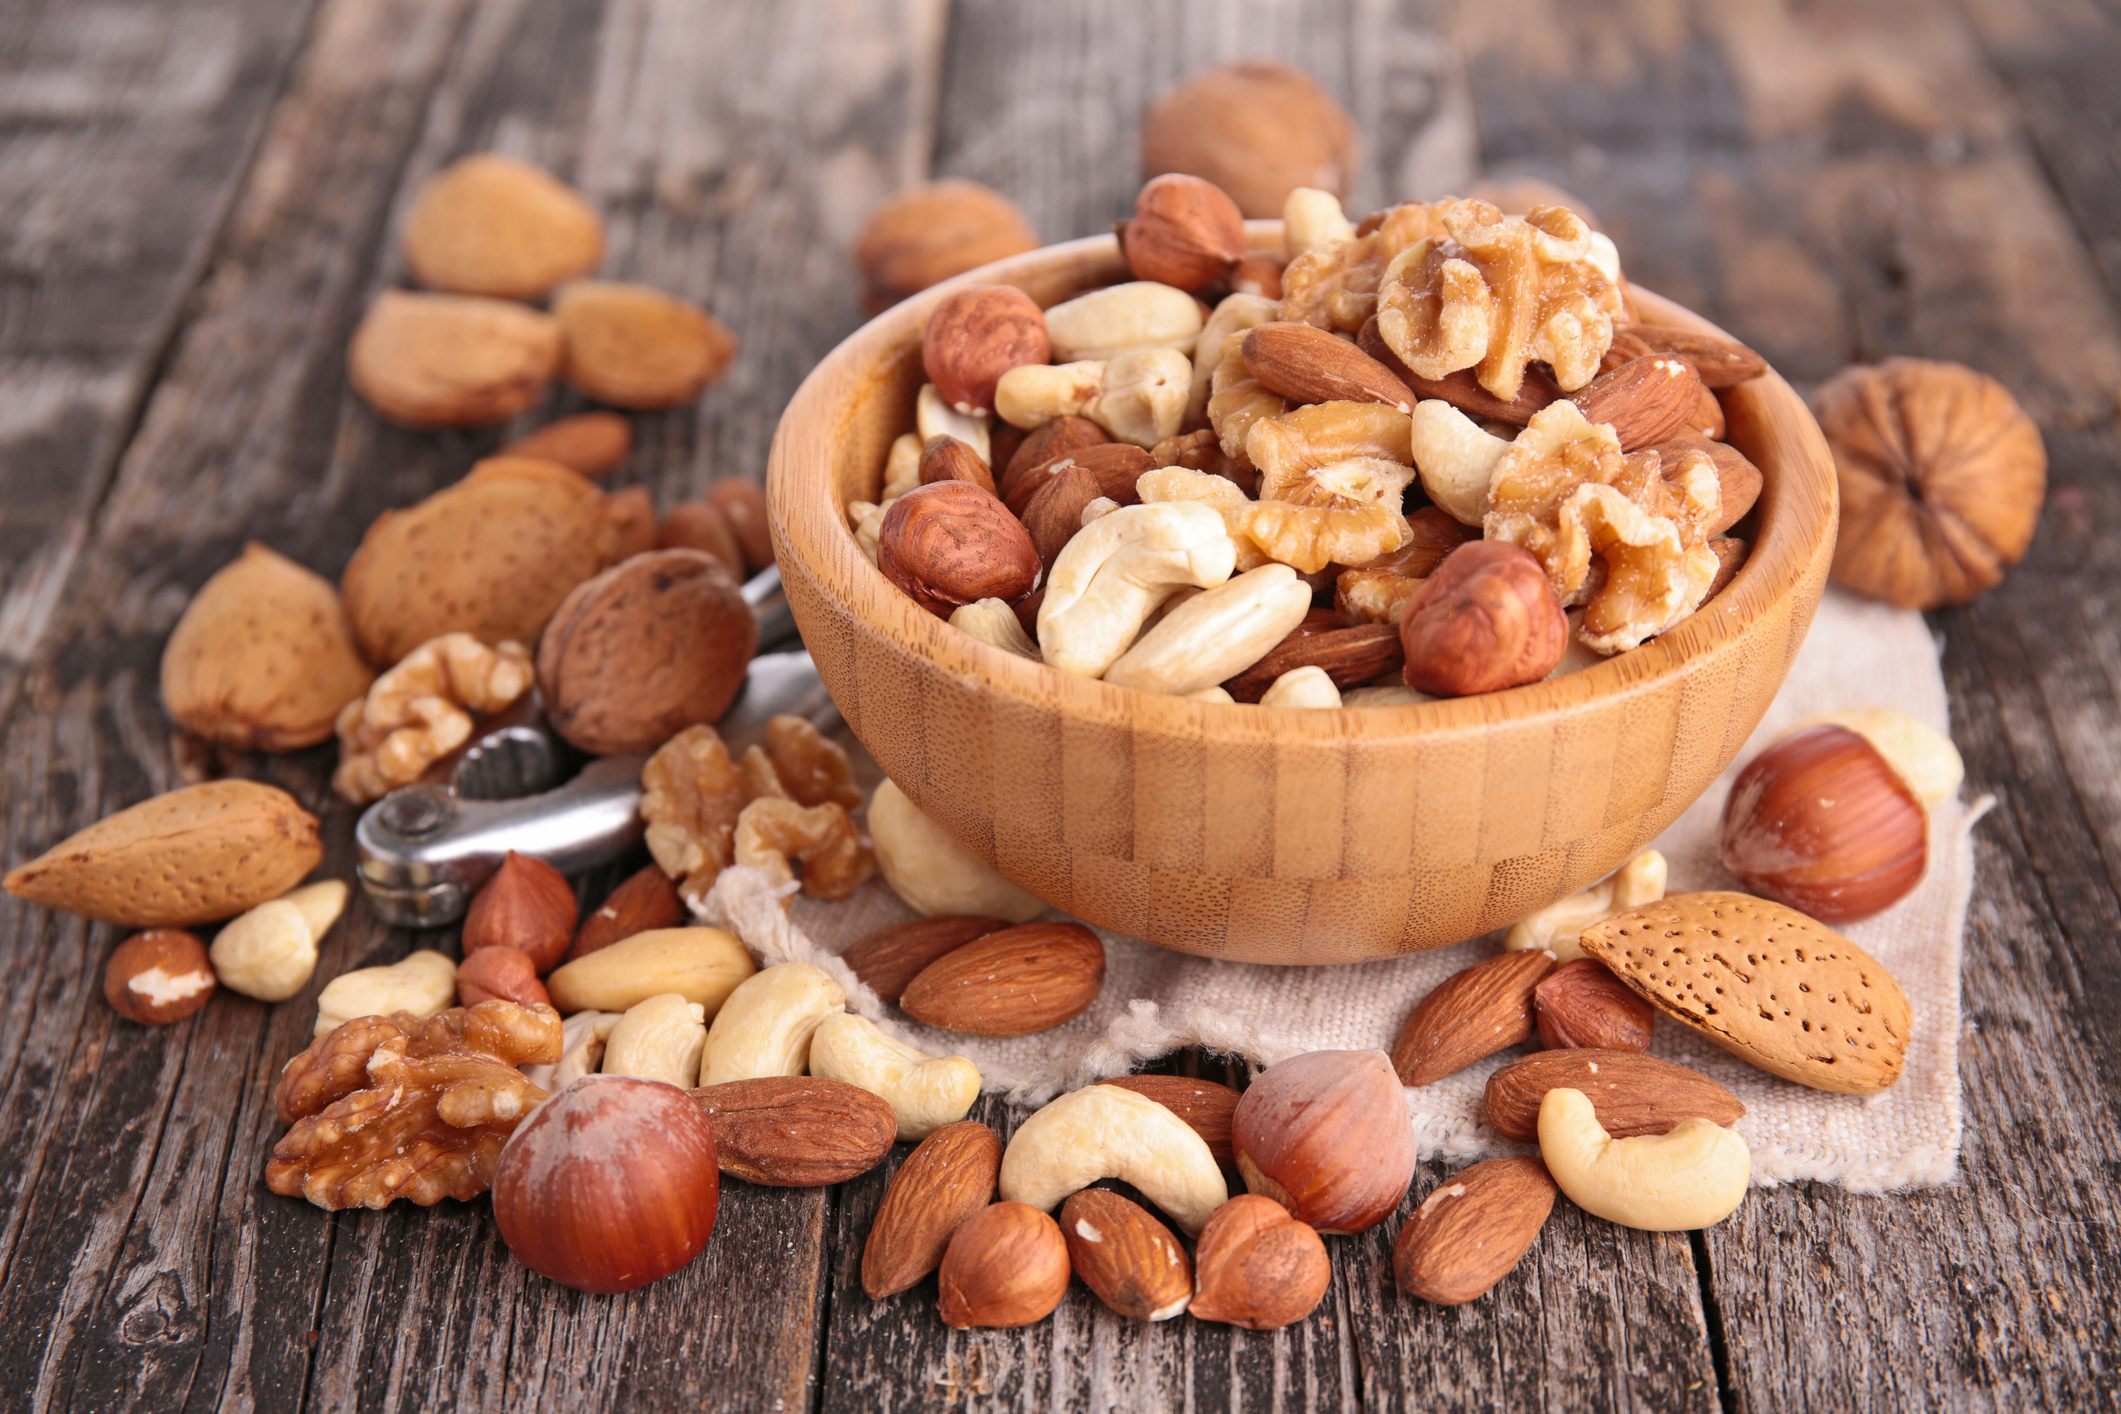
Smoked Nuts
Rather than paying extra for a fake smoke flavor on mixed nuts, how about the real thing?
This is one of those “it’s so easy why didn’t I think of it before?” recipes and using a wood pellet grill makes these especially easy.
Here’s the ingredients: 1 container of your favorite nuts – mixed, single variety, whatever works for you. Here’s the method: Dump them into a foil pan and put them into the smoker at between 180 degrees and 250 degrees for an hour or so, stirring every 15 minutes or so – more time if you want more smoke flavor, less time for a more subtle flavor.
We quote a temperature range there because these can go on with other food, but if doing them by themselves on a wood pellet grill, go to the low end – 180 degrees as pellet grills tend to kick out more smoke at lower temps.
Now, to kick them up a notch, do this – for every 3 cups of nuts, melt 3 tablespoons of butter and whisk in 1 tablespoon of worcestershire sauce, 1 t each of garlic powder and onion powder and if a spicy kick is wanted, a few shakes of your favorite hot sauce. Toss this with the nuts prior to smoking. You’ll see this same mixture below.
Smoked Goldfish™ crackers or cheese crackers
Again, super easy – for one bag of Goldfish crackers or a regular sized box of cheese crackers, simply toss them with a ¼ cup of cooking oil mixed with 1 tablespoon of worcestershire sauce, 1 teaspoon each of garlic powder, onion powder and paprika, and if you want heat, ¼ t of cayenne pepper.
Spread in a foil pan and put in the smoker for an hour, stirring every 15 minutes. Temperatures are ok from 180 to 250 on these as well. Absolutely delicious and we double dog dare ya to not eat a huge handful hot from the smoker. Amazing!
Smoked Nacho Cheese Tortilla Chips
Yeah we said that. These are even easier – it’s literally dump, smoke, eat like it’s your job.
Spread a bag of nacho-cheese flavored tortilla chips out on a sheet pan and slide them into your pellet smoker at 180 degrees – let them go 1 hour, stirring every 15 minutes.
You’ll never eat another “straight from the bag” nacho cheese tortilla chip again. Also works great with potato chips, especially cheese flavored.
Smoked Queso Dip
This has been quite the rage of late in the BBQ social media forums and it couldn’t be easier.
There are a thousand different recipes for this online.
Here’s the one we’ve found to be the best combo of easy and tasty:
Taco Meat or Chorizo: Using a prepared taco seasoning and ground beef, prepare 1 lb of taco meat to the instructions on the package. Can also substitute crumbled chorizo sausage, browned and drained. For this recipe, use a ½ pound of the taco meat or browned chorizo
1 can Rotel tomato/chile pepper mixture
1 cup diced raw onion
1/2 cup diced pickled jalapenos (can be omitted if desired)
20 ounces of Velveeta cheese cut in 1” cubes (note – regular cheese like cheddar will not melt evenly enough for this, you need the pasteurized process cheese to work right)
⅔ cup of sour cream
Mix together the prepared taco meat, the Rotel, onion and jalapenos or chiles and spread out in a foil pan, then scatter the cubed cheese over the top. Smoke for 45 minutes at 250 degrees, stirring every 15 minutes, then stir in the sour cream and smoke 15 minutes more. Serve hot with tortilla chips and enjoy!
Smoked Chex Mix
Who doesn’t love a big batch of homemade Chex mix? Everyone that makes it puts different custom touches in their mix.
Here’s a link to a great oven-toasted Chex party mix recipe that we’ve used a lot and it’s always a winner. And here’s how you kick it to the next level – instead of toasting this in your oven at 250 degrees, smoke it in your wood pellet smoker with Griller’s Gold pellets for 1 hour, stirring every 15 minutes.
Also, the linked recipe calls for using sheet pans – this also works fine in a foil roasting pan – just make sure you’re stirring it well to expose as much of the crunchy stuff to the smoke. It’s great with a mug of cold beer!
Try Your Own!
Do you have a favorite snack recipe that requires some oven baking? One of the beautiful things about wood pellet grills fueled with Griller’s Gold pellets is that they offer great temperature control and will give your food a subtle “baked in a wood burning oven” flavor. Any oven-baked canapé or appetizer will be extra tasty when baked in your pellet grill. Experiment a little – we have yet to find something that wasn’t just a bit tastier after a ride in our pellet smoker. Pick the perfect wood pellet for your next meal, and, happy smoking!
Whether it’s a
hearty and savory one-dish morning meal, or a sweet sandwich that will bring
back childhood memories, or a great bread to enjoy at home or take to a
friend’s, there’s a lot of flavor in brunch dishes from the grill. (Bonus: Enjoy any of these brunch dishes with pumpkin spice
latte – unless that’s not your thing, at which point just forget we
mentioned it…)
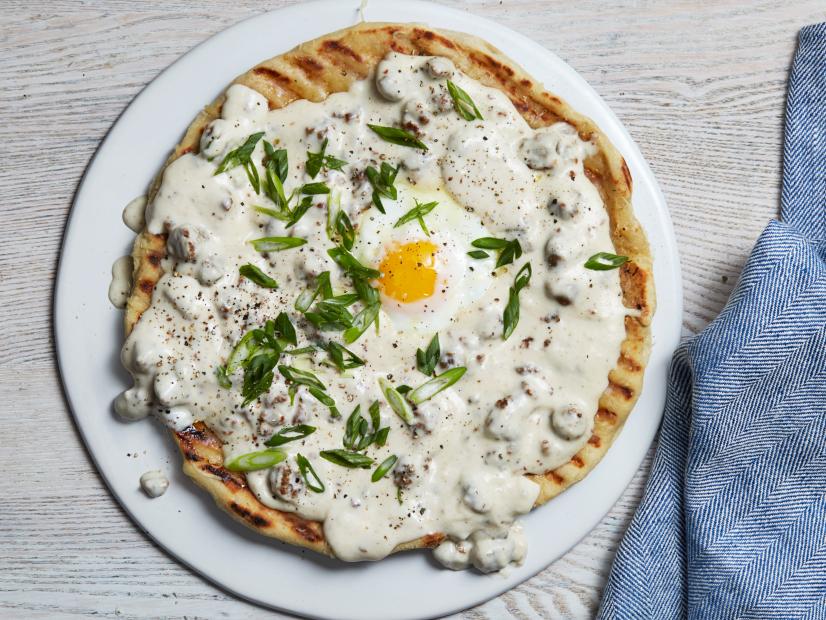
Breakfast pizza
with sausage gravy
This sausage-and-gravy-and-pizza recipe delivers all the classic flavors of a Southern breakfast — on a pizza crust! Make the sausage gravy indoors, and then turn your outdoor grill into a pizza oven. Spoon on the warm gravy and serve.
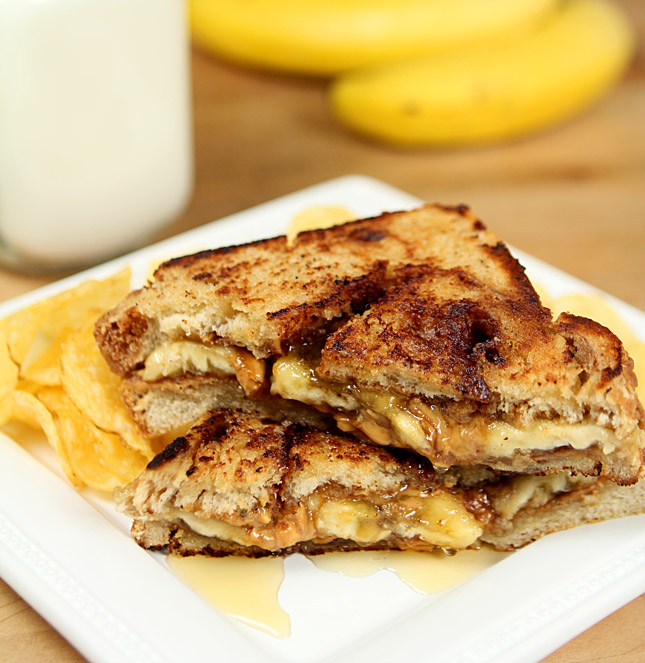
Grilled peanut butter banana sandwich
This is an insane sweet-spicy indulgence with minimal prep and cooking time. Assemble (preferably on cinnamon bread) and throw onto the grill in an uncovered skillet. Our favorite step is the recipe’s final one: “Pretend you are eleven. To make it totally official, eat with some potato chips.”
That pretty much says it.
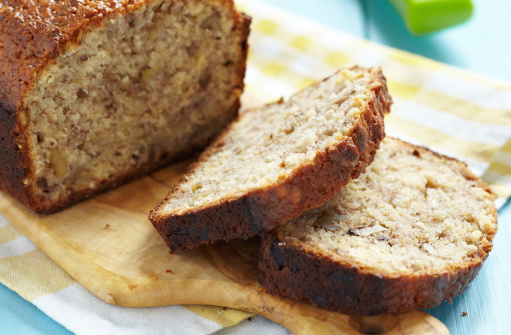
Baking banana walnut bread on
the grill
Sliced banana bread with walnuts
Follow your favorite family recipe – because with a wood pellet grill, you can control temperature for baking. And refer to The Wood Pellet Smoker & Grill Cookbook by Peter Jautaikis if you want a complete, delicious recipe. (You can order some Griller’s Gold pellets while you’re shopping.) Pumpkin bread is a great alternative.
Pizza, sandwiches, sweet baked goods – they’re all delicious
grilled brunches with fall flavor. Have a great weekend.