Who remembers the big scene in “My Big Fat Greek Wedding” where the Greek family is roasting a whole lamb, on a pit in a barbecue pit, in the front yard of their home? All we know is that we were drooling looking at that wonderful feast!
Grecian food is known to be a) healthy – it’s part of the Mediterranean diet after all; b) full of amazing flavors; c) often grilled over wood. They have lots of amazing meats – lamb, pork and chicken are their faves along with seafood. And the care they give to cultivating flavor is amazing.
Today we’re sharing some of our favorite Greek recipes, optimized to be cooked on a pellet grill fired by those tasty Griller’s Gold natural hardwood barbecue pellets! For all of these recipes, it’s “chef’s choice” on pellet type although either Competition Blend or Smokeshack Blend would be our selection.
Let’s get to our yummy Greek treats!
Greek Grilled Starter & Sauce
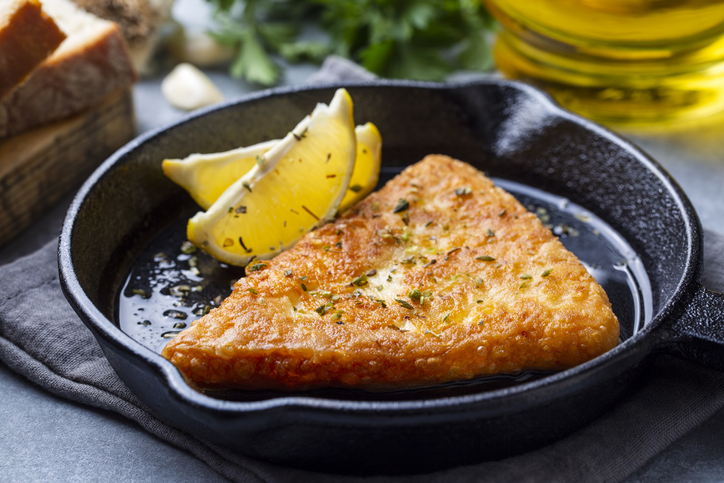
Wood-grilled Saganaki in Cast Iron
While an American dish that Greek restaurants in the US serve, you don’t find it often in Greece. Nonetheless, saganaki is a fave of the Greek dining experience.
Who doesn’t love that big “Opaa!” moment when the waiter brings out the sizzling platter of delicious melty cheese, dumps a quick shot of brandy on it, and fires it up, shooting flames nearly to the ceiling, then squeezing a fresh lemon over the top.
OMG so good! Here’s how you can do it at home. Please note, we DO NOT recommend flaming it off in the house. But you can gather the family and friends outside to the grill for the big moment.
To make this, we recommend using a heavy cast iron skillet, although any oven-proof heavy skillet or baking dish will work. When we serve this as an appetizer, as soon as the meats come off the grill and are resting, we fire the pellet grill up to 400F and put our cast iron skillet on to preheat. Since the grill is already heated up from making our meats, it will come to that temp within 10 minutes along with the cast iron skillet.
Ingredients:
Kefalotyri, Graviera, or, Kefalograviera cheese – if you can’t find that, Kasseri or haloumi are good substitutes and are more generally available. It does melt more easily though. If you really can’t find Greek cheese in your area, pecorino romano, fontinella or even a strong aged provolone will work for this recipe. Figure on one ½” thick slab about 4” square for every 2 people.
Extra virgin olive oil (“EVOO”, thanks Rachel Ray!) for frying
Flour (for coating it to make a nice crust)
Black pepper – since the cheese is already salty tasting, just some pepper works for seasoning
Brandy or cognac to flame it. If you don’t have either of these and don’t want to buy, you could also use vodka for flaming fuel.
½ of a fresh lemon, cut and ready to go
Crusty bread
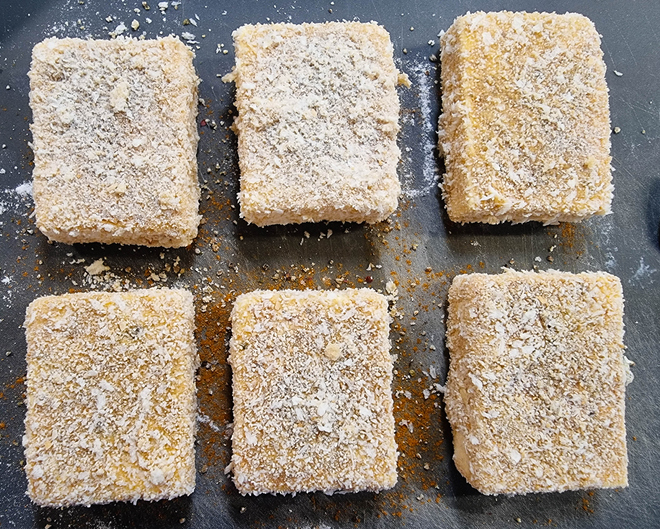
Cut the cheese into ½” thick slabs or squares. Run them under warm (but not hot) water for a few seconds then pat dry with paper towels. Dredge them in flour (a half cup of flour on a plate will serve the purpose), then season them gently on both sides with black pepper. Out to the grill!
At the grill, pour ¼ cup of the EVOO into the hot skillet and swirl it to spread it out – give it a few seconds to heat up (it will shimmer as it does) then carefully lay the cheese in the oil and close the grill. Fry it for about 3 minutes on the first side (peeking under it to check for browning – when it is golden, it’s time to turn it) then carefully turn it and fry the other side for 2 to 3 minutes or until golden and becoming melted. The family should be gathered to the grill by the time it hits the second side because it’s about to be OPAA Time!
When it’s browned on both sides, have a stick lighter handy as well as the lemon and take 1 ounce of the liquor and carefully pour it over the cheese then immediately light it with the stick lighter, making sure your face is well away from the grill.
The flames will shoot several feet in the air – yell OPAA!!! And then take the lemon and begin squeezing it over the cheese to put out the flames. Head to the table afterwards and serve it with big hunks of crusty bread and a good glass of dry Greek white or rose wine.
Greek Marinade:
When preparing Greek style meats and poultry, there are a few dominant ingredients and flavors – oregano and garlic figure heavily in the mix. Greece is a major place for lemon production as well as olives, so lemon juice and olive oil will be there too. We have a “master recipe” for a great grilling “slather” or marinade that we use on most of our Greek themed meats – here’s the recipe for it:
½ cup olive oil
¼ cup freshly squeeze lemon juice
1 T dijon mustard
4 cloves fresh garlic, or 1 1/2T minced “jarred” garlic
1 t oregano
Whisk this up and you can then slather it over meat and poultry to give it that authentic Greek flavor. The addition of the Dijon is what creates a fairly thick sauce that tastes oh so good. We season the meat first with salt and pepper and also like to shake some paprika over the meat right before it goes on the grill both for color and flavor.
Grilling The Meats
Just like some other cultures (like the Brazilians!) the Greeks love their proteins. Because they are hard against the Mediterranean Sea, they do enjoy a lot of fish, as well as lamb, chicken, pork and beef. Here’s four quick recipes that are quick and easy to do on your pellet grill and the wood smoke flavor will really give it that delicious outdoor essence!
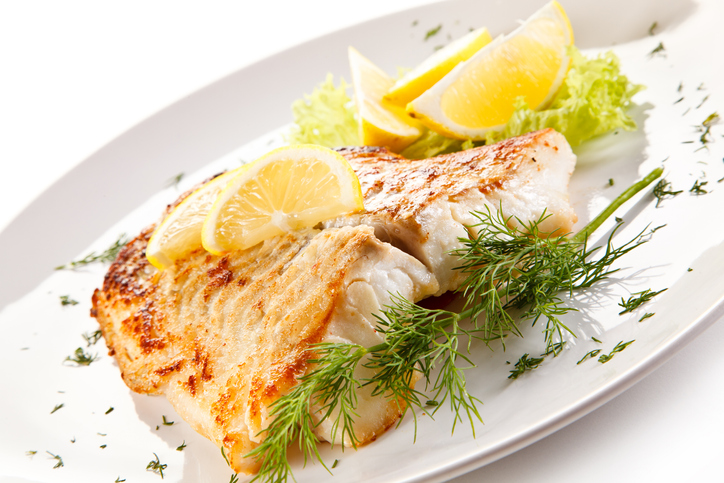
Greek-style Fish
The Greeks love their fish! This recipe works on just about any fish you’d like but especially on ocean white fish like grouper, flounder or cod, as well as meaty fish like swordfish. Also, if you want to splurge it’s really great on Chilean Sea Bass.
Prep:
Preheat your grill to 400F (hey, you’re right at the Saganaki temp!). If you like to use a searing grate like GrillGrates, put them into the grill – they will perform beautifully for this recipe.
Remove the fish from the package, drizzle olive oil and rub to cover it fully on both sides. Then season both sides of the filets with a gentle hit of salt and pepper plus a bit of garlic powder and a gentle shake of oregano. No heavy hands with the seasoning here please!
Cooking Time/Doneness:
Your cook time will generally be about 8 minutes for an inch of thickness of filet – so if your filet is about ¾” thick at the thickest, your cook time will be about 6 minutes in total, and if it’s an inch and a quarter, you’re at about 12 minutes. Note this is total cook time, not per side. Now that said, we like to use a thermometer. Fish is generally done when the internal temp at the thickest part of the filet is 145F.
Oil your grates with a rolled towel dipped in olive oil then gently lay the fish on the grate so the grates are at an angle across the fish – this gives it more interesting grill marks. Squeeze some fresh lemon juice over it and close the grill.
At halfway through your cook time, carefully flip the fish over and again squeeze some fresh lemon over it, close the grill and cook. Remove and serve! This is great with greek-style roasted potatoes and fresh green beans sauteed in olive oil with lemon juice.
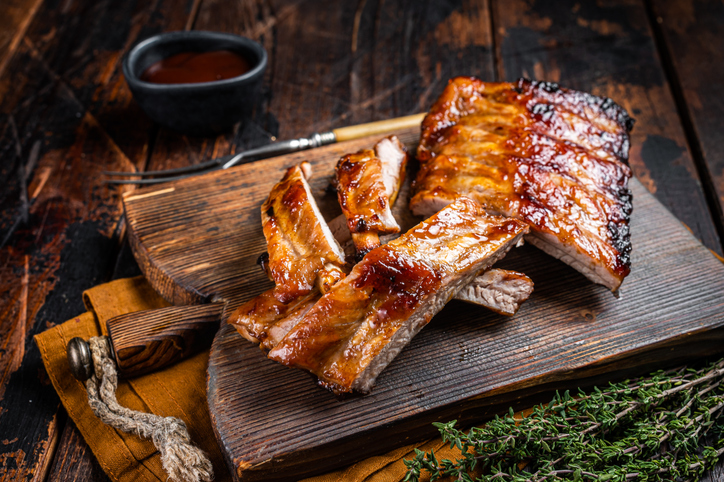
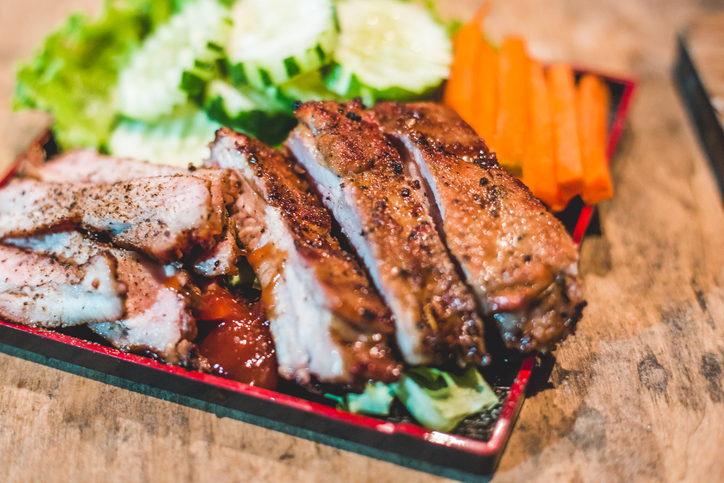
Greek Baby Back Ribs
Now if you’ve read enough of our blogs here, you’ll know that a) we love our ribs at Griller’s Gold and b) low and slow on a Pellet Grill makes fantastic ribs. Combine that with some great Greek flavors and you’ll think you’ve gone to heaven when you have these!
Buy:
Baby Back Ribs – try to buy the ones that haven’t been brined or injected (the label clue is “with a X% solution for tenderness) – minimally processed is the way to fly here. Costco sells them as well as Sam’s Club.
Prep:
Start by making up a batch of that Master Marinade above. Get your ribs out of the package, give them a rinse in the sink, pat them dry and remove the membrane on the back side. Refer to our post “Never Fail Baby Back Ribs” for that technique. After the membrane is off, flip them over and give them a generous seasoning of salt and pepper on the meaty side. Slather them generously with Greek Marinade and set them aside for about an hour.
Cooking Time/Doneness:
Preheat your grill to 275F and let it run for 15 minutes – you want it well preheated. After the grill is hot and the ribs have marinated for an hour, put the ribs meaty/marinade side up on the grill and close it up. Go away for 2 hours!
At the 2 hour mark, come back to your grill and give those slabs a flip to marinade side down. Give them a full hour with that side down, then come back and flip them meaty side up. At this point, give them a quick doneness check using the Bend Test (again refer to the Never Fail Baby Backs post). If they aren’t quite done, give them another 30 mins and check again. They are done when the bend test has them cracking easily, and the meat pulls cleanly off the bone (but doesn’t fall off).
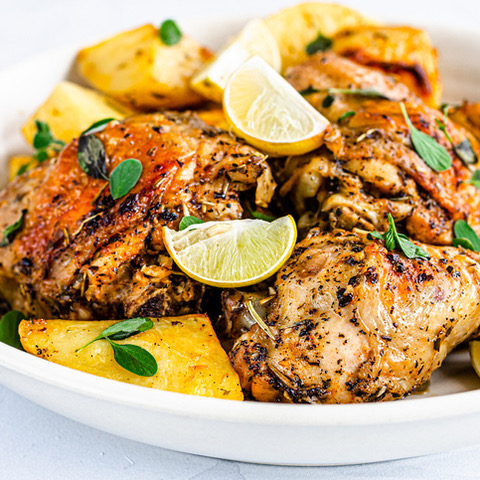
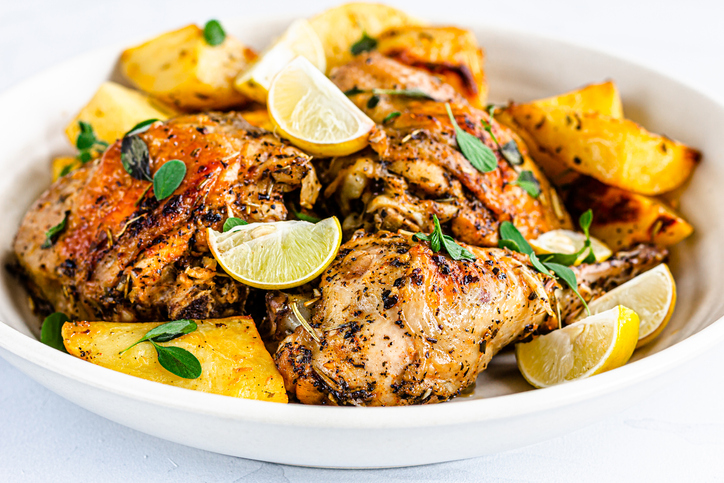
This really doesn’t get easier. We like to use skin-on/bone-in chicken. The instructions are easy:
Preheat the grill to 400F.
Unpackage your skin-on/bone-in chicken and put in a large bowl, season with salt and pepper, tossing to coat.
Mix up a batch of Greek Marinade – make more if you have a lot. That recipe will coat about 12 pieces of chicken.
Dump over the chicken and toss to coat
Grill on the hot grill, turning every 10 minutes, until at least 165F at the bone for breast pieces. 185F at the bone for legs, thighs and wings.
Serve with your favorite Greek sides.
This chicken is outstanding cold! Great picnic food!
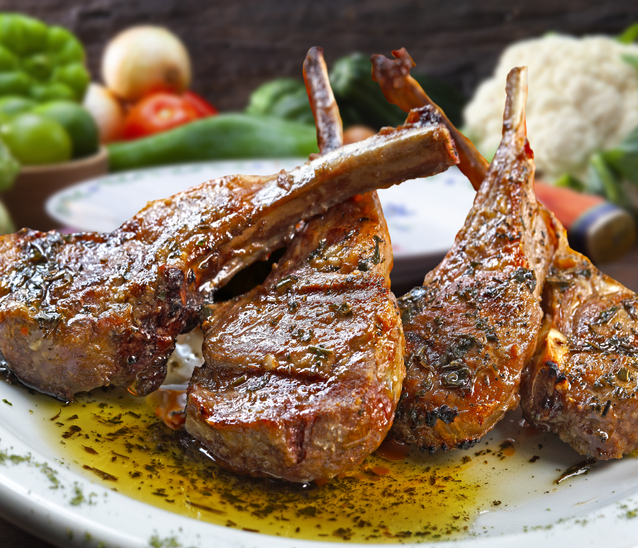
Greek Rack of Lamb
Oh my, our favorite thing. We think that if someone said to us “if you could only have one food the rest of your life, what would it be? “Greek rack of lamb, that’s what.” Both elegant and casual (best finger food ever is lamb lollipops – the little lamb chops you get when you carve up a rack of lamb), decadent and rich yet still lean at the same time. We love them and can’t get enough. So for this recipe, we’re going to be using the Reverse Sear technique. If you haven’t done it for a bit, go read our post on that, and brush up.
One of our favorite things to do is serve these at a dinner party. One nice presentation is to cut them apart between the bones and serve a big platter of “lamb lollipops”. But our favorite presentation and this works great for a “couples” dinner, is to serve each couple one rack to share. We put them on a platter with the sides and put a platter in front of each couple. Most people like between 2 and 4 bones worth, so this works perfectly.
Buy:
We like to buy lamb racks at Costco or Sam’s Club. In fact, to make sure we always have some in the freezer, we make it a point to buy at least 1 or 2 every time we go!
Process:
Make up a batch of Greek marinade. Get the lamb racks out of the package, rinse them off and pat dry. Then season generously with salt and pepper and slather the marinade all over the lamb racks. Set aside to marinate for at least 1 hour.
About 45 minutes into the marination period, fire up your pellet grill to 225F with Griller’s Gold pellets. Once your lamb racks are done marinating, put them on the grill, fat/meaty side up. Close the lid and leave it for 15 minutes.
Cooking Time/Doneness:
After 15 minutes, open the grill, check the temp with an instant read in the center of thickest part of the meat. It won’t be done but you’ll get an idea of how things are progressing. Flip them meat side down, then check again in 10 mins. If the meat is above 110F, start checking them every 5 minutes. We like our lamb bright pink medium rare so we pull them off when the temperature is about 125F.
Rest the lamb racks by covering them on a warm platter with heavy duty foil. Then put a folded bath towel over the top of them to hold the heat in. You can safely rest them at least 30 minutes without them losing too much heat. We normally rest them about 15-20 minutes. When you put them to rest, go turn up the heat on your grill to 400F.
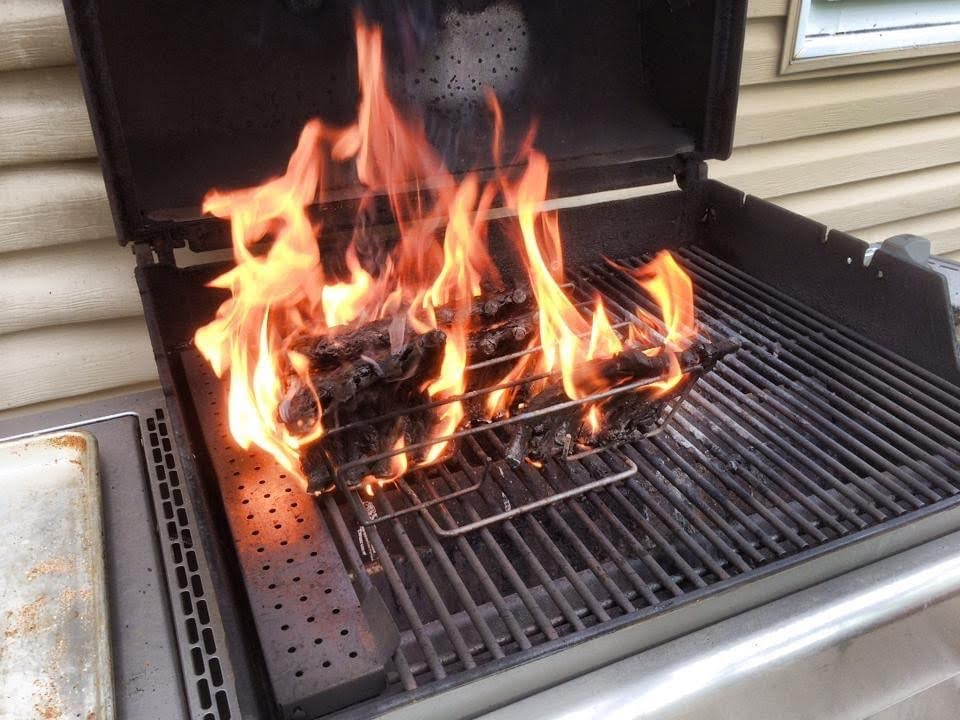
Note that this isn’t the “screaming hot” 500F temp that you usually use when searing steaks. And that’s because lamb fat is extremely flammable. In fact we had one particularly bad experience with that a few years ago in the photo below. Yes, this is our grill. And that’s about $75 worth of rack of lamb. OUCH. On to “plan B” with that dinner.
(Stew Campbell)
We definitely recommend keeping your grill clean and putting a fresh lining of foil onto your grill’s heat deflector plate, prior to cooking lamb. You don’t want to cook them over a build up of grease and ash and have a grease fire ruin your lamb.
So, to sear them nicely, and to avoid the result above, keep the temp to no more than 400F. And keep a squirt bottle of water handy to knock down any flames.
Put the lamb meaty side down, close the lid and set a timer for 2 minutes. At 2 minutes flip them meat side up. Close the lid and set a timer for 3 minutes. Repeat the 2 minute meaty side down cycle, then check the temp.
Our ideal doneness (for our preferred bright pink medium rare) is about 135F. If they need a few more minutes to doneness, just keep them meaty side up. This is to avoid too much fat dripping down and potentially igniting. We have also found that if you want crispy fat on the outside of them, fire up a kitchen torch or workshop propane torch. Then play the flame over the fat after you remove them from the grill after searing. The fat will crisp up.
Last thing…
Last thing – dessert and a toast!
If you frequent Greek restaurants you may have experienced the end-of-meal toast. Many Greek restaurants will pour you a complimentary shot of Ouzo, the anise-flavored liqueur. And the traditional Greek dessert is Baklava.
To complete your Greek feast pick up a bottle of Ouzo at the liquor store and give it a chill in the refrigerator by putting it in there right before you sit for dinner – you just want it a bit cooler than room temp. Pour 1 to 1.5 ounce shots in either shot glasses or small stemmed glasses and pass out to your group.
Have everyone raise their glasses and shout “Ya Mas!” which is “cheers!” in Greek. It’s traditional to drink the ouzo down in one go!
So that’s your Greek feast! From our blog team to you we wish you good health and good fun!
Here on the Griller’s Gold team, we’re breakfast people. There is nothing better than cooking up a big breakfast on a weekend morning and feeding the family well with lots of goodies like eggs, pancakes, bacon, sausage, cinnamon rolls and more! We also love the taste of wood grilling that you get from using a grill fired with those amazing Griller’s Gold Natural Hardwood pellets. So let’s bring those two great things together – it’s breakfast time, wood grilled style!
So the concept is simple – your pellet grill is going to be your stove and your oven for this effort. We all know that outdoor griddles have become “a thing”, but did you know that you can do that on your pellet grill?
Simple – just buy a nice sized griddle for it and toss it on top! We happen to have one from Lodge Cast Iron that’s big enough to do a few eggs, an omelet, or 4 pancakes at once. But also, let’s use the oven capabilities – when heated to typical oven temps in the 350 to 400 degree range, your pellet grill does a fine job of mimicking a kitchen oven, with evenly-controlled temperatures and the added bonus of the kiss of wood-grilled flavor from those Griller’s Gold pellets. For all of these recipes, just use your favorite pellets. We like Competition Blend for this.
Breakfast Recipes for the Grill
Bacon and sausage:
This is simple – you’re just grilling your sausage and bacon right on your pellet grill. For either, preheat the pellet grill to 375F for at least 15 minutes and then put the food right on the grate. Sausage patties that are about ¼” to ⅓” thick will take about 4-6 minutes a side to grill up, just like cooking burgers. For the bacon, we like to either put a foil pan under the grate to catch the grease so your grill doesn’t have to be cleaned after cooking, or we will do the bacon on a baking sheet on the grill which will catch the grease.
Either way, bacon takes about 12-16 minutes depending on the thickness and how crisp you like it. The bonus of doing it on the grill is that there’s no need to turn the bacon! Winning! A note though – sausage also puts out a fair amount of grease, so you may want to clean your grill after cooking it to avoid future grease fires.
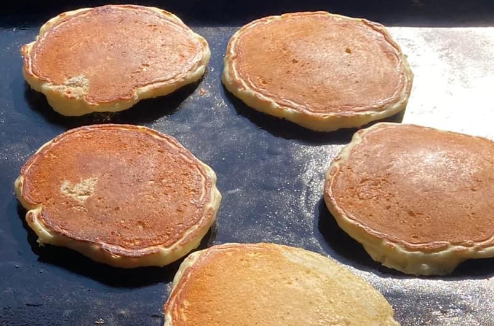
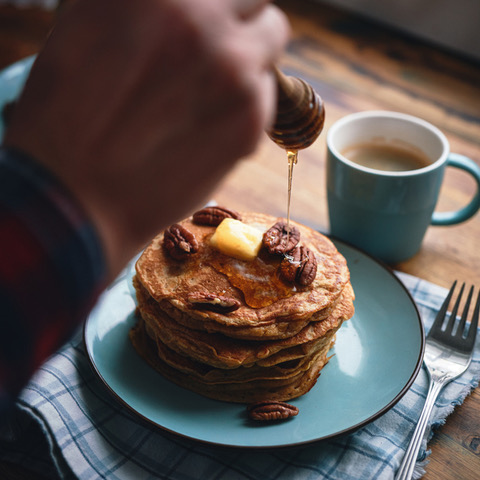
Pancakes:
( Stew Campbell)
Griddle food is pancakes, french toast, yummy stuff.
Our favorite pancake recipe is as follows for 4 servings:
2 cups all purpose flour
3 T sugar
1 ½ t baking powder
1 ½ t baking soda
1 1/4t kosher salt
2 ½ cups of buttermilk
2 large eggs
3 T unsalted butter, melted.
Mix together the dry ingredients in a large bowl, then make a well in the center. Pour in the buttermilk and crack the eggs into the buttermilk. Pour the melted butter over that mixture and whisk it all together. Don’t overmix – some lumps are fine.
Preheat your griddle on your pellet grill for at least 15 minutes at 350 degrees. Spread some butter or canola oil out on the griddle then ladle on the batter in ⅓-½ cup measures. Flip after bubbles rise to the surface and the edges look dry.
Peek under to make sure they are browned, then flip and cook another 1-2 minutes until lightly browned on the bottom side. Keep warm on the warming rack of your grill until all are cooked and ready to eat.
You can also easily cook pancakes in a large cast iron skillet (or oven-safe skillet) using the same techniques although it’s hard to do more than about 2 at a time.
French Toast:
For French Toast, buy either good challah or brioche style bread cut in thick slices, or Texas Toast bread.
Whisk up 6 large eggs with 2 cups of milk. We like to add cinnamon to the mixture as well. Dip the bread on each side, and fry in butter on your hot griddle or skillet until browned on each side. Could not be easier!
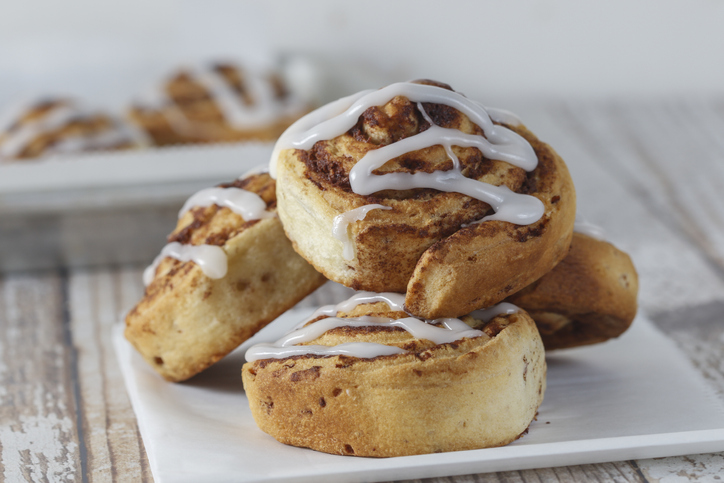
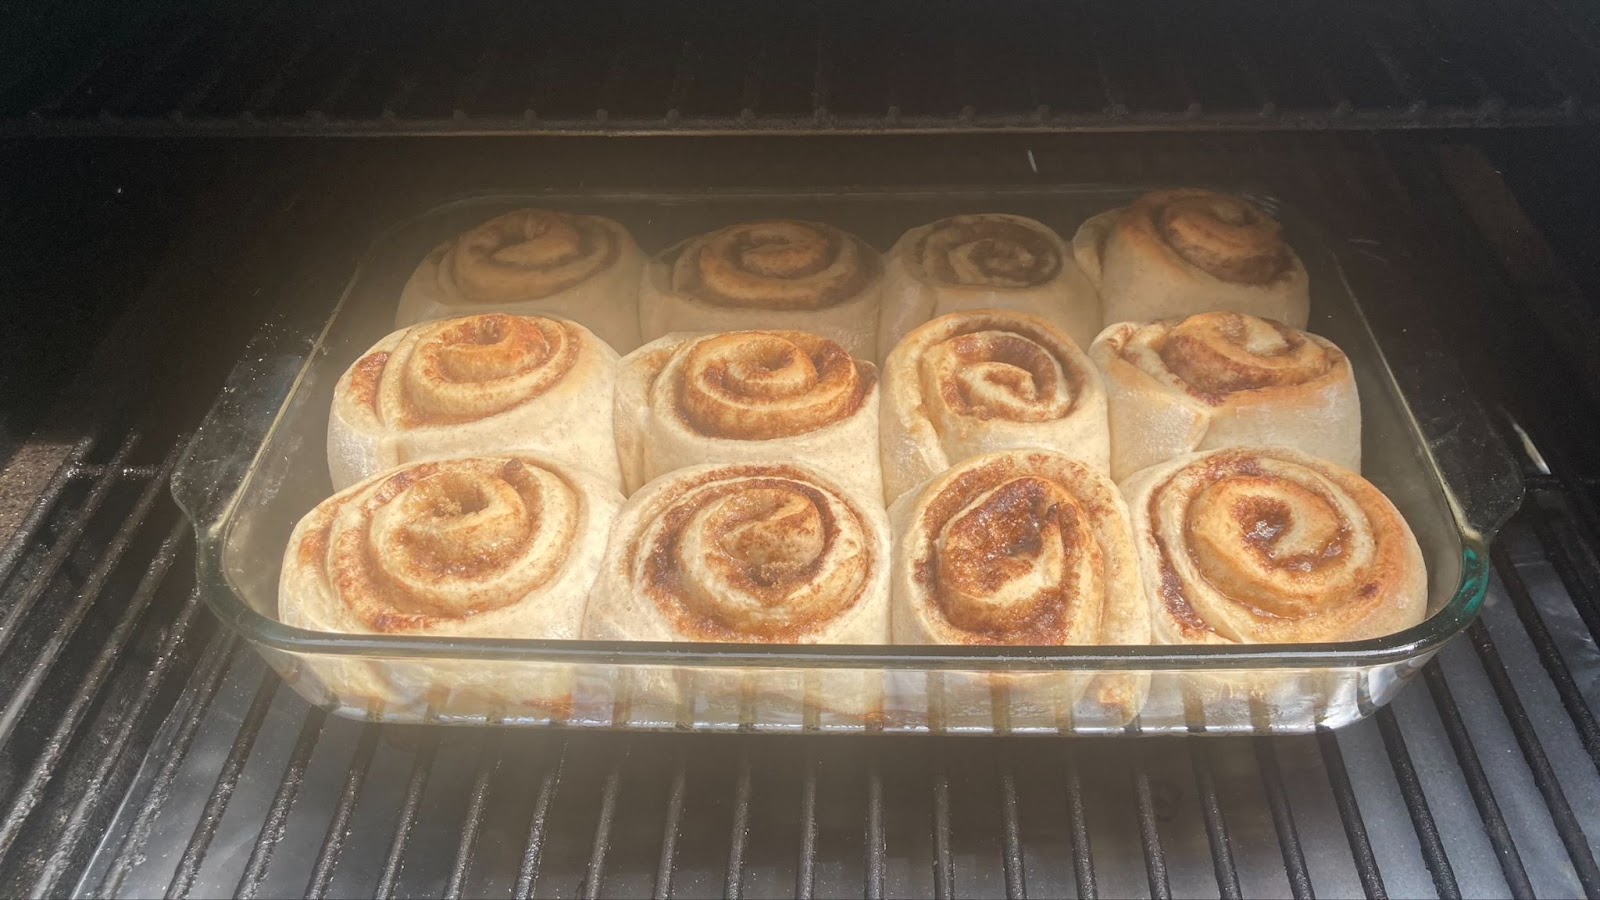
Cinnamon Rolls:
Now we’re going to have some fun with using our pellet grill like a wood-fired oven. Cinnamon Rolls are so easy and tasty to make. You can even bake the “tube” cinnamon rolls on your pellet grill – just follow the instructions on the package but use your pellet grill for the oven.
Here’s our favorite “from scratch” cinnamon roll recipe:
1 packet of dry yeast
¼ cup warm water mixed with 1 tsp sugar
1 lb all purpose flour (or 3 ½ cups)
¼ cup sugar
1 ½ t kosher salt
1 cup milk
2 large eggs, beaten
1 stick unsalted butter softened
Brown sugar (about ⅔ cup)
Cinnamon (about 1 T)
Mix together the yeast with the warm water and teaspoon of sugar. The water should not be hotter than 105F. Set aside while you measure out the rest of your ingredients.
Mix together the flour, sugar and salt. Whisk your milk and eggs together and measure – you should have about 1 ⅓ cups of egg/milk mixture. Mix the milk/egg mixture with the yeast mixture and then mix that with the flour/sugar/salt.
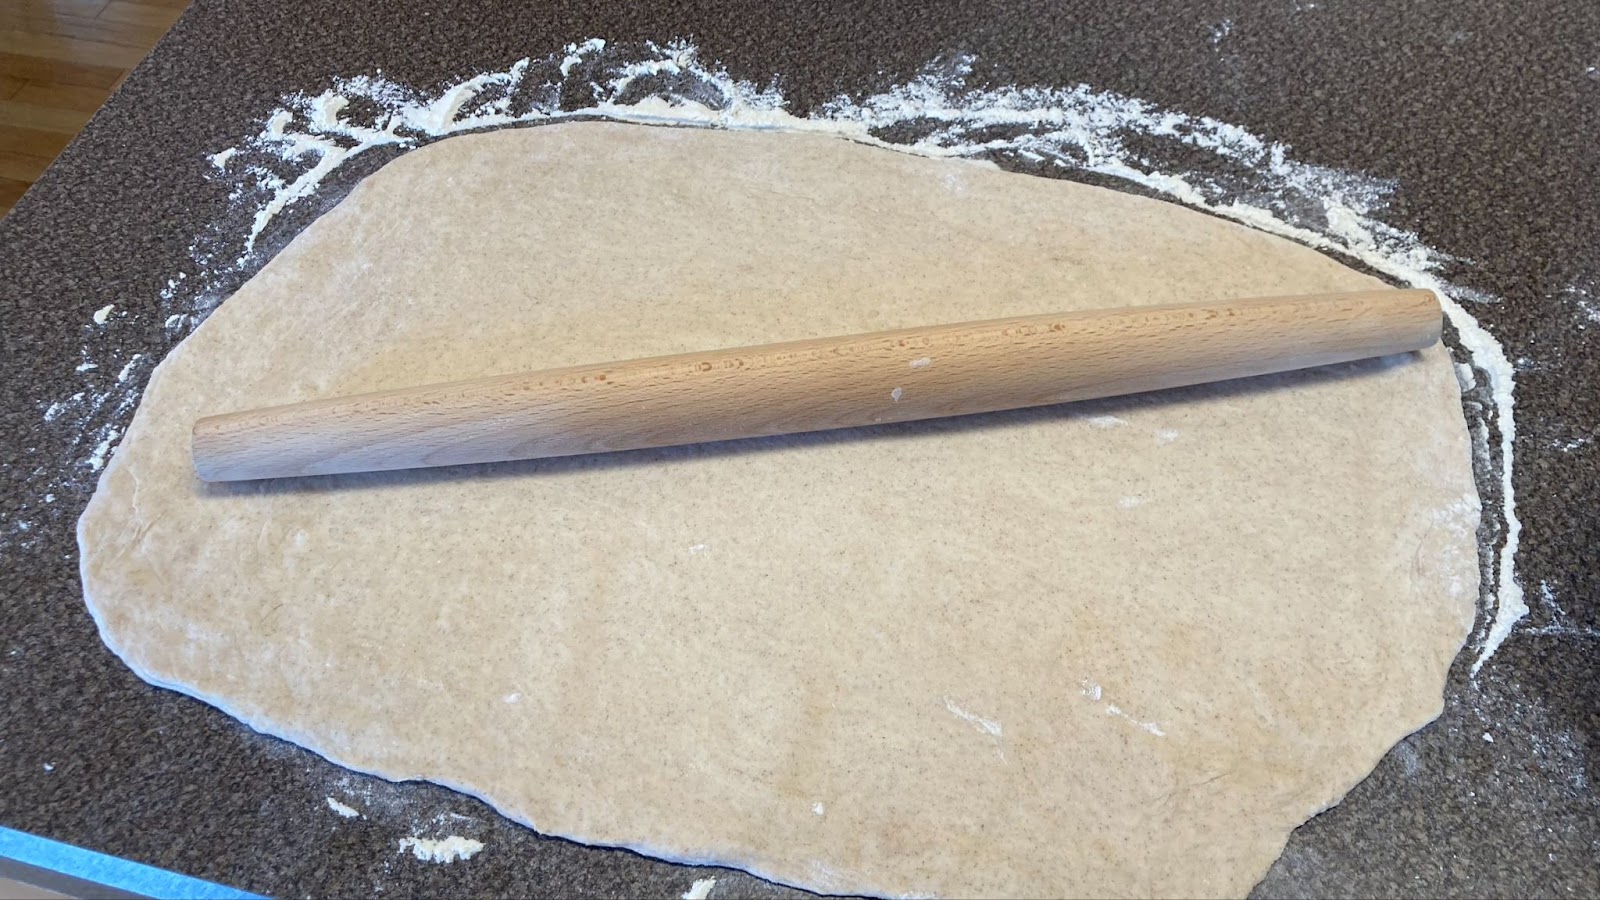
Your dough should be soft and sticky. Turn it out to a well floured surface and knead gently until it’s just beginning to be satiny (knead technique: fold in half, press flat with the heels of your hands, turn ¼ turn, repeat).
Put the dough back in the bowl and cover with plastic wrap and let it rise 1 hour or so. In that time it should grow significantly.
Turn the dough out to your floured surface again and flatten it into a rough rectangle about ½” thick and about 12” wide. Make sure your surface is well floured so it doesn’t stick, and then using a floured rolling pin, roll your dough out into a rectangle about ⅛” to ¼” thick and about 16” wide by about 14” deep.
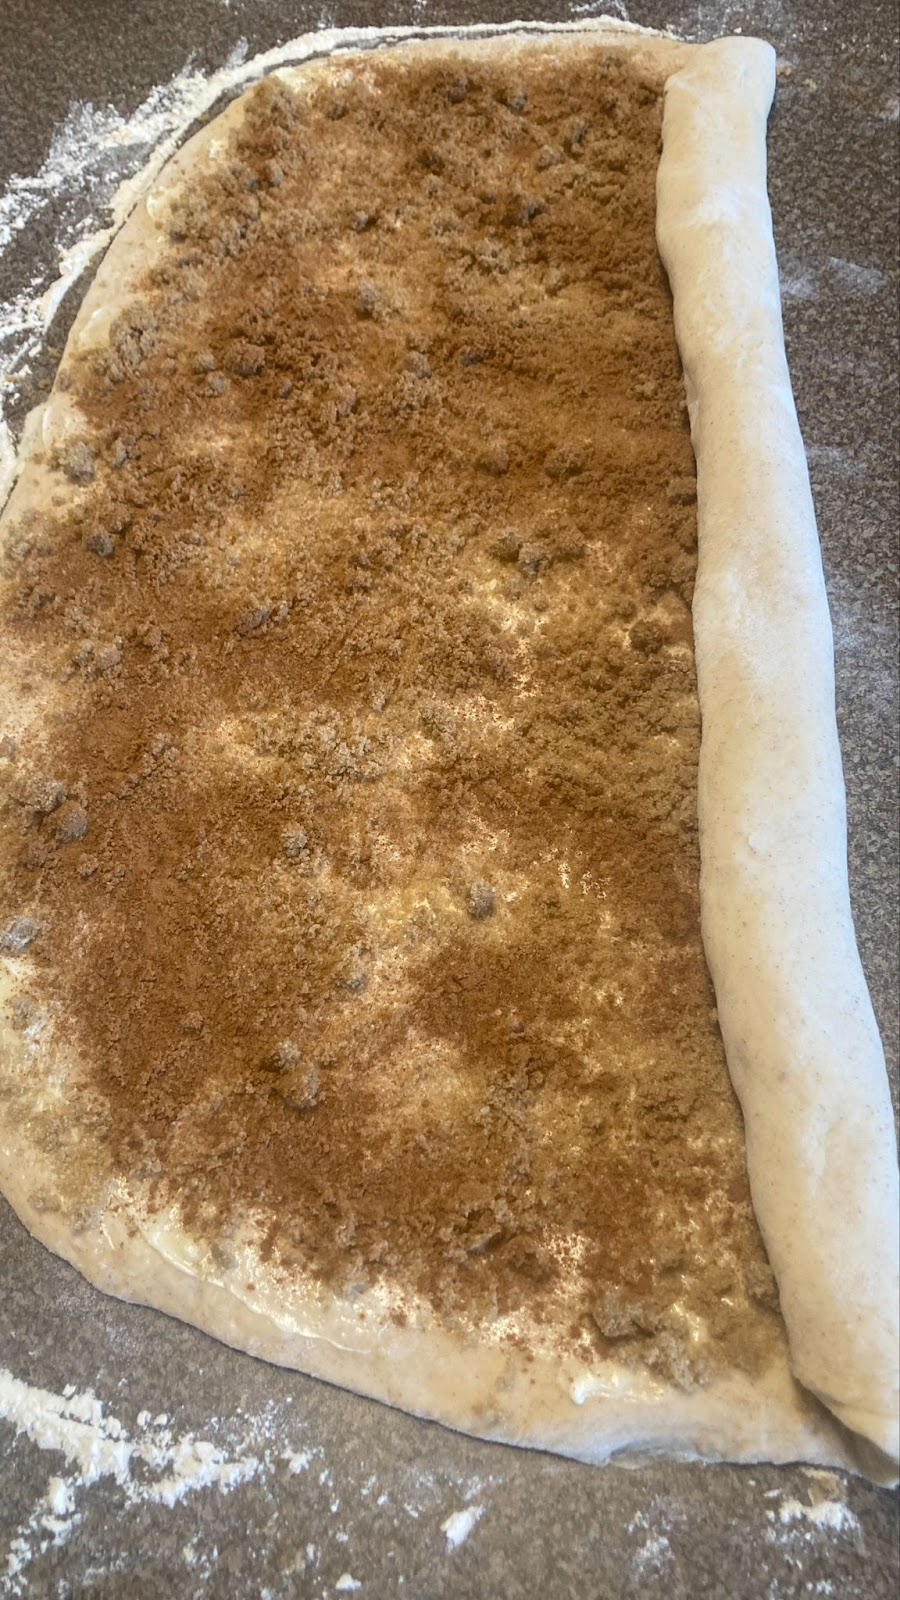
Spread softened butter evenly over the surface of the dough to the edges and then cover generously with brown sugar and cinnamon.
Rolling from the long edge, roll it into a long log and put the seam side down. Cut it first in half, then cut the halves in half, and then cut those quarters into 3 even slices.
Arrange in a pre-buttered (or cooking sprayed) baking dish or cast iron skillet with the sides touching and cover with plastic wrap.
Let sit out at room temperature for about 45 minutes, during which you’ll preheat your pellet grill to 350F. After they’ve had a chance to rise for 45 minutes, remove the wrap and put them on your grill and close it up. Check them after 15 minutes of baking – they should be puffed up and browning a little – continue to bake until they are golden brown on top and are about 200F internal temperature (if you don’t have a thermometer to measure that, don’t sweat, just let go until nicely browned). Serve hot out of the pan!
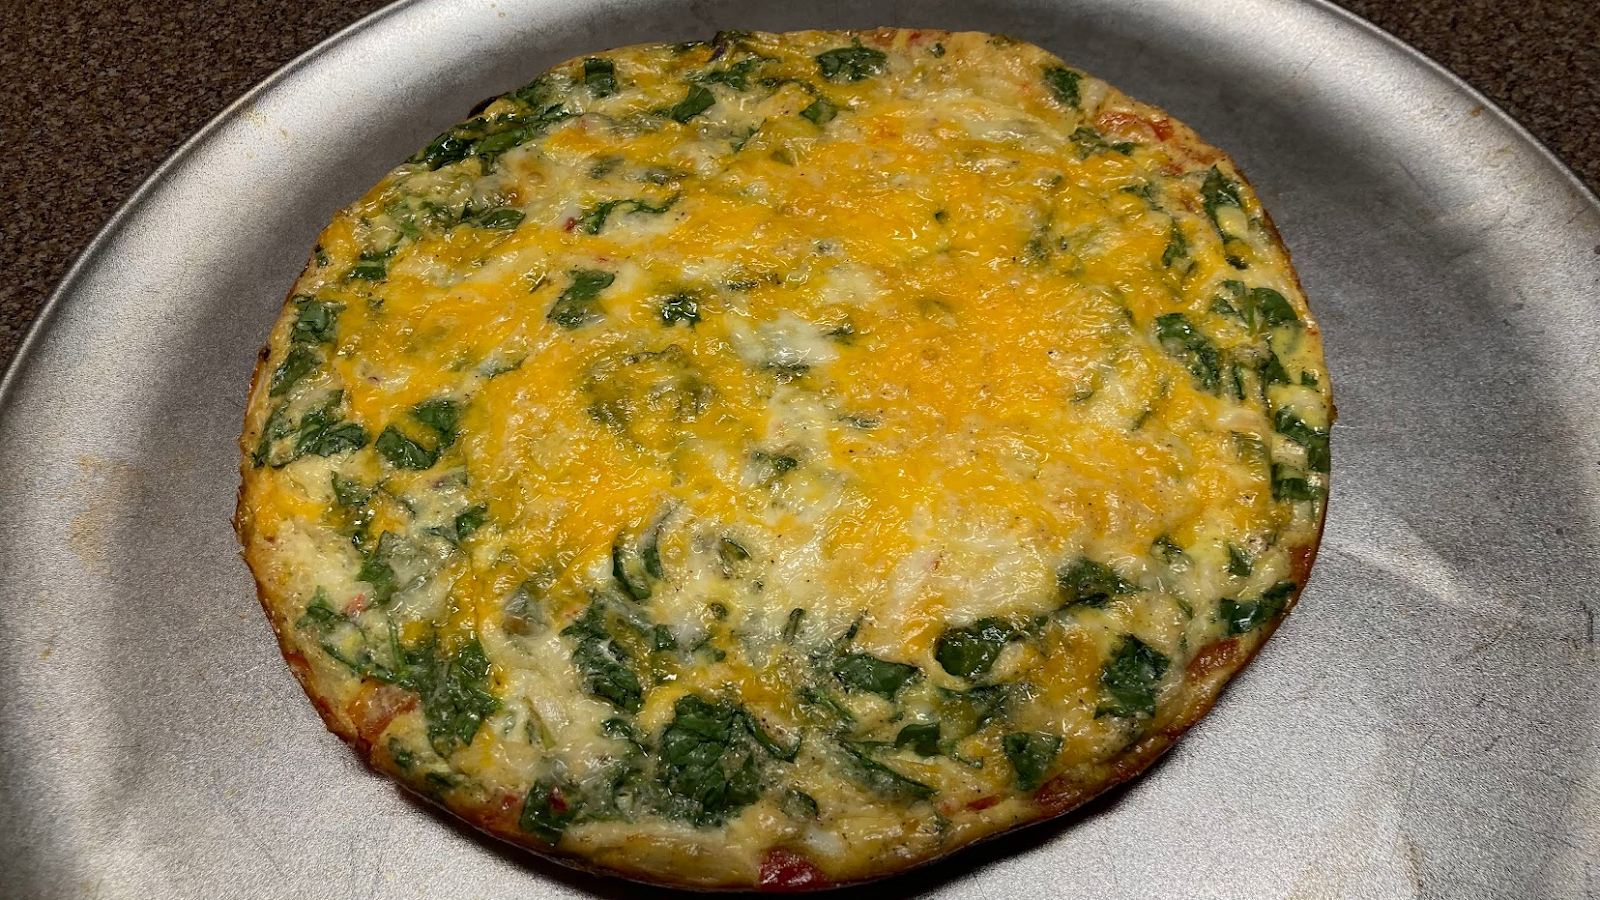
Egg Frittata:
(Stew Campbell)
Egg Frittata is a great way to serve eggs for a crowd of folks. All it is is a baked omelet. You can put veggies, meats, cheese, whatever in it, and then it just bakes – no flipping or anything needed. It’s so easy!
To get started, decide on what you’re going to put in your frittata – we like onions, bell peppers (red and yellow are our faves, but green also works great), green onions, spinach, mushrooms, etc.
The key thing is make sure you sauté your onions, peppers or mushrooms (green onions are the exception) to soften otherwise they will have a raw taste. For spinach, good to use raw but cut the leaves into small strips by rolling them up like a cigar and then slicing into ¼” slices (this technique is called “chiffonade”).
If you’re using sausage, pre-brown it, or bacon, pre-cook it. Cubed ham is also great as is prosciutto cut in strips.
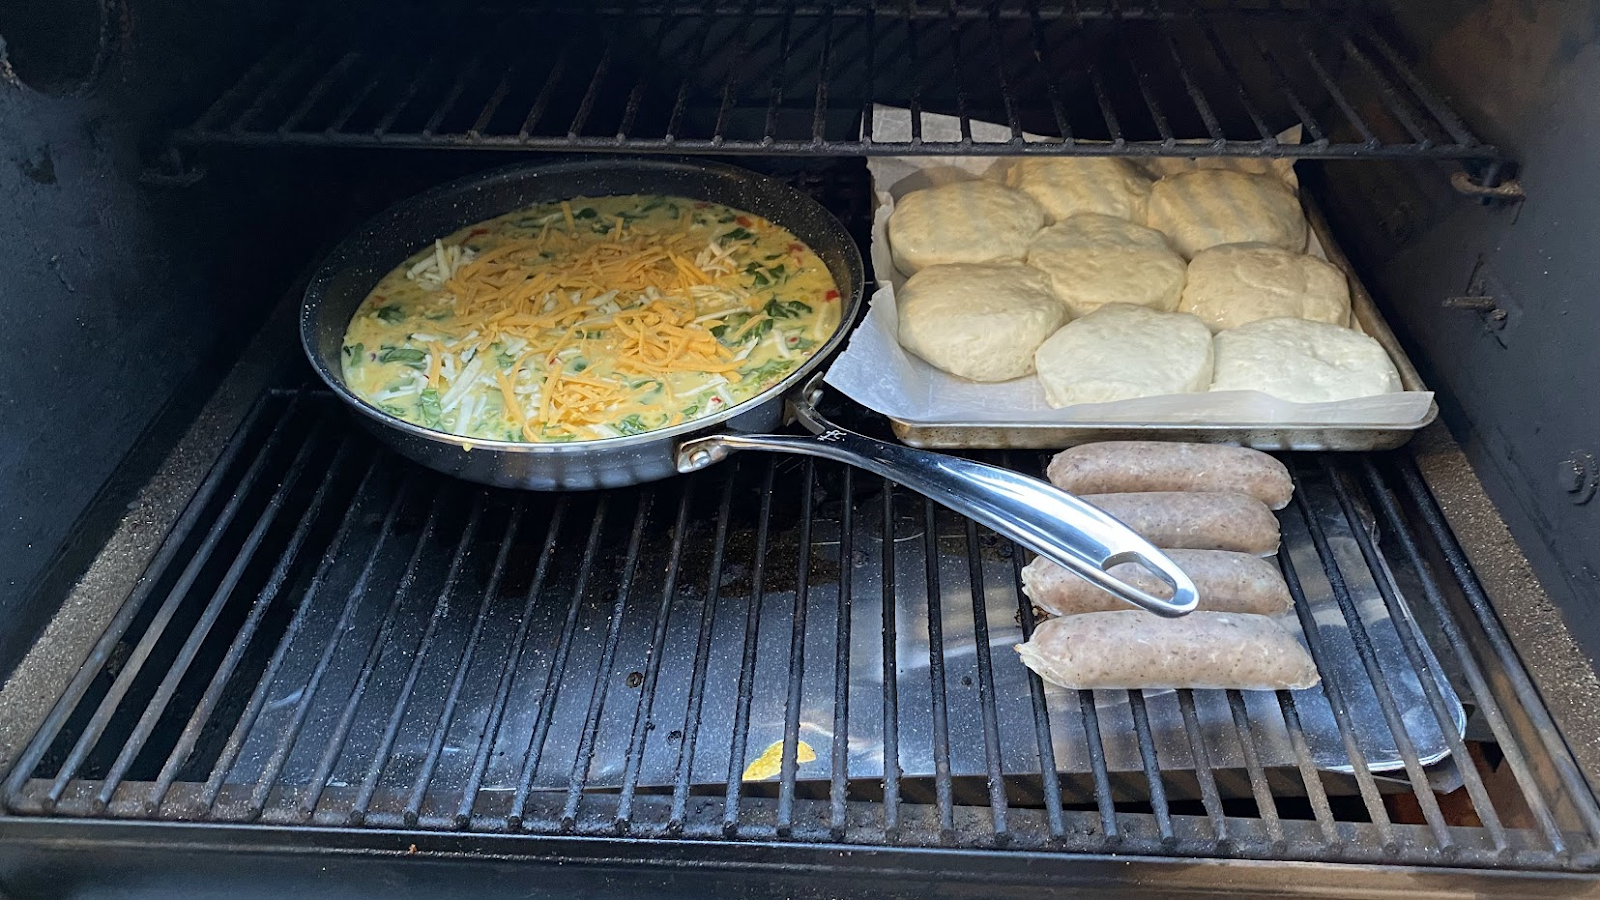
Preheat your pellet grill with a large oven proof skillet inside for at least 15 minutes at 350F. We like using a big cast iron skillet for this. For a frittata that serves 8, use a 12” skillet and the following ingredients:
10 eggs whisked or blended with ½ cup milk, 1 tsp Worcestershire, 1/2t salt and 1/2t pepper
About ½ cup each of sauteed onions, peppers and mushrooms. If omitting anything you can add more of another – about 1 to ½ cups total.
About ¾ cup chiffonade cut spinach
About 1 cup shredded cheese of any kind (but we like sharp cheddar) – reserve about ¼ cup extra to scatter on top
About ½ cup of any meat items
Put about 3 tablespoons of butter into your skillet and swirl to coat the bottom and up the sides by at least 1”.
Mix your filling ingredients with the eggs in a large bowl and pour into your hot skillet on the grill. Top with the additional reserved cheese then close up the grill.
Check after 15 minutes – it should be beginning to brown on top and be puffed up some. It is done with it is quite puffy and browned on top. Remove carefully, then work a spatula under it while tilting the skillet – it should begin to slide out.
Slide onto a large platter, cut into wedges or squares like pizza and serve!
(Stew Campbell)
Note in the photo we had room in the grill for a tray of “canned” jumbo biscuits and some freshly made breakfast sausages that our butcher sells.
And that’s it – you’ve got the recipes and tools to make an amazing, wood-kissed brunch feast! Serve with copious amounts of coffee, juices, mimosas and bloody mary’s!
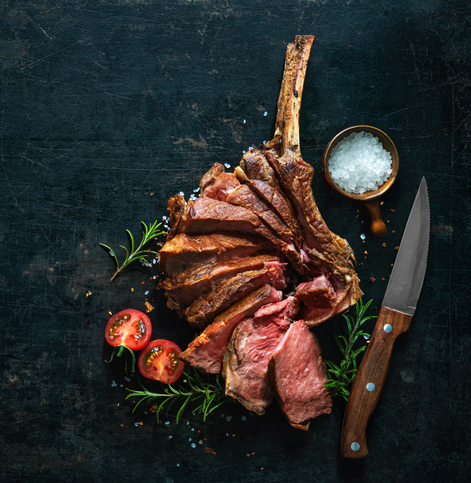
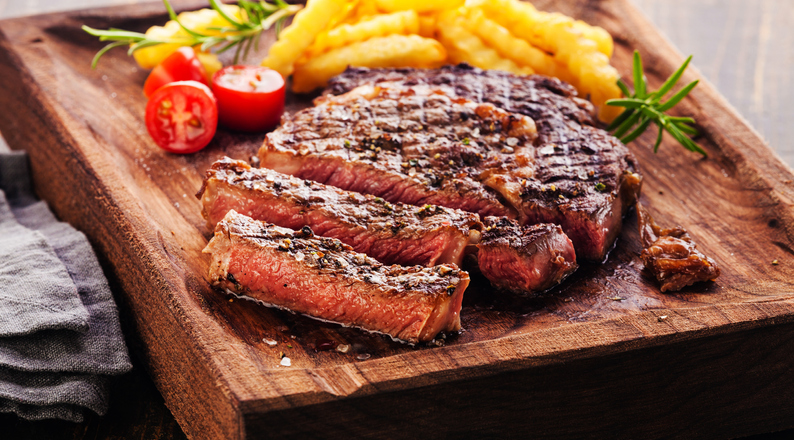
It seems that nothing strikes more fear into the hearts and minds of dedicated grillers and barbecuers like the awesome Tomahawk steak!
There’s something about its massive size, its formidable expense and its sheer amazingness that scares off a lot of folks from wanting to tackle making one or more of these. To that we say, FEAR NOT THE TOMAHAWK!
Read on and then prepare to conquer this incredible meaty achievement.
(Photo by Stew Campbell)
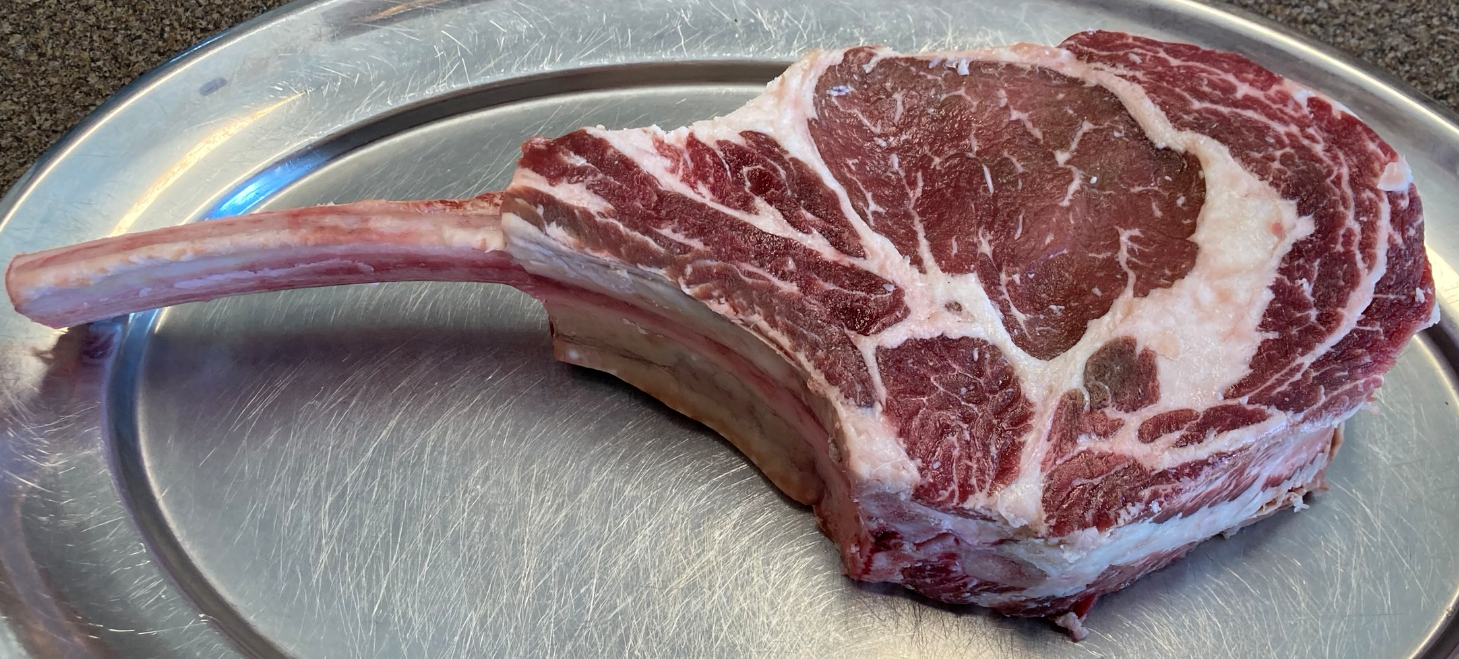
What is a Tomahawk Steak?
So, let’s start with the groundwork – in case you’re not fully familiar, a Tomahawk steak is basically a one-bone ribeye roast instead of having the bone cut flush with the end of the meat, a length of bone is left on and is “Frenched” – which is the technique of cutting away any remaining flesh to expose the bone.
They are typically between 2 and 3 inches in thickness and typically weigh about 3-4 pounds, of which about 2 pounds is edible meat. This makes it look like the Native American weapon, the Tomahawk. It also looks like something Fred Flintstone would eat!
Buying Tomahawk Steaks
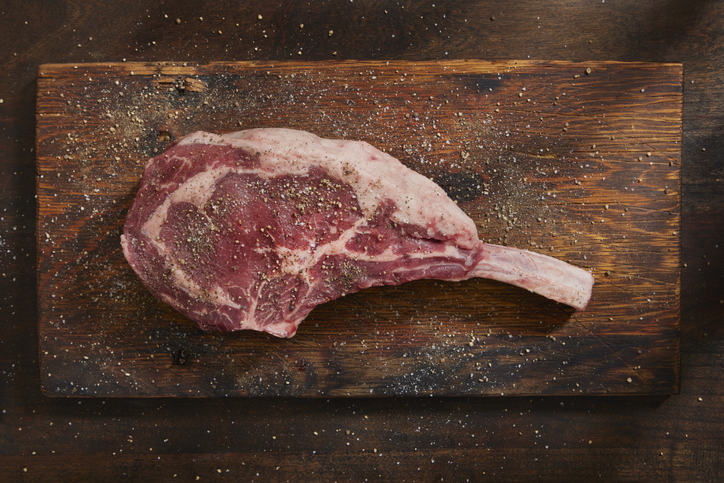
The great news is, with as popular as they have become, the prices have come down somewhat as they have become much more available. In fact, the Tomahawks featured in the pictures here … came from Walmart!
They are also available at Sam’s Club, Costco and often in grocery stores. That said, we are also very partial to local butchers and you can get some incredibly tender and delicious Tomahawks from a good local butcher. These Walmart steaks were on special at only $9.99/lb so each one was about $35. We’ve paid as much as $75 or more for these which does put the “scary” factor into making them.
Taming the Tomahawk comes down to one simple technique – the Reverse Sear, and fortunately, using a pellet grill fueled with Griller’s Gold Premium Hardwood pellets makes this SUPER easy.
To give a quick review (and for an in-depth look at that technique, have a look at this post from our blog), the “Reverse Sear”. This is where you cook the meat at a relatively low temperature until it is just short of the right doneness temperature. Then you give the meat a rest of 20-30 minutes while you preheat your grill to a very hot temperature. You then put it on and sear it for a few minutes to put that tasty crust on it.
The result is amazing edge-to-edge perfect doneness.
Let’s break it down and then at the end, we’ll share some favorite side dish ideas to enjoy with this gorgeous hunk of meat!
The Tomahawk Grill Setup
Fire up your pellet grill with your favorite Griller’s Gold pellet – we like Competition Blend or Smokeshack Blend for beef, but you do you! Set the temp to deliver 225F (know your grill and its variability!) and let it preheat for at least 20 minutes. Also find your temp probe if you have one and have it ready to use.
Tomahawk Meat Prep
It sounds crazy, but our “rub” for this is just a generous sprinkle of kosher or sea salt over all of it – both sides and the edges, and we apply that about 4-6 hours in advance and let the meat sit in the fridge uncovered.
This technique is called “dry brining.” This helps the salt absorb into the outside of the meat and dries the meat a bit which allows the smoke of the grill to flavor it more.
If you like, a nice hit of pepper with the salt is also good, as is Montreal steak seasoning. Our favorite other than just salt is Meathead Goldwyn’s “Mrs. O’Leary’s Cow Crust.” This is a salt-free rub you can make at home with pantry stuff, so you can also dry brine it without the worry of it getting too salty.
Temperature Management
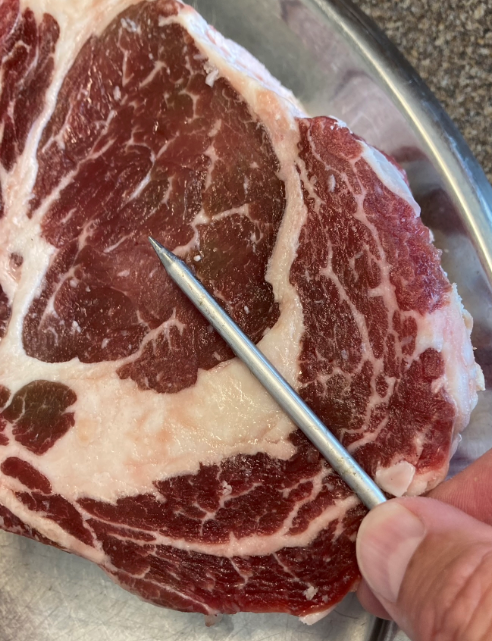
Cooking to the right doneness temperature is really critical for this to be successful. If your grill has a thermometer probe, use it but be sure to know its variability (for example on one of our pellet grills the probe reads 10 degrees low).
A great way to make sure you’re putting the probe in the right place and depth is to line it up outside of the meat, then put your fingers on the probe right where it needs to stop and insert it. Check the photo here to see what we mean. If you don’t have a probe, have an instant-reading thermometer handy to check it when you turn the meat over..
(photo by Stew Campbell)
Grill it!
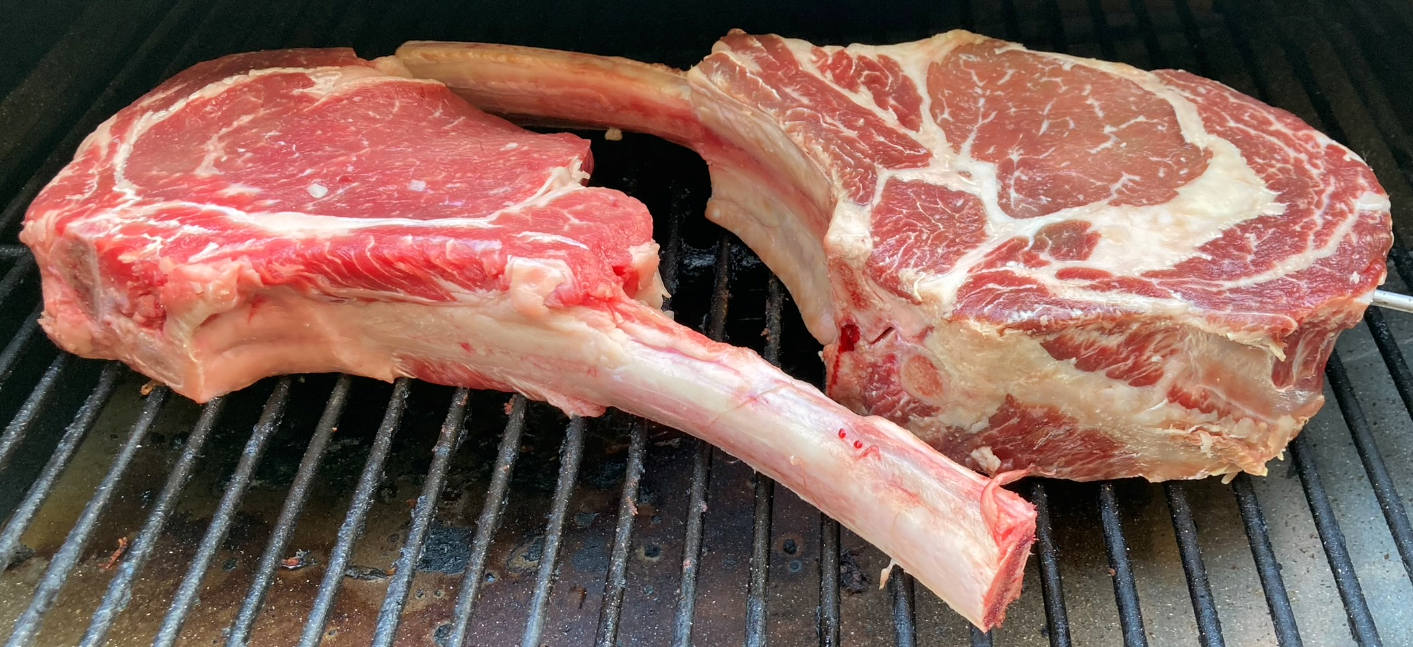
Ok, you’ve got it (or them …) salted/seasoned, got a probe in one (if doing two, probe the thinnest one as it will get done quicker), you’re all set to go. Place the meat in the center of the grill grate (or if doing two or more, down the center the long way) and close the lid!
Set a timer for 45 minutes and go away (this assumes your tomahawks are at least 2” thick) and don’t open the grill to peek. After 45 mins, turn the meat over and using an instant-reading thermometer, “confidence check” your probe temp readout.
Keep turning every 15 minutes until you’re about 10 degrees below the perfect doneness temp.
(Photo by Stew Campbell)
Know Your Done Temperature
As a review:
Blue Rare: under 120F
Rare: 125F (remove at 115F)
Medium Rare: 135F (remove at 125F)
Medium: 145F (remove at 130F)
We’re really not joking here. Generally speaking don’t cook big beef like this to anything more than Medium, because the results really suffer. If you have someone in your dining group that wants medium well to well done beef, you’re better off grilling them their own steak.
When it hits the “remove at” temp, pull it off, put it on a platter (and if two of them, stack them to “cuddle” the heat in them), cover with heavy duty foil then lay a folded heavy towel over them. All of that helps them retain heat and for the carryover cooking to do its magic.
Rest for at least 30 minutes. While your meat is resting, either fire your pellet grill to its max, or preheat a gas grill to all burners on high or even light a hot charcoal fire. We like searing on the gas grill since the flavor is already in the meat and it’s easy to manage.
Sear the Tomahawk
Unwrap the steaks, retaining the accumulated juice in your pan, and put them on the grill. Do NOT go away from the grill – you can go from “sear” to conflagration in seconds. We like to do our searing on our gas grill. We set the burners of our 3-burner gas grill on high to preheat and when ready to cook; we shut off the middle one to limit the chances of a flare up.
Ribeye’s have a LOT of fat on them and that fat can light off in seconds and ruin your steak. If your grill suddenly starts to smoke a lot, get that hood open and move the steaks away from the flareup. We keep a little squirt bottle of water handy to kill those flames.
Turn the steaks about every 2 minutes until they have a nice even brown crust on them and beautiful grill marks. It usually takes 2 turns on each side – about 8 minutes total.
(photo by Stew Campbell)
Move them back on your platter and then immediately carve the meat from the bone. Slice in ¼ thick slices across the grain, trimming out any big fat areas. Because the meat was already rested, you can slice and serve immediately hot off the grill. Top on a serving platter with accumulated juices and serve! It’s amazing!
The Tomahawk Meal
So, make a meal out of it! Our recent Tomahawk meal, shared with a few friends on the patio included:
Fresh corn on the cob – we like to prepare ours by simply loosening the husks and pouring about a tablespoon of water into the husks, then close them and grill them on a hot grill (great thing to do while the steaks rest) about 15-20 minutes until the outer husks are charred a bit
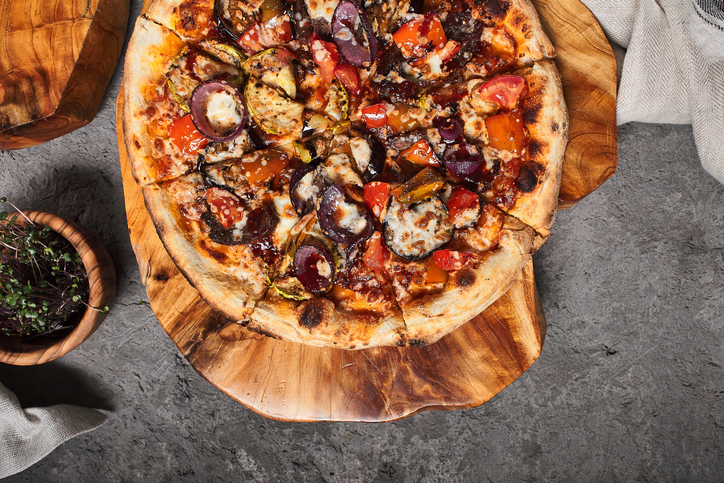
Let’s face it – there’s nothing better than fresh, hot pizza. There, we said it, change our minds! Oh, you agree!
Well then, let’s talk about making fresh, hot, wood-oven style pizza on your pellet grill fueled with Griller’s Gold Premium Hardwood pellets!
We’re going to break up this post into two parts – part 1 is simple. How to get a great wood-oven flavored pizza from your pellet grill using Griller’s Gold pellets for fuel.
This is easy! You can buy frozen pizzas, take and bake pizzas, etc., and just baking them in your pellet grill will add a kick of flavor to them that you won’t find in pizzas baked in your oven.
Part 2 however, is kicking it to the next level. Fresh homemade dough, fresh homemade sauce, and super fresh ingredients. All adding up to completely next-level pizza that will have your friends and neighbors begging you to make it over and over again. You’ll be a pizza rock star!
Part 1: Baking Pizza in a Pellet Grill
The scenario is you want pizza, it’s a gorgeous evening and you want to serve it hot off your pellet grill. Buzz out to your local grocery and buy either a fresh “take and bake” non-frozen pizza – most groceries have these including national chains like Walmart, Target and Aldi. OR you can also buy a frozen pizza, the brand being your choice.
Take & Bake Pizzas
It is as simple as this: most take and bake and frozen pizzas are designed to be cooked directly on your oven’s rack, aka the main grate on your pellet grill. Then cooked at a temperature that is easily attained by your grill – the most common being 425F.
So simply preheat your pellet grill, using your favorite Griller’s Gold pellet choice – Competition Blend is a good choice here – to the temperature noted in your pizza’s instructions. Let’s assume 425F though.
Give it a good 20 minutes of preheat time to make sure it’s truly up to temp. Then just slide that pizza onto the grate, close the lid, and set a timer for the recommended time on the package. To remove it, it helps to have a pizza peel (large spatula like thing for getting pizzas out of an oven) or a rimless baking sheet. Worst case scenario, use your barbecue tongs to grab it and slide it onto a tray for serving. Your pizza will have that “kissed by smoke” flavor that a good wood-oven pizza has and you’ll be very happy!
Notes for Great Grilled Pizza:
First, for great pizza results, oven or grill, buy yourself a pizza stone. A pizza stone is a large piece of stone-like material that absorbs and concentrates heat and absorbs moisture. A pizza baked on a stone will have a nice crunch to the bottom crust and a great flavor that you just can’t get otherwise. These are pretty inexpensive on Amazon – here’s an example: https://a.co/d/g6Aawyi
Second, if you want a smokier flavor for your pizza, use a smoke tube filled with Griller’s Gold pellets. We’ve covered those numerous times before – check out our December 2022 gift guide for examples.
Which leads us to part 2 and why you’re really here – to make amazing craft pizza on your backyard wood burning pizza oven, aka your pellet grill burning Griller’s Gold pellets!
Part 2: Making Craft Pizza
Craft pizza is made with delicious homemade crust, tasty tomato sauce that’s super easy to make, fresh cheeses and lots of love! All baked on your pellet grill with Griller’s Gold fuel, giving it that “kissed by wood smoke” flavor.
First of all there are TONS and we mean TONS of resources online for making great pizzas. One of our faves to follow on YouTube is Vito Iacopelli – he is an Italian-born chef making incredible artisan pizzas. His techniques and recipes are a bit complicated, so in the interest of making this easy for you we have our own versions. But check his channel out here: https://www.youtube.com/@vitoiacopelli
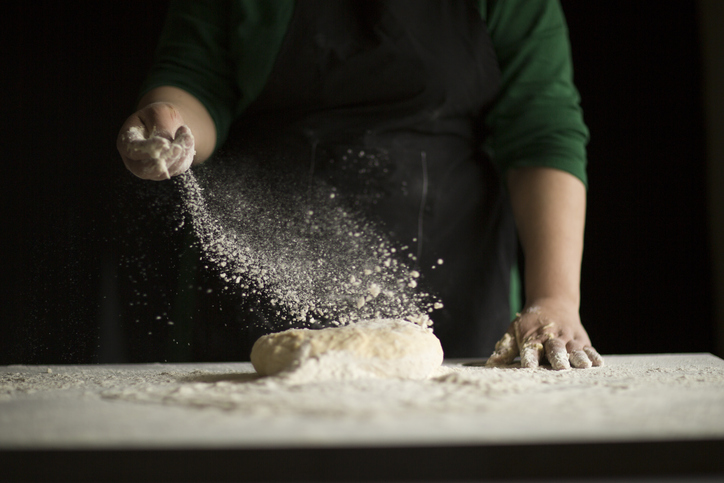
Here’s an easy-to-follow recipe for making great pizza dough. The key/trick to outstanding pizza dough is to let it ferment overnight in the refrigerator. Letting dough rise overnight in the fridge gives it a flavor and texture that just doesn’t come out in a short process. So, making great homemade pizza does take a touch of planning.
Special gear – here’s where a pizza stone and a proper pizza peel are a must. This really won’t work without those two pieces of equipment. Also, to get the pizza to slide off the peel and onto the stone, the peel needs to be floured.
We have found that the best for doing this is not regular flour but semolina flour. Its granular texture makes it work like little ball bearings for sliding the pizza off the peel and onto the stone.
Making the Pizza Dough
Ingredients:
1 pound or 453 grams of flour (or if using cups, about 3 ½ cups)
1 ⅓ cups of water at 100F temperature plus 2 tablespoons of water at 100F (or if by weight, 320 grams of water plus 10 grams of water)
1 ¾ tsp kosher or sea salt. If using iodized table salt, cut to 1 ¼ tsp
1 packet instant yeast or 2 tsp if using bulk yeast
½ tsp sugar
Pizza Dough Steps Day 1:
The night before you want pizza, measure out the flour into a large mixing bowl and stir the salt into it.
Measure out the 1 ⅓ cups of water, and put the 2 tablespoons of water in a separate small dish.
Add the yeast and sugar to the 2 tablespoons of water and stir well.
Let rest 5 minutes (this activates the yeast) then stir the yeast mixture into the larger container of water and mix that well with the flour to form the dough.
Let the dough sit in your mixing bowl 10 minutes then stir again, and turn out onto a surface sprinkled generously with flour.
Fold the flour in half, pressing flat, turn ¼ turn and repeat.
Repeat that 15 more times – if the dough is sticking to your hands, flour them.
Then put the dough back in your mixing bowl and cover with plastic wrap.
Let rise 2 hours.
Then wet your hand and reach into the bowl, grab the side of the dough and stretch it up and fold it over the dough. Do this 4 or 5 more times, turning the bowl ¼ turn each time.
Let rise 1 more hour covered, then repeat the stretch and fold, then cover again with plastic wrap and put in the fridge until tomorrow.
Pizza Dough Steps Day 2:
2 hours before you’re ready to make pizza, turn your dough gently out onto a floured surface and shape it into a rough oval.
Using a scraper or a sharp knife divide the dough into two more-or-less equal portions.
On each, gather the edges of the dough up to the top center forming a ball.
Set the ball on a floured part of your surface and repeat with the other, then let the dough balls rest for at least 20 minutes, covered lightly with a sheet of plastic wrap.
To Form a Pizza Crust:
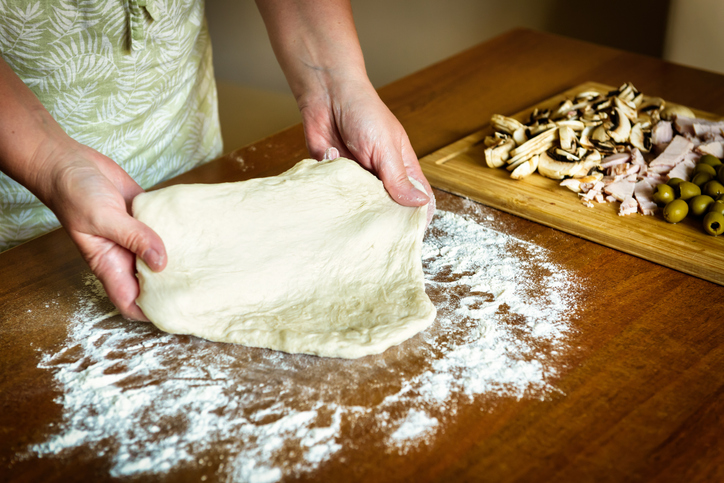
Put a dough ball in the middle of your floured work surface and using your finger tips, press down on it to flatten it – repeat all over – the dough will have little craters all over it.
Then pick up the flattened disc, and holding it about 1” from the edge, start shuffling it in a circle like you’re turning a steering wheel, keeping the bottom edge in contact with your surface.
After a few times around, lay the dough back on your floured surface, and using your hands, press any thickness out of the center of the dough, trying to flatten it to an even round of between 8 and 10 inches in diameter, leaving a thicker edge section. You can also lay it over the back of your fists and use them to stretch it.
Generously sprinkle flour or semolina over your pizza peel. Brush the top surface of your pizza crust with olive oil then gently pick it up and lay it on your floured pizza peel. Now you’re ready to build your pizza.
To bake your pizza, fire your pellet grill up to it’s hottest temperature using Griller’s Gold pellets – ours goes to 500F. Give it at least 30 minutes to preheat. Make sure your pizza stone is in there for the entire preheat.
To “launch” a pizza into the oven (look up YouTube videos on this!), first give your peel a “shake” back and forth to make sure the pizza will slide – this is why flouring the peel is so important. If it won’t slide, gently lift sections of the dough with a wide spatula and toss flour under it until you can slide it.
Then, open your grill, set the end of the peel about an inch from the far edge of the stone and holding the peel at about a 10 degree angle, give it a few back and forth shakes to get it sliding down the peel. As soon as the pizza touches the stone, gently start pulling the peel out back towards you. The pizza will slide off the peel and onto the stone.
This does take practice!
Building Pizzas
Fresh Tomato Sauce
Ingredients:
1 22 ounce can whole roma tomatoes, ideally imported San Marzano tomatoes from Italy
2T extra virgin olive oil
¾ tsp salt
Dump the can of tomatoes into a mixing bowl, then using your hand, squeeze each tomato, breaking them up into chunks. If you don’t like chunky tomatoes, run the canned tomatoes through a blender or food processor to puree. But chunky is better!
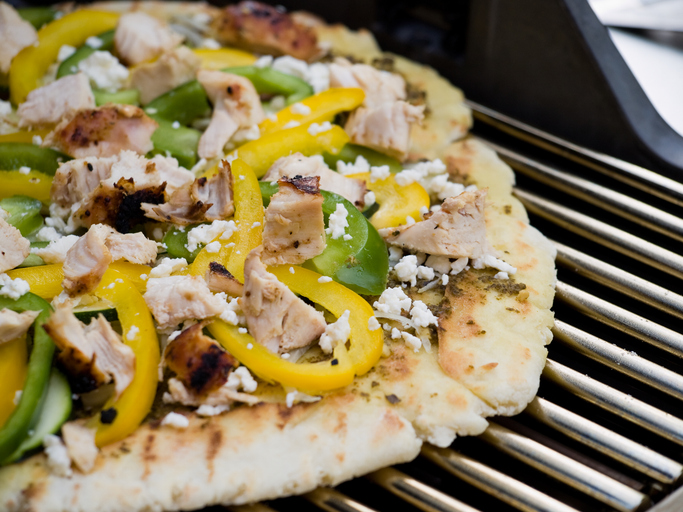
Pizza Recipe Ideas
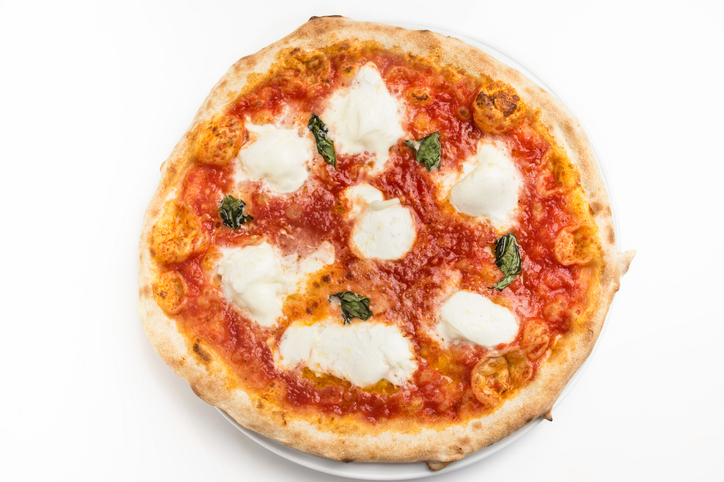
Margarita Pizza:
For the freshest, most authentic tasting Italian pizza, make a Margarita Pizza. For this, use fresh mozzarella (this is the stuff in large balls packed in liquid) sliced about ⅛” thick.
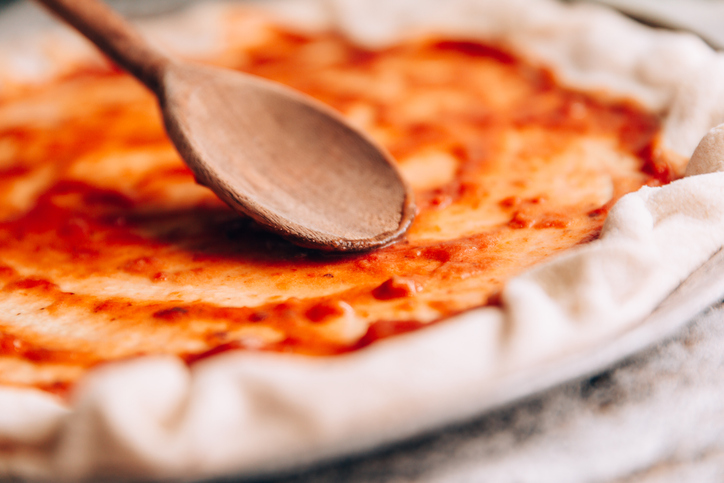
Spoon the sauce over your crust – you don’t want a LOT of sauce – be gentle with it. Then scatter the mozzarella slices over the sauce and finally, tear up some fresh basil leaves into big pieces and scatter over the top of the pizza.
Bake according to the instructions above until the crust is golden and the cheese gets little dots of browning on it, about 12-14 minutes.
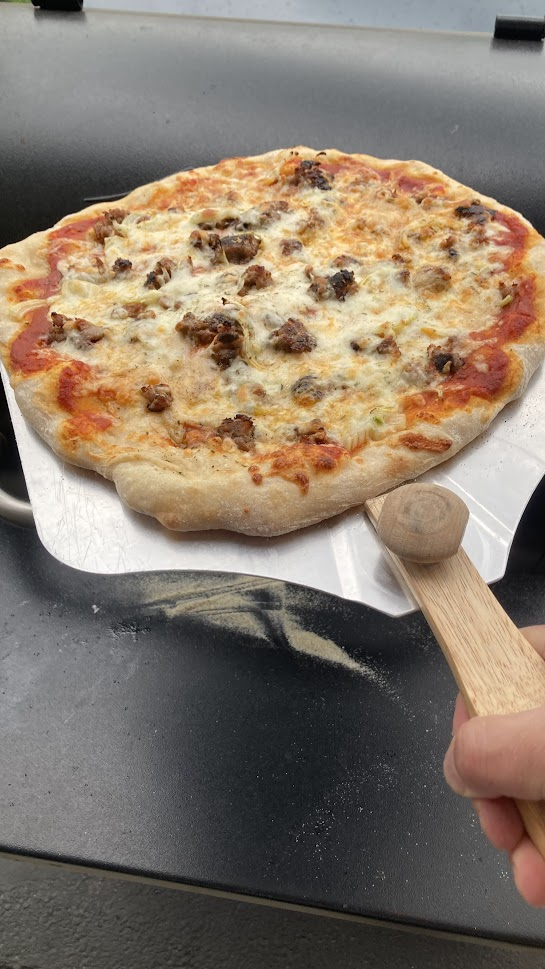
Traditional “Meat Lover” pizza:
Brown crumbled Italian sausage in a hot pan then drain the grease. After forming your crust and brushing with olive oil, spread sauce over the pizza in a thin layer. Then scatter the Italian sausage over it.
Using either slices of fresh mozzarella or shredded commercial mozzarella cheese, add a layer of cheese to the pizza. If you like extra meat,, scatter slices of pepperoni over the top of the cheese. Bake until the pepperoni curls, the cheese is dotted with brown spots and the crust is golden – about 12-14 minutes.
(Stew Campbell)
Salad Slice pizza:
The salad slice is a NYC Little Italy thing at lunch time. I guess having a crisp arugula salad on top of your pizza makes it seem healthier!
For the pizza, build a classic Margarita pizza above, omitting the basil leaves. For the salad, make a quick lemon vinaigrette by whisking together the juice of a fresh lemon with ½ cup of extra virgin olive oil and one clove of garlic, smashed or pressed.
Add salt and pepper to taste, then stir in 1T of grated parmesan cheese. The salad is just fresh arugula tossed with the dressing – this dressing is “a little goes a long way”. When the pizza is fresh from the oven, top with the dressed arugula salad. Then cut it into wedges, garnish with shaved parmesan and serve.
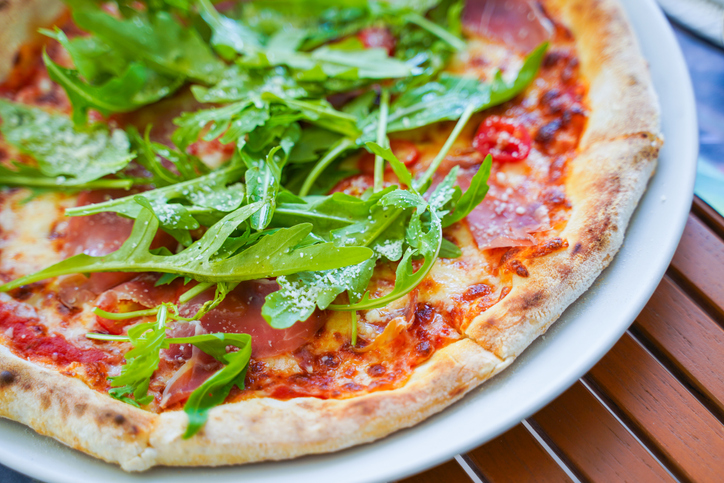
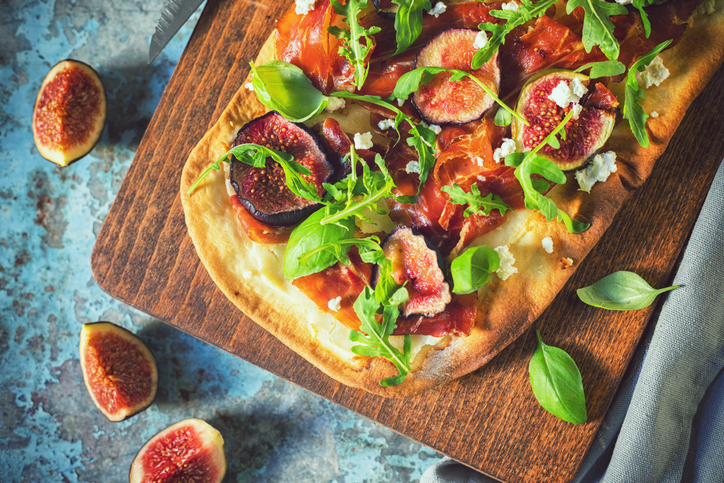
Fig/Goat Cheese/Prosciutto Pizza:
Now this one is extra tasty. Make your crust but don’t brush with olive oil.
Take some fig jam and stir it with a bit of water just to make it more spreadable. Then spread it out over the top of your pizza crust. Lay slices of prosciutto over the fig jam, then dot generously with chunks of goat cheese. Garnish with slices of figs.
Bake as usual. After it comes out, garnish with torn basil leaves and a drizzle of balsamic vinegar glaze. AMAZINGLY GOOD!
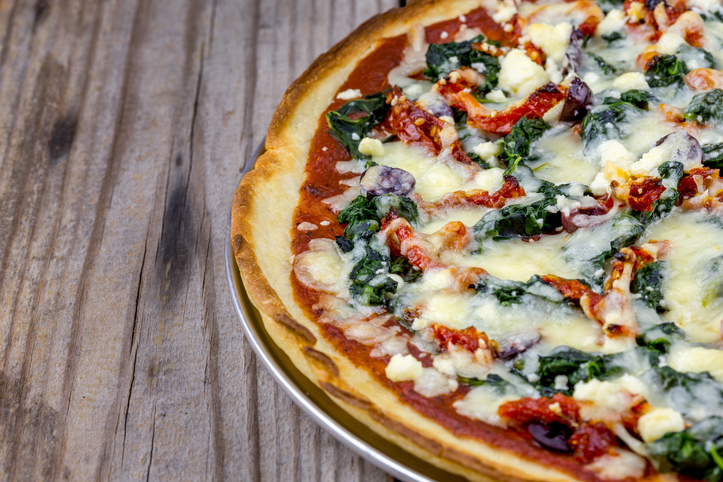
Spinach/Blue Cheese/Pine Nut/Sun Dried Tomato with Red Onion:
Rough dice a half of a red onion.
Prepare your crust and brush well with olive oil.
Scatter the red onion over the crust, then blue cheese crumbles, slices or strips of sun dried tomatoes (buy the oil packed for best results) and finally, pine nuts or chopped walnuts. Bake until the cheese melts and browns and the crust is golden.
Scatter some fresh basil strips over the pizza for a nice garnish after baking. Super appetizer pizza!
It looks like summer is finally arriving after a cold spring here in the upper Midwest where the Griller’s Gold blog team resides. Time for lazy days spent on a boat, picnics under a big shady tree in a park, outdoor music festivals, long hikes and much more.
This is also time to have some great ideas for tasty things that are a) portable and b) safe to eat with minimal refrigeration. And of course prepared on your pellet grill using Griller’s Gold Premium Hardwood pellets!
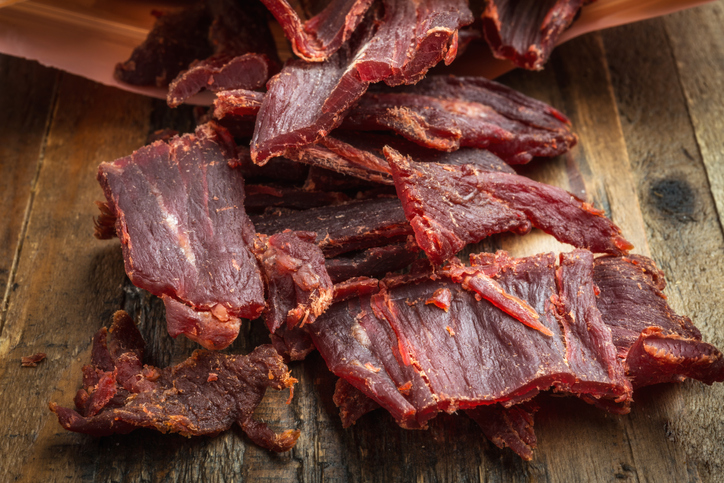
The star of that summer show is Pellet Grill Jerky. We really don’t know a single person who isn’t vegan that doesn’t love a good strip of jerky. The fun part is that this recipe is repeatable across a lot of other meats – not just beef.
To accompany the Jerky recipe we also have recipes for smoked cheese crackers, smoked caramel corn and smoky nuts – all great to munch on a summer day accompanied by a great cocktail. And speaking of great cocktails, we have a couple to share with you too!
Let’s get to it!
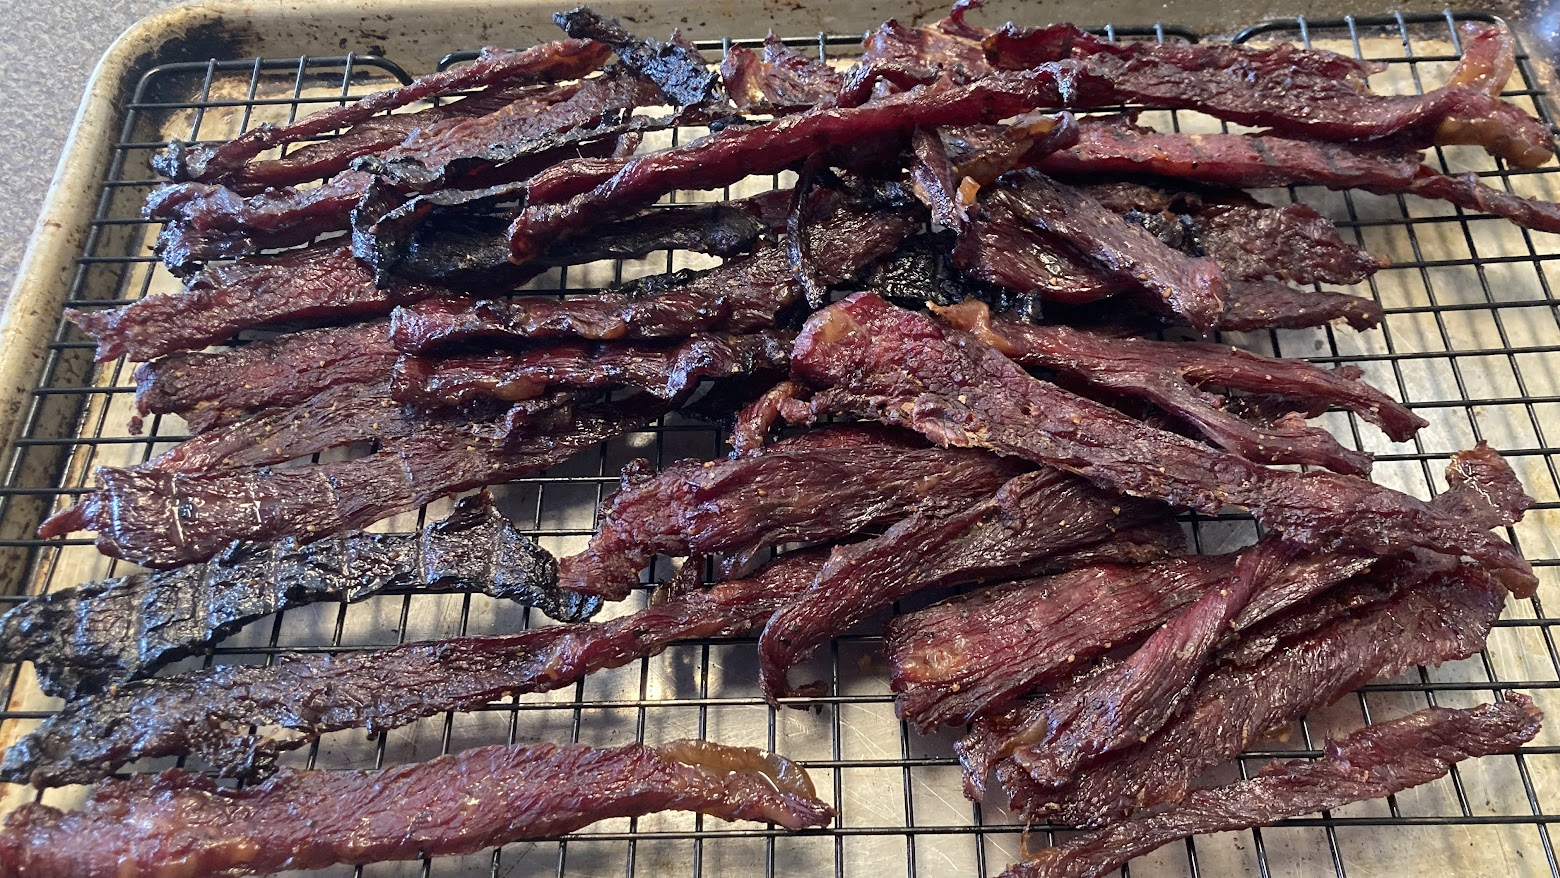
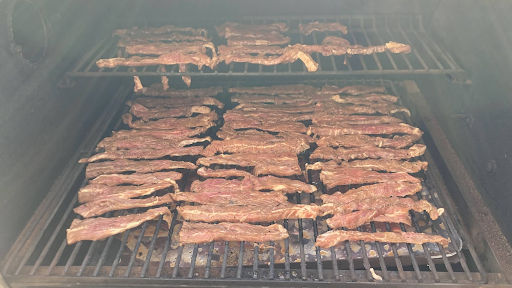
Pellet Grill smoked Beef Jerky
(Stewart Campbell)
Making your own homemade beef jerky will ruin you forever from buying the commercial stuff. For starters, the amount of jerky you can make for about $20 total will be at least 3X what that $20 would buy in the commercial brands. And it is so easy!
Also the trick to having your jerky be more safe out of the refrigerator is to use some curing powder in the marinade. This powder, available online is what is used to cure bacon and other meats. This recipe is for beef flank steak but you can also substitute game meat (venison is off the chart!), turkey or pork.
Ingredients:
2-3 lbs of beef flank steak
Marinade:
½ tsp Pink Curing Powder #2 (“Prague Powder”) (You can also use Morton’s InstaCure, follow the box instructions on how much to use)
1 cup Pineapple Juice (we used Jumex branded Pineapple Nectar)
½ cup Worcestershire sauce
½ cup Low Sodium Soy Sauce
½ cup dark brown sugar OR ¼ cup Agave Syrup
4 cloves of garlic, mashed or pressed (or 1 tsp granulated garlic)
1 inch piece of fresh ginger, grated (OR ½ tsp powdered ginger)
2 tsp coarse ground black pepper
2 tsp hot sauce (we use Frank’s Original sauce)
Chill the beef well – or even put it in the freezer for about 45 minutes – you want it very cold and firm for good slicing. Cut the piece of flank steak in half AGAINST the grain, then turn it ¼ turn and make ⅛” thick slices WITH the grain. Cutting with the grain is key to having those nice chewy pieces of jerky.
Mix up your marinade. Put the meat into a 1 gallon zip closure freezer bag and then dump in the marinade. Press as much air out of the bag as possible, then put the bag into a shallow container and place in the fridge. (This is to contain any leakage, this marinade will make a sticky mess out of your fridge if it leaks. Ask us how we know!) Let the meat marinate at least overnight, or up to 24 hours.
On cook day, fire up your pellet grill to its lowest setting with your favorite Griller’s Gold pellets. For this recipe we like Smokeshack Blend or Hickory. Our pellet grill will run at 165F and if yours has a “super smoke” or extra smoke setting, use that.
Give it at least 15 minutes to warm up to temp.
Then simply lay the meat strips over the grill, leaving a bit of air gap between them to allow the warm air and smoke to circulate. Close the grill up and set a timer for 5 hours and go do something else!
After 5 hours the meat will have smoked, dried and shrunk into amazing jerky strips. Try one warm off the grill – it should be chewy, not juicy. If it needs more time, (if it is juicy for example, or not firm) then let it go 1 more hour.
Remove the jerky to a cooling rack over a baking sheet and let cool at room temp. Store in a sealed bag or container in the fridge. It also keeps great longer term in the freezer in a well sealed container with the air pressed out. On an outdoor day, it’s safe that this is out of the fridge as it’s both cured and smoked.
(Stewart Campbell)
Super easy! There are a lot of variations of recipes out there – just search for “Pellet Grill Jerky” recipes, or combine your own ingredients to make it yours!
Smoked Cheese Crackers
These are so decadently tasty they ought to be illegal. And ridiculously easy to make!
Ingredients:
1 regular sized box cheese crackers like Cheez-Its
Melt the butter, then mix in the rest of the sauce ingredients. Put the crackers in a large mixing bowl, dump the sauce over them and gently toss to coat well all over.
Spread the crackers out on a cooling rack placed over a large cookie sheet and put that on the grate of your pellet grill. Let smoke for 1 hour, then boost the heat to 300F and bake about 30-40 minutes until the crackers start to darken a bit.
Remove from the grill and let cool to room temp. Store in a zip lock bag or sealed container, although they won’t last very long!
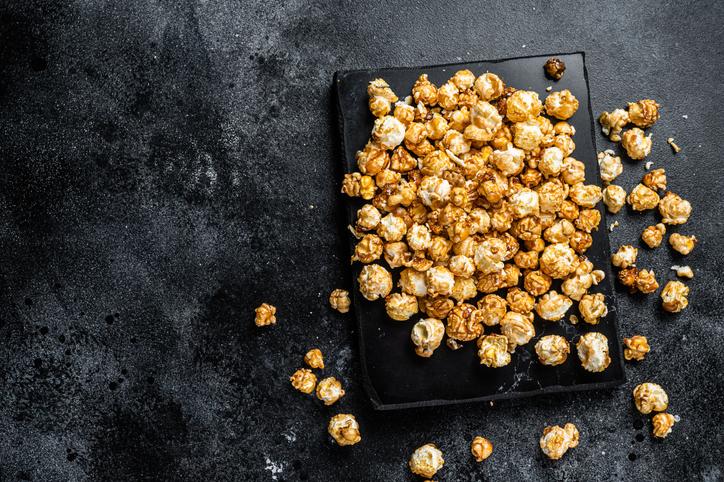
Smoked Caramel Corn
As much as the Griller’s Gold Blog Team is all about fresh ingredients and making from scratch, well, this one is so easy to do with a commercially made caramel corn, that it feels like cheating. The trick is you want just enough heat so that the coating softens and absorbs smoke, without burning. 200F seems to be that magic temp.
The ingredient is a big bag or container of caramel corn, and if you want to mix it up a bit, using the caramel corn/cheese corn mix, this is also outstanding in this recipe.
Preheat the pellet grill (using Griller’s Gold pellets of course) to 200F, spread the corn out over a large rimmed baking sheet and put it into the grill. Let bake/smoke for 1 hour, tossing every 15 minutes. Remove and let cool, store in a zip top bag or sealed container.
Smoked Cajun Seasoned Nuts
This takes that container of mixed nuts and kicks them to the next level, and then just for fun, kicks them even further with a pop of sweet heat from Cajun seasoning and some honey.
Ingredients:
3 cups mixed nuts of your choice, or a single kind of nut, whatever you prefer
3 T butter
2 T honey
1 ½ tsp Tony Cachere’s Cajun Seasoning
Preheat your pellet grill to 165F with Griller’s Gold pellets – for this recipe, try Applewood or Hickory.
Spread the nuts on a rimmed baking dish and smoke them for 1 hour at 165F. Remove from the grill and increase the grill heat to 350F.
Meanwhile melt the butter, and mix in the honey and Cajun seasoning. Dump the nuts into a bowl and toss well with the melted butter/honey/seasoning.
Line your rimmed baking sheet with parchment paper and spread the nuts out evenly over the pan. Bake in the pellet grill at 350F for 30 minutes, stirring the nuts after 15 minutes to bake the coating onto the nuts and caramelize the sugar in the honey.
Store in a sealed container (but have a handful hot from the smoker, they are amazing!).
smoked Cocktail Recipes
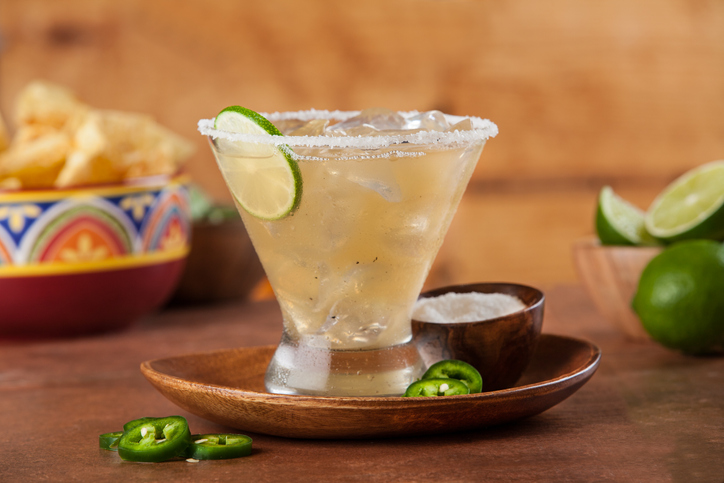
What’s the point of snacks without drinks? Here’s a couple of our summer faves, starting with our favorite Margarita recipe:
Never Fail “Toppest Shelf” Margarita
This is for a margarita that is more like a martini than the oversized monsters you see in Mexican restaurants. Note, there is no mix in this – it’s all individual and fresh ingredients because that makes the best drink!
Those mixes are loaded with things like high fructose corn syrup and citric acid. Bleah. Also critical to this using super premium tequila and top shelf orange liqueur. Nothing that comes in a plastic handle bottle, please!
For two fantastic Margaritas:
4 ounces very premium tequila, we like Resposado grade from Don Julio, Milagro, Casa Migas, Cabo Wabo, or Hornitos.
1 ½ ounces Cointreau, which is a very premium orange liqueur
Juice of 2 limes
1 ½ ounces of Agave Syrup
Salt or Tajin Seasoning for rimming glasses
Ice
Rim a pair of chilled glasses (either martini or rocks glass) with sea salt or Tajin seasoning (if desired)
Put all the liquid ingredients in a cocktail shaker or large pint glass and stir well. Fill the shaker or glass with ice and either shake (better) or stir vigorously to cool and slightly dilute the drink.
Either strain into a martini glass (dividing, you’re making two here!) or divide the drink and ice from the shaker evenly into two rocks glasses.
Perfect Ice Cold Summer Mint Julep:
This cocktail is most often associated with the Kentucky Derby but we just love it all summer long as it is frosty cold and tastes so fresh.
For two:
4 ounces premium Kentucky bourbon of your choice. We love to use Woodford’s Reserve for our Juleps, but really any good bourbon works.
1 ½ ounces simple syrup (You can buy this premade but why do that when it’s super simple to make. Recipe: https://tinyurl.com/4bmbp45e )
6 mint leaves, torn, for muddling. 6 more mint leaves on stems for garnish (3 per stem)
Crushed ice (at least 2 cups)
In two rocks glasses (although the tradition is a copper cup), add 1 ounce of bourbon to each plus a splash of simple syrup and 3 torn mint leaves. Muddle the mint with the bourbon and simple syrup.
Add the remaining bourbon and simple syrup to each drink and stir, then fill with crushed ice. Add a short straw and garnish with 3 whole mint leaves on a stem. Sip slow and enjoy!
So that’s it for this time.
Have a great start to your summer and we will see you again soon in this space!
Spring is springing and summer’s not far behind. This season brings warm, enjoyable weather perfect for gathering with friends and enjoying lots of treats off your grill fueled with Griller’s Gold Natural Hardwood pellets!
So here’s the situation: Your friends have gathered for an impromptu get-together in your backyard (or deck, patio, garage, etc…) and you want to whip up some tasty barbecue for them, but you don’t have hours to do it.
Set up your grill for HOT AND FAST grilling and smoking:
While “HOT AND FAST” seems like the antithesis of classic low and slow grilling, the results you can get with it are amazing and delicious – but … also different than what you get with low and slow.
To set up your grill for HOT AND FAST, simply fire up your pellet grill (making sure your hopper is loaded with your favorite Griller’s Gold flavor) and turn up the heat. We like to go at 400 degrees for HOT AND FAST barbecue!
Now this all said, smoke production at hot temps is much lower on most grills than it is at low and slow temperatures. If you are looking for that good smoky flavor as well, there are a couple of easy solutions:
Smoke Tube: These are stainless steel perforated tubes that you fill with Griller’s Gold pellets and light one end with a propane torch. That starts the pellets smoldering and will fill your grill with great smoke flavor when you place it on the grill. Here’s one that works great: https://a.co/d/9xCEIwv
“Cigar”: This is kind of a “DIY smoke tube” that works on the same concept. Take two pieces of heavy-duty foil about the size of a sheet of standard paper, stack them up and roll them into a tube, crimping one end closed. Fill it full of your favorite Griller’s Gold pellets, leaving one end open, then using a sharp stick or skewer, poke holes all over it. Light the pellets through the open end and place it on the grill!
Placement: In either case, place it AWAY from your temperature sensor – you don’t want the extra heat to cause your grill to run cool.
hints for Running HOt:
Since you’re going to be running hot, it helps to have a clean grill. If it’s been a while since you cleaned your grill’s heat plate, give that a scrape or change the foil covering on it. You don’t want a grease fire.
Also, make sure you have your supply of Griller’s Gold pellets at the ready – rolling hot and fast for a few hours will use a surprising amount of pellets. You don’t want to run out.
Choosing What to Cook – Hot & Fast
So, what to cook? Here are four ideas on how to deliver that wonderful BBQ flavor in just a couple of hours for your impromptu crowd.
HOT AND FAST Baby Back Ribs:
Baby Backs are perfect for this as they cook quicker than St. Louis Cut ribs (or spare ribs) and respond just fine to the high heat.
We like to cut the slabs into 3 rib pieces right from the start – that helps them cook more quickly. Season with your favorite rib rub, put them on, and turn them every 30 minutes until they are at least 165 degrees in the thick meaty part. Then sauce them up and leave them on for 10 minutes more.
Note, due to the hot heat, these will be more “toothsome” and not “fall off the bone” like low and slows can be. But they WILL be very tasty. These ideally cook between 90 minutes to 2 hours with the thinner pieces getting done first.
HOT AND FAST Country Style Ribs:
So let’s make sure we point out the misnomer of country-style ribs. These are actually pork shoulder or Boston Butt pork roasts cut into 2” thick and wide strips. They aren’t “ribs” any more than boneless wings were ever flapped by a chicken! That doesn’t mean they aren’t tasty!
For technique and seasoning – the same as Baby Backs – season with your favorite rub, cook to between 165 and 180 degrees (which should take 90 minutes to 2 hours max) then sauce up, leave for 10 extra minutes, and serve hot off the grill!
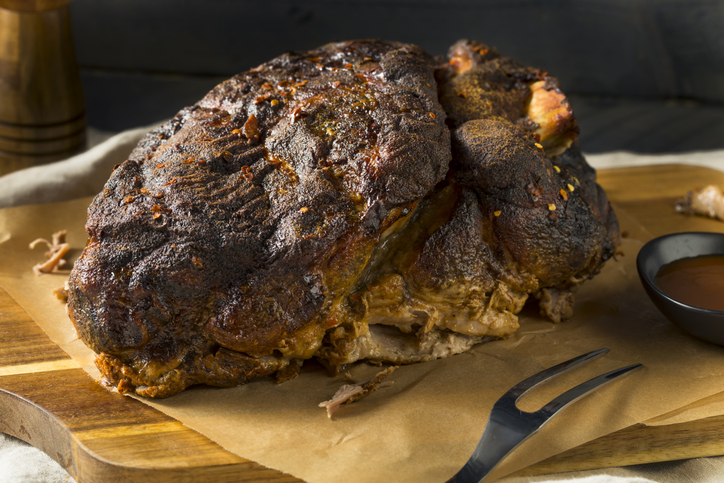
HOT AND FAST Butterflied Pork Shoulder or Boston Butt:
So when you hear Boston Butt and pork shoulder, you think of classic, low and slow cooked, pulled pork, right?
To make this hot & fast, take that roast, remove the bone, and then butterfly it by slicing it down the long way into two big pieces about 2” thick.
Season these up as you would ribs with your favorite rub and throw them on the grill. In about 2 hours, you should be at around 165 degrees.
Take it off and slice it fairly thin across the grain and you’ll have absolutely delicious, juicy slices of delicious pork with a wonderful barbecue flavor. This is especially good when you’re running a smoke tube.
This is also fantastic for making Cuban sandwiches. Sliced pork combined with slice ham, Swiss cheese, yellow mustard, and pickles on a French baguette, smashed down on a panini press! Fantastic!
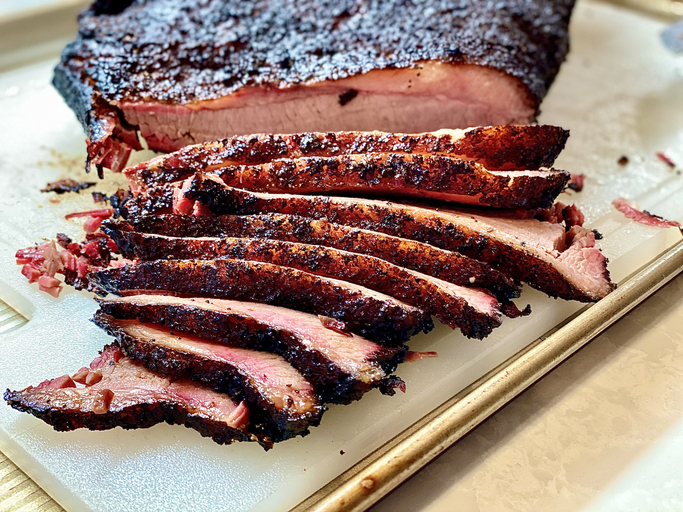
HOT AND FAST Beef Chuck Roast:
Beef Chuck Roasts are one of the most versatile things you can cook on your pellet grill. Go low and slow and they are the “budget priced brisket” – giving a brisket-like flavor for a fraction of the price. But cooked hot and fast, then sliced thin across the grain and kissed with smoke flavor, you’ll think you’re dining at a fine Texas steakhouse.
Texas Style Chuck Roasts
We like to do our HOT AND FAST chuck roasts Texas style. We season them up with “SPG”. This is a blend of good kosher salt, granulated garlic, and coarsely ground black pepper. You can mix this up yourself (2 parts salt, 1 part each garlic and pepper) or it’s easily found in barbecue stores pre-mixed. Normally, the GG Barbecue Crew is all about the homemade rubs. But because we find we use it all the time on things like burgers, steaks, fish, and even potato wedges on the grill, we have started buying premixed SPG.
After seasoning, put it on the grill, turning it every 10 minutes like a big, thick steak. We find that medium rare to medium (130-145 degrees) works best for the doneness of chuck. Too low and it’s tough, too high and it’s dry.
Once it’s hit desired doneness, let it rest under foil on the platter for at least 15 minutes and then carve. Then separate the various muscles, trim off and discard any gristle or silver skin. Then slice the meat into nice slices across the grain.
Served with sauce or not, this is a sublime way to get your beef on in a pretty short time!
One of the best parts of summer is doing impromptu things. Impromptu grilling and barbecue doesn’t mean you’re limited to burgers, dogs, brats, and chicken breasts. You can make great authentic barbecue in a very short time!

")