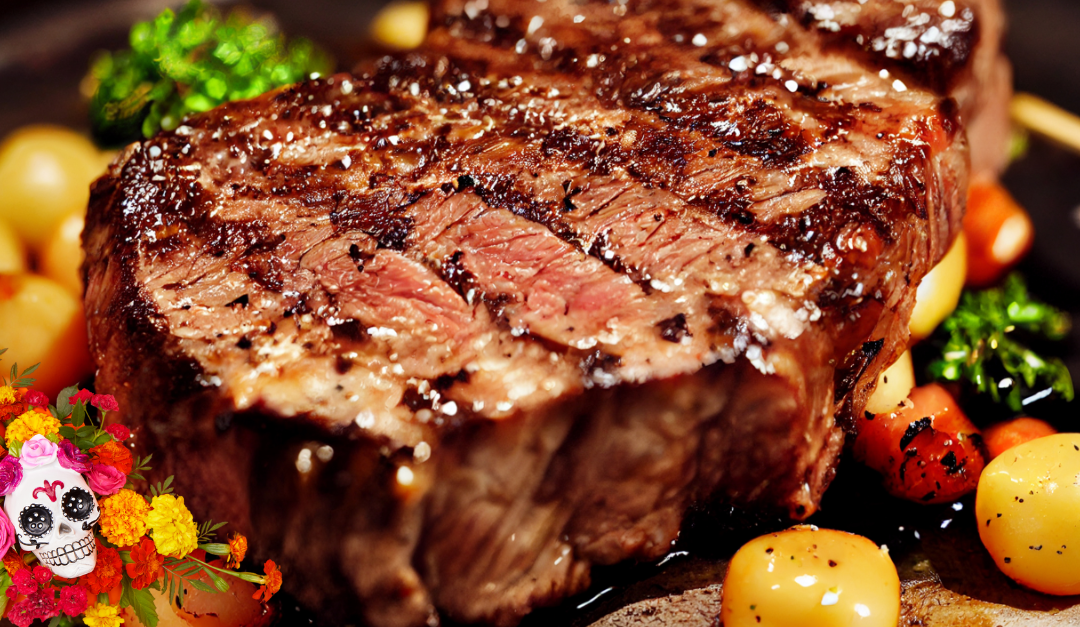
Have you ever had one of those food moments where every bite feels like a celebration? That’s exactly what you’ll get when you bring smoky, mesquite-grilled Mexican flavors to your Day of the Dead (Día de los Muertos) festivities. I’m talking carne asada that melts in your mouth, tacos with a kick of citrus and spice, and grilled elotes so good you’ll want to make them every weekend!
And you know what takes these dishes to the next level? Grillers Gold Smokeshack Blend BBQ Pellets. Mesquite smoke brings that perfect bold, earthy flavor that’s basically made to go with Mexican spices.
So let’s dive into this trio of dishes and celebrate life, food, and flavor!
What’s the Deal with Día de los Muertos?
Okay, real quick—Día de los Muertos is one of the coolest holidays around. It’s all about celebrating and honoring loved ones who’ve passed away. But instead of being somber, it’s vibrant and full of life—just like the food!
Families set up beautiful altars (called ofrendas) with marigolds, candles, photos, and all the favorite foods of the departed. And that’s where we come in—with delicious, smoky grilled dishes that fit right into this colorful tradition.
Why Mesquite?
Mesquite wood is a powerhouse of flavor. It’s strong, smoky, and perfect for grilling up meats and veggies with a ton of spice. When you use Grillers Gold Smokeshack Blend BBQ Pellets, you’re getting a flavor reminiscent of Mexico and the southwestern U.S., which is why it pairs so perfectly with bold Mexican flavors.
Trust me, mesquite is like the secret sauce of grilling—it’ll take your carne asada, chicken, and even corn to a whole new level of amazing.
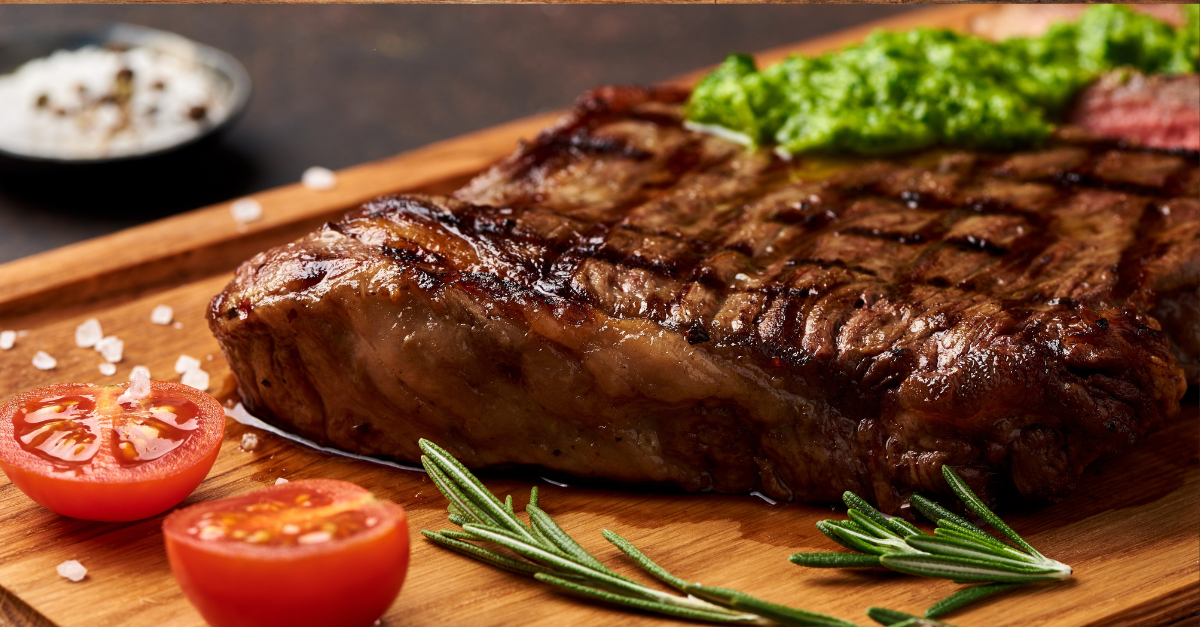
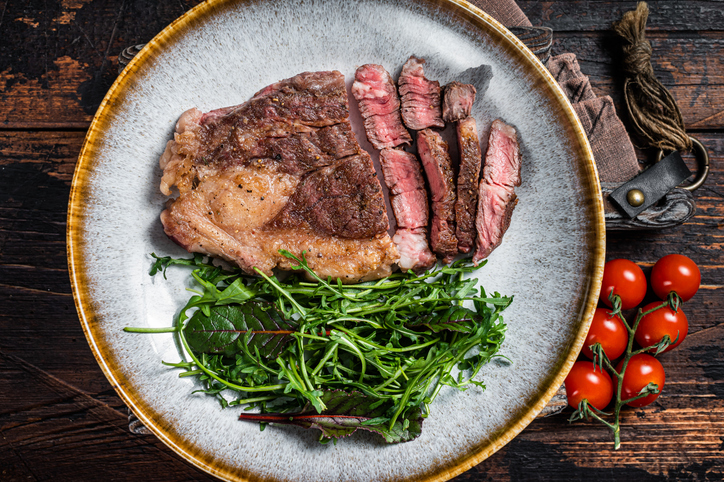
Recipe 1: Smoky Grilled Carne Asada
If you haven’t grilled carne asada before, this is your sign to do it. It’s simple, packed with flavor, and when you use mesquite smoke, it’s next-level good.
Here’s What You’ll Need:
2 lbs of flank or skirt steak (go for skirt steak if you can—it grills beautifully)
1/4 cup olive oil
1/4 cup fresh lime juice (seriously, fresh is key)
3 garlic cloves, minced
1 tsp ground cumin
1 tsp smoked paprika (because, why not?)
1 tsp chili powder
Salt and pepper to taste
Fresh cilantro and lime wedges to finish it off
How to Make It:
Marinate that Steak! Mix up the olive oil, lime juice, garlic, cumin, paprika, chili powder, salt, and pepper. Pour it over the steak in a shallow dish or bag and let it marinate for at least 2 hours (overnight if you can—it gets even better).
Fire Up the Grill! Preheat your grill to medium-high and throw in those Grillers Gold Smokeshack Blend BBQ Pellets. The mesquite smoke is where the magic happens.
Grill It Up. Toss the steak on the grill and cook for 4-6 minutes per side, depending on how you like it. You want a nice char on the outside—it locks in all those juices.
Slice and Serve. Let the steak rest (just for a few minutes, I know it’s tempting), then slice it against the grain. Finish with some fresh cilantro and lime wedges.
Boom—you’ve got yourself some seriously smoky, delicious carne asada. Serve it with tortillas, or just eat it straight off the plate!
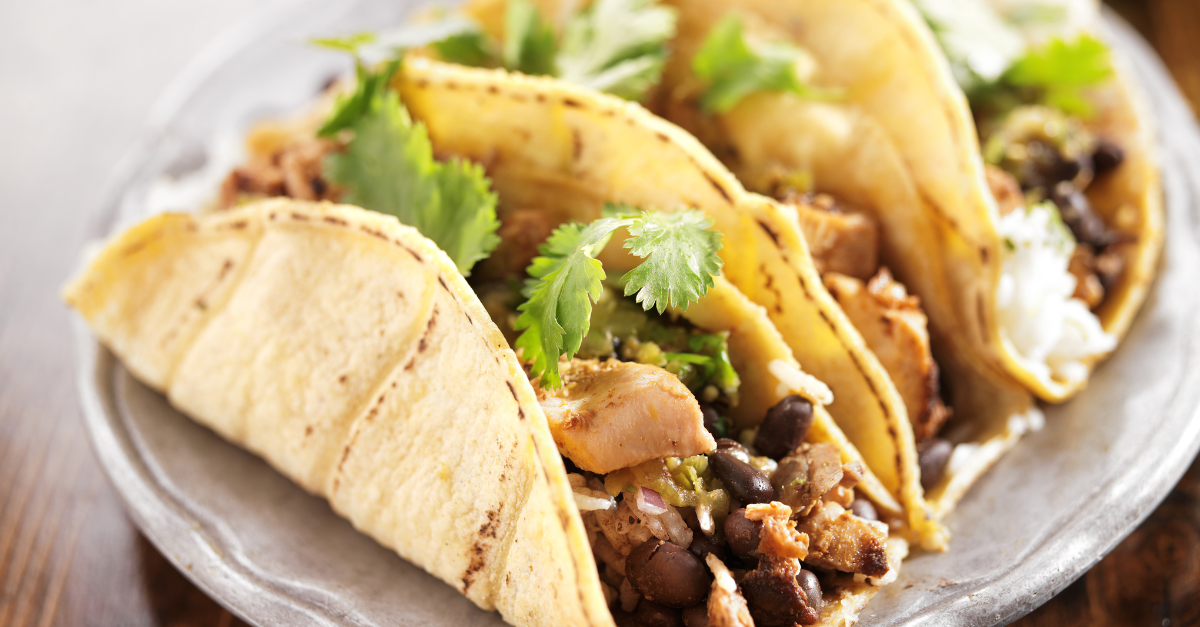
Recipe 2: Mesquite Chicken Tacos
Tacos are life, right? These mesquite chicken tacos are juicy, flavorful, and so easy to make. Let’s do this.
You’ll Need:
4 boneless, skinless chicken thighs
1/4 cup fresh orange juice (trust me, the orange juice makes a huge difference)
1/4 cup fresh lime juice
2 tbsp olive oil
2 tsp ground cumin
1 tsp chili powder
1 tsp smoked paprika
Salt and pepper
Warm corn tortillas
Toppings: diced onions, fresh cilantro, salsa, lime wedges (all the good stuff)
How to Make It:
Marinate the Chicken. Mix up the orange juice, lime juice, olive oil, cumin, chili powder, paprika, salt, and pepper. Let the chicken soak up all that goodness for at least an hour.
Grill Time! Preheat your grill with those Grillers Gold Smokeshack Blend BBQ Pellets and get the grill going on medium heat. Mesquite is perfect for adding that smoky flavor without overpowering the citrus.
Grill the Chicken. Pop the chicken on the grill and cook for about 5-7 minutes per side until it’s cooked through and perfectly juicy.
Assemble Your Tacos. Slice up the chicken and throw it into some warm tortillas with your favorite toppings. Don’t skimp on the salsa!
These tacos are pure joy in every bite. The mesquite smoke gives the chicken such depth, and the citrus marinade keeps it light and fresh.
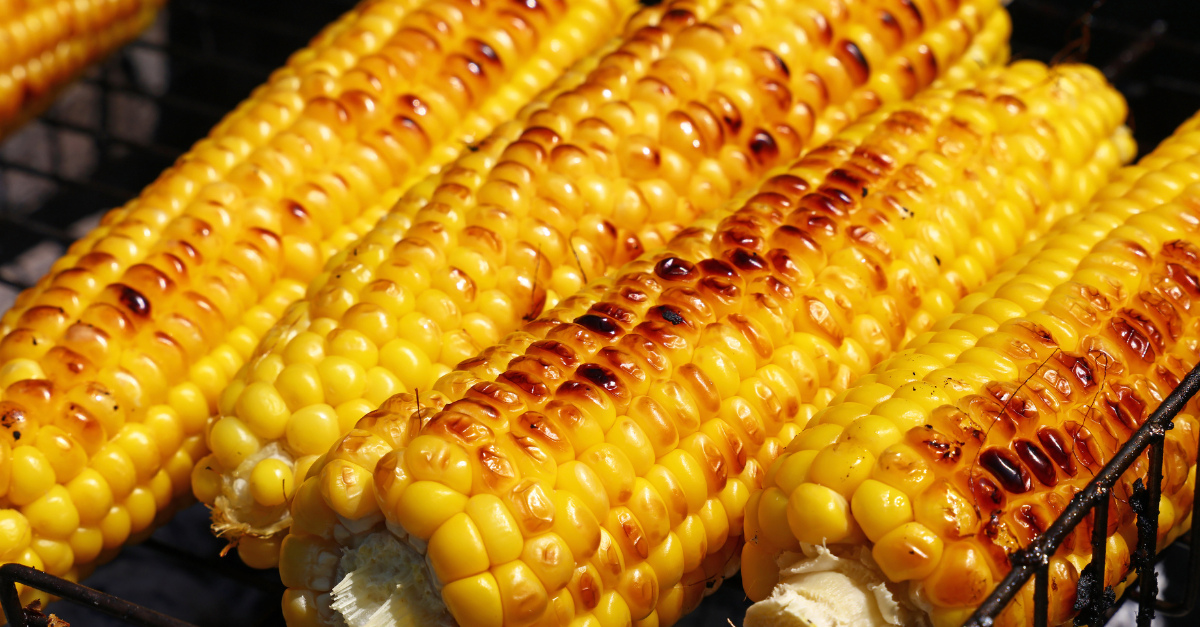
Recipe 3: Grilled Elotes with Chili-Lime Seasoning
You can’t have a Mexican feast without elotes—grilled Mexican street corn. Grilled to perfection and covered in chili-lime sauce, this is the side dish that steals the show.
You’ll Need:
6 ears of corn (husked)
1/4 cup mayonnaise
1/4 cup sour cream
1/2 cup crumbled cotija cheese
1 tsp chili powder
Zest of 1 lime
Fresh cilantro
Lime wedges
Here’s How to Make It:
Grill the Corn. Preheat your grill to medium-high, toss on some Grillers Gold Smokeshack Blend BBQ Pellets, and grill the corn for 8-10 minutes, turning it occasionally so it gets charred all over.
Make the Sauce. In a bowl, mix together the mayo, sour cream, cotija cheese, chili powder, and lime zest.
Slather it On! When the corn’s done grilling, slather it with that chili-lime sauce, sprinkle on more cotija, and garnish with fresh cilantro. Serve with lime wedges for that extra zing.
This is hands down one of the best ways to eat corn. The mesquite smoke adds a depth of flavor that pairs perfectly with the creamy, spicy topping.
Let’s Talk Hosting Tips
If you’re hosting a Day of the Dead grilling party, here’s how to make it epic:
Decorate: Get colorful! Think papel picado, sugar skulls, and marigolds to set the scene.
Side Dishes: Whip up some smoky salsas, guacamole, and grilled peppers to keep the Mexican flavors rolling.
Drinks: Serve up some margaritas or smoky mezcal cocktails to complement the food. It’s all about balance!
Music: Create a playlist with a mix of traditional Mexican tunes and fun Latin beats to keep the party vibes high.
Let the festivities begin…
Día de los Muertos is all about celebrating life, love, and those who’ve come before us. And what better way to do that than with some amazing, smoky, mesquite-grilled food?
So go ahead—fire up that grill, gather your friends and family, and dig into the flavors of Mexico!
It’s summer! The season of impromptu gatherings, outdoor meals and hanging with friends and family.
So let’s set the scenario – it’s a weekend day, you’re out in the yard doing some work and friends who live a little distance away ping you to let you know they are in the area and want to stop by to say hi. They arrive and you enjoy some refreshments on the patio and enjoy conversation. Then one of your neighbors pops over to say hello, and the party grows and so on, right? As the afternoon continues on, you ask if anyone wants to stay for dinner. Anyone up for steaks, you ask?
The challenge with steaks for a crowd is that it’s difficult to manage a bunch of steaks on a grill – you have to tend it the whole time which takes you out of your gathering, and individual steaks often wind up unevenly done. As usual, there’s a better way!
Luckily, you happen to have a nice sized 5 pound ribeye roast in the fridge as they were on special this week! So, normally a big rib roast is a slow-roasted special occasion thing but they are great for serving some tasty beef to a good sized crowd. It’s all in how you slice it.
Obviously, the trick is to have it on hand – we always keep one in the freezer – and believe it or not, if you have it wrapped in plastic, you can dunk it in a cooler of cold water and it will thaw fully in just a couple of hours. That is a great trick that works with pretty much any cut of meat or fish – just make sure it’s well sealed up in plastic.
The way we’re going to cook this is of course on your pellet grill fired up with Griller’s Gold natural hardwood pellets. We’re going to use a hotter version of reverse searing without the searing part – the trick here is to keep turning the meat over.
Truthfully, we’re roasting it as we would in an oven. Only our oven is outdoors, and delivers a wonderful wood-roasted flavor because of those awesome Griller’s Gold natural hardwood pellets!
So let’s do this!
Prepping the Ideal Ribeye Roast
BUY: 4-5 lb. ribeye roast – ideally, bone in, but boneless works great too. The trick is the thickness of the meat – a roast this size will be at least 4” thick. If bone-in, get at least a 2-bone roast.
TRIM: Trim back any fat cap and also the wedge of fat as the meat transitions to the bones – that extra fat can cause your grill to flare up and that’s no fun. After trimming, drizzle olive oil (or other vegetable oil of your choosing) all over it and use your hands to cover it evenly.
SEASON: Just salt. Give it a very generous sprinkling of kosher salt. If you do think you want more seasoning on it, add pepper and perhaps some garlic powder, but really, just salt works great. If you have time, put it on about 2 hours before you start cooking.
PREHEAT: 325F with any of your favorite Griller’s Gold pellet flavors. For this, really anything works, but either Smokeshack or Competition Blend are probably our faves.
COOKing Your Rib Roast
The technique is simple – you put it on, and you turn it every 20 minutes until it is the right temp in the middle – this is where having a proper instant-reading thermometer is key. The higher temp and the coating of oil will give it a nice “crust” on the outside and it will get a wonderful wood-roasted flavor on it as well. One difference here – when you do a rib roast in the oven you typically put it ribs down (if bone-in) or rib-side down if boneless. With this, cook it more like a steak and put it cut side down and turn it to the other cut side – the only time we wouldn’t do that is is if you’re doing a roast that is larger than say 3 bones.
TIMING and Temperature: The cook time will vary with thickness, but for a 4-5 lbs 2 or 3 bone roast, you’re looking at an hour or so on the grill.
Temps: Rare (red warm center): remove at 120F; Medium Rare (hot bright pink center) remove at 128F; Medium (hot light pink center): remove at 135F. You’re on your own for temps above that, and whatever you do, don’t do this recipe if you want it well done please. It will dry out and be tough as leather.
REST: As always, resting is key, and we like to rest our big cuts in a cooler so as to retain the heat. Give it a good wrapping in 2 layers of heavy duty foil, then nestle in a small picnic cooler with a folded bath towel on top of it. That will help retain the heat and help the heat migrate throughout. Rest it for at least 10 minutes per 2 pounds of pre-cooked weight.
CARVING: As we said in the beginning – a great way to serve a crowd with this is in the carving. Take it out of the cooler, unwrap it carefully so you don’t lose any accumulated juices – pour those off into a bowl to hold while you carve. Then put it on a big board and have a warm platter ready (we just stick it in the grill while the grill does the shutdown).
Your first cut is to remove the bones – put the roast bone side down and work your knife along the curve of the bones to free the roast from the bones. Then (and this sounds crazy, but hear us out!), with the bone-side down on the board, cut it into 2-inch thick slices – so a 2 bone roast will yield two big slices, a 3 bone roast will yield 3, etc.
Next you’re going to lay those big slices flat on the board and cut them in half from the middle of the bone side to the top of the cap side, and then cut each of those pieces into ¼” slices. Arrange the meat on your platter and keep going until you’ve sliced up the whole thing!
Now you have this marvelous platter of beautifully sliced steak, all having some “crust” on the outside of the slices – and it’s bon appetite time!
SIDES AND SERVING: We are a big fan of steakhouse side dishes – so we like to make creamed spinach, garlic mashed potatoes (although big fans of tater tots too!) and also a big Caesar salad with this meal.
And that’s it – you’ve fed a crowd easily, you didn’t struggle with cooking a bunch of individual steaks and, you were able to still be a guest at your own gathering. A win all around! Until next time!
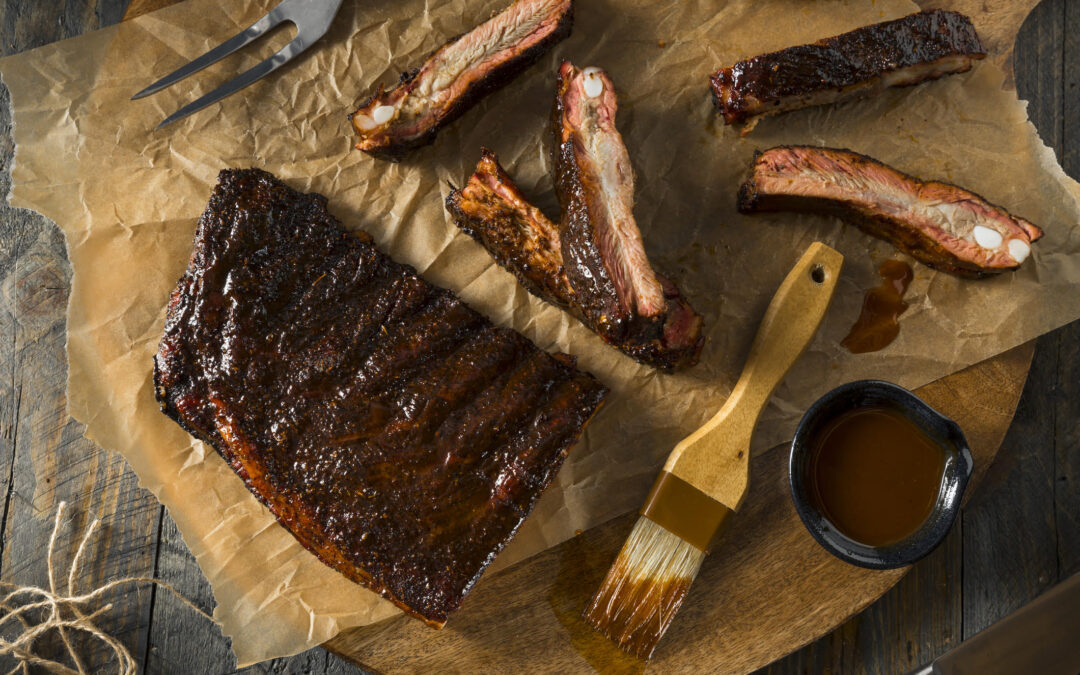
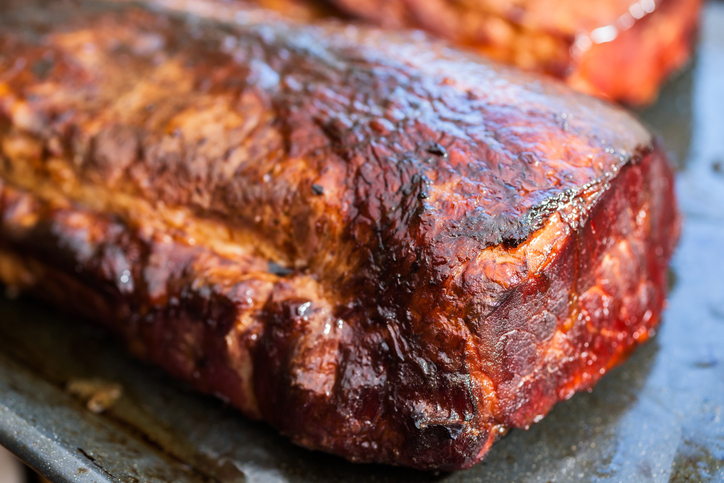
“Summertime and the livin’ is easy”, goes the song. So should making great food to serve at summertime celebrations. Here at Griller’s Gold, one of our summertime faves are pork baby back ribs. Now, many grillers and barbecuers are afraid of them – and there are a thousand techniques out there including the “3-2-1” method, preboiling them (NO NO NO!!!), fast cooking (it works, but not as good), etc. So our topic today is how to make GREAT ribs with an easy to make method.
The great thing is that a pellet-fueled grill makes this super easy. The grills are thermostatically controlled for even temps, and they self-feed fuel so there’s no fire maintenance. Speaking of fuel, Griller’s Gold Premium Hardwood pellets give great flavor to ribs. We’ve used pretty much every pellet we make in making ribs, and they all work great, but that said, for pork baby backs, we love either Hickory or Fruitwood Blend. So let’s do this!
This recipe delivers ribs that are tender, not chewy, with a nice clean “tug” of the meat coming off the bone. They are not “fall off the bone” ribs – those usually only happen when you braise ribs in a sauce after smoking.
What to Buy
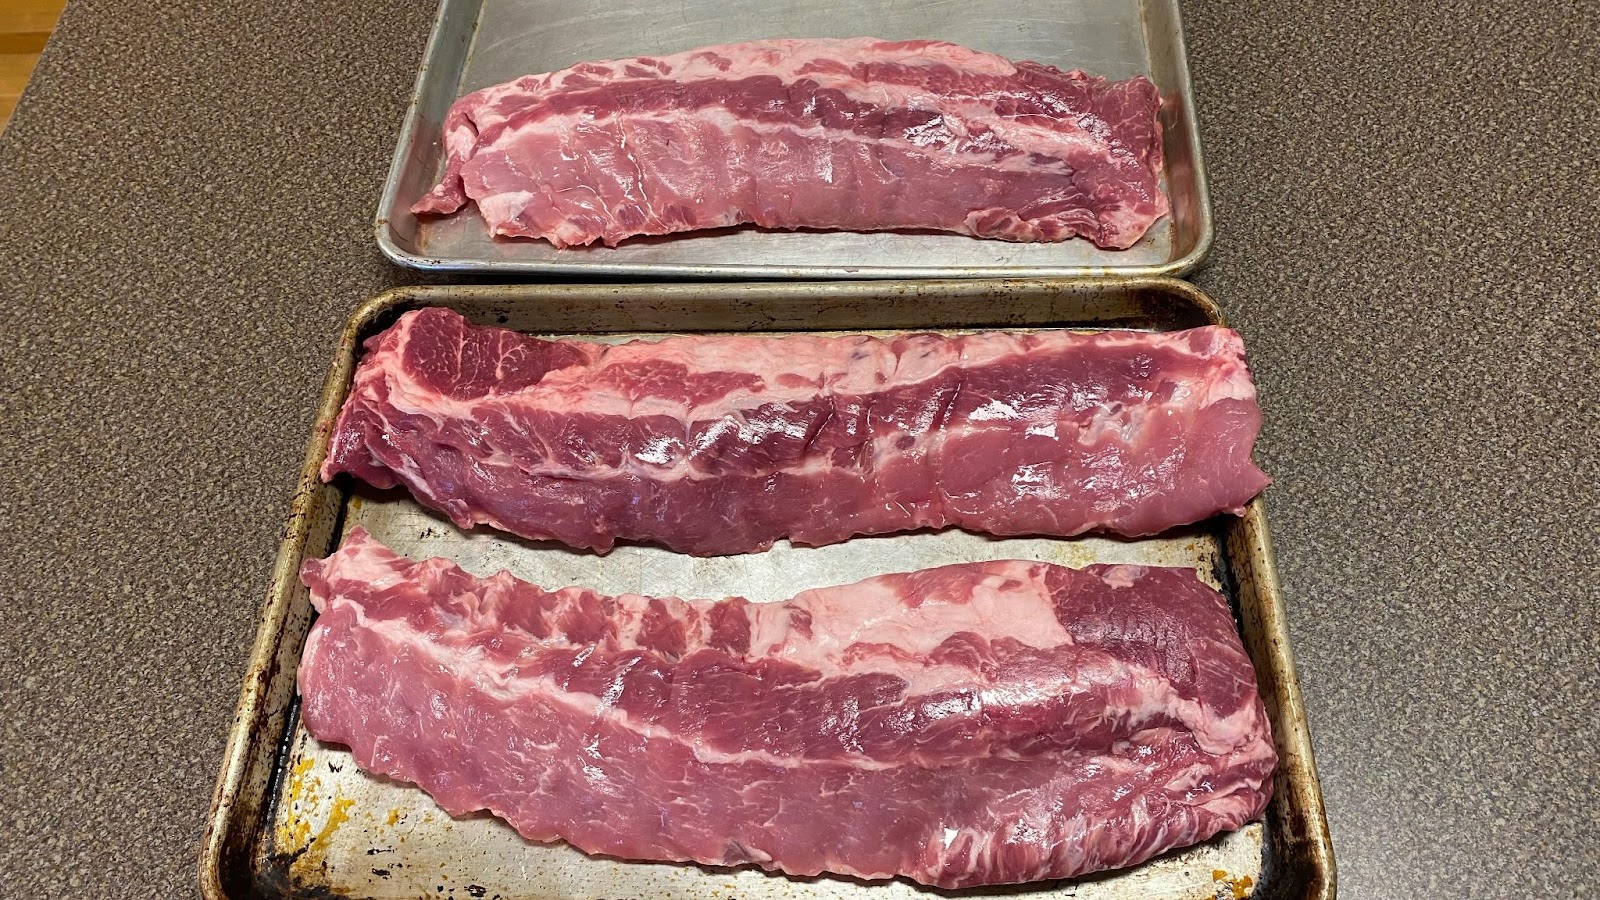
Pork Baby Back ribs – these are the rib sections from the back of the hog nearest the spine and have a lot of meat on them – much more meaty than St. Louis cut ribs. We like to buy the minimally-processed ribs – often you’ll find them with a notation on the package of “contains up to 10% of a solution of …” which is that they are injected with a brining solution. We find those to be too salty tasting for our taste. Great sources for minimally processed ribs are at Costco and Sam’s of course – and they come in 3 packs. Figure a half-slab of ribs per person, so a 3 pack should serve 12.
Prepping Your Ribs
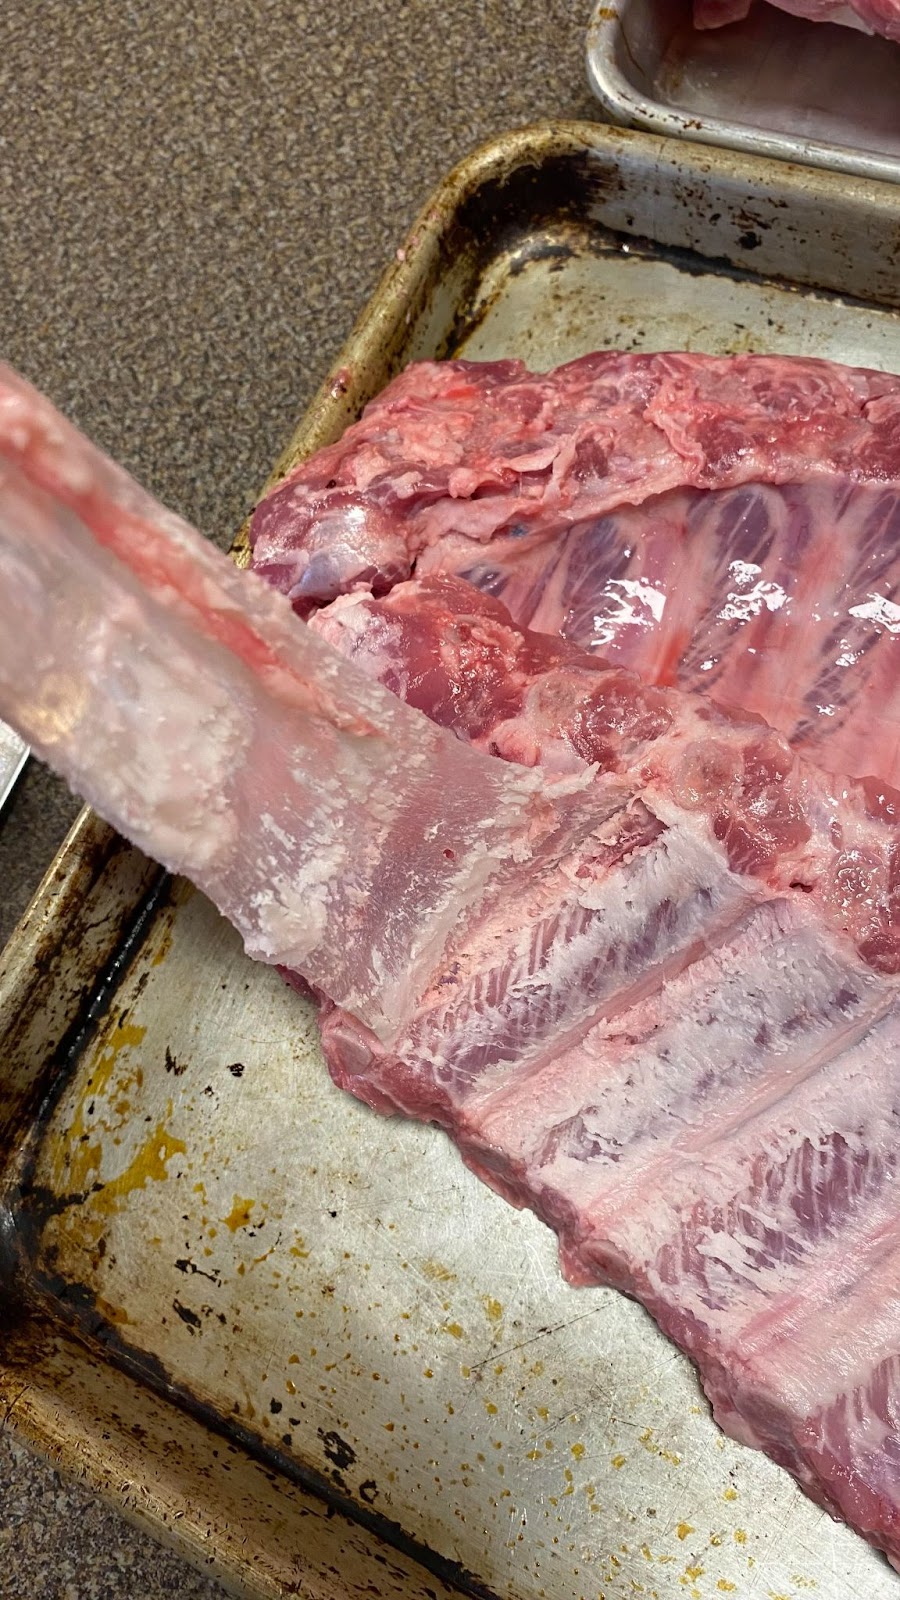
Generally speaking, ribs straight out of the package will have a membrane on the underside. That needs to get removed as it gets chewy as it cooks. Costco ribs frequently have had it removed. You can tell if it was already removed or not by how the underside of the ribs look – if they have a shiny/glossy coating – that’s the membrane.
Now some people think this is a very difficult thing to do, but they just haven’t found the right technique yet.
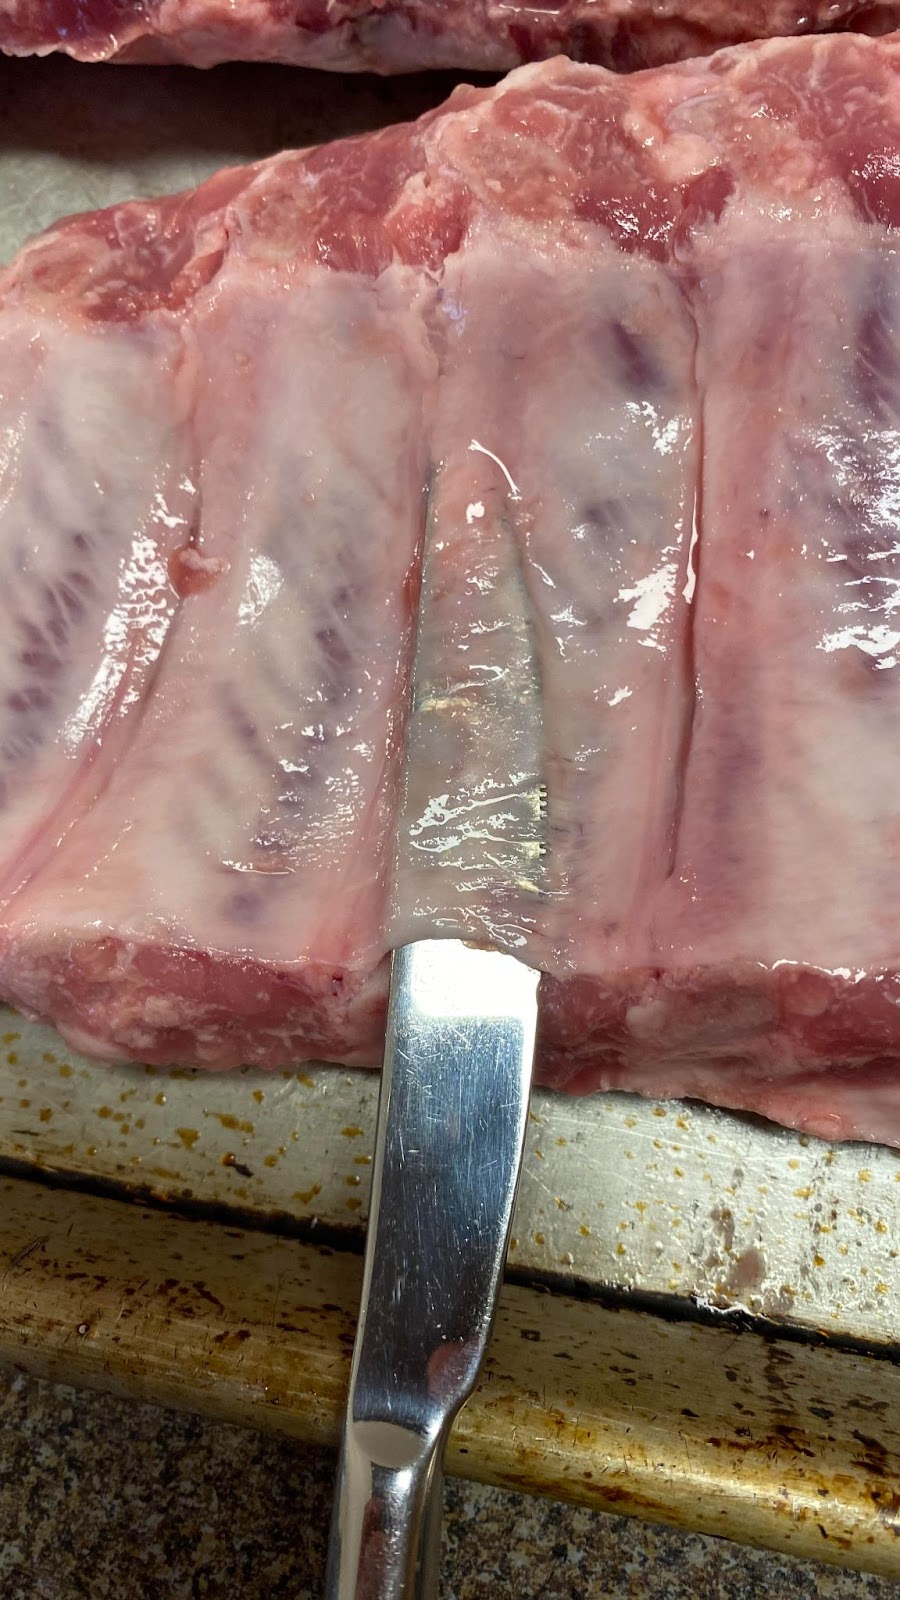
Here’s what to do: 1) Get a butter knife – up, a non-sharp butter knife is ideal for this technique.
2) Work from the side of the ribs away from the backbone. In the photo below one end of the ribs is sharply cut off at a near 90 degree angle while the other side sort of slants away. Start at the sharp cut off end.
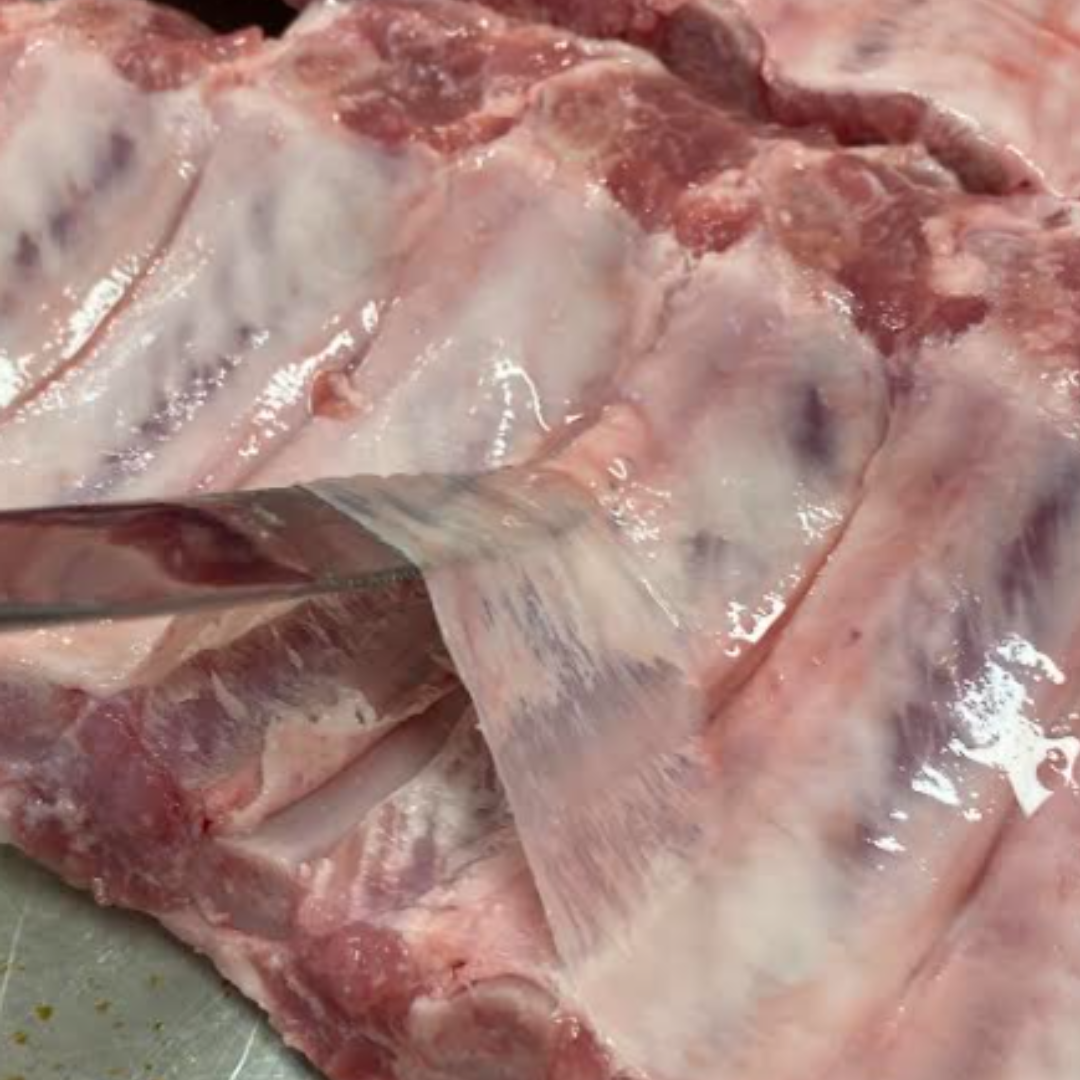
3) At the rib that’s closest to the middle of the slab, slip the butter knife under the membrane – it’s sort of a scraping action where you’re scraping the membrane up off the bone. Once the knife is inserted about half the length of the bone, lever it upwards, levering the membrane up – you can hear it tearing away. With a clean (not greasy/slimy) hand, get your thumb under the membrane and start pulling upwards – it will start peeling away. Work to one end and pull the membrane completely off, and then work the other direction to finish. Most of the time it will come off in one piece and the first time you do that you’ll feel like you pulled Excaliber from the stone!
4) From there, clean the ribs up a bit – if there are little bits of meat hanging off anywhere, just cut those off as they typically will burn and become dry and hard anyway.
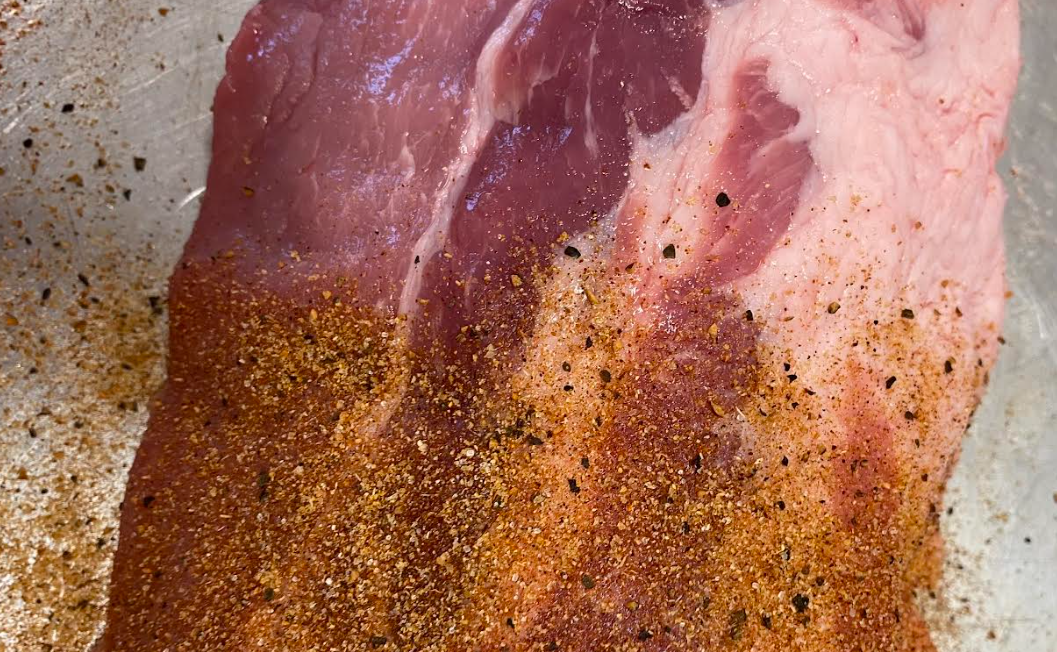
Seasoning Your Ribs
Ok, we’re going to share a secret with you here. Our head blogger developed this rub recipe about 30 years ago and we’re here to say that even with all the commercial rubs out there, this works the best. And it’s simple to make. For enough Rub for 3 slabs of ribs:
2 T (tablespoons) EACH of kosher salt, sugar, ground pepper, paprika, garlic powder and onion powder
1 T chili powder 2 t (teaspoons) dry mustard powder (we like the Colman’s brand)
1 t ground cumin
½ t ground ginger
Mix up well and put it into an empty shaker container. By the way, we use so much of this that we make it in quantities where the tablespoons above turn into cups!
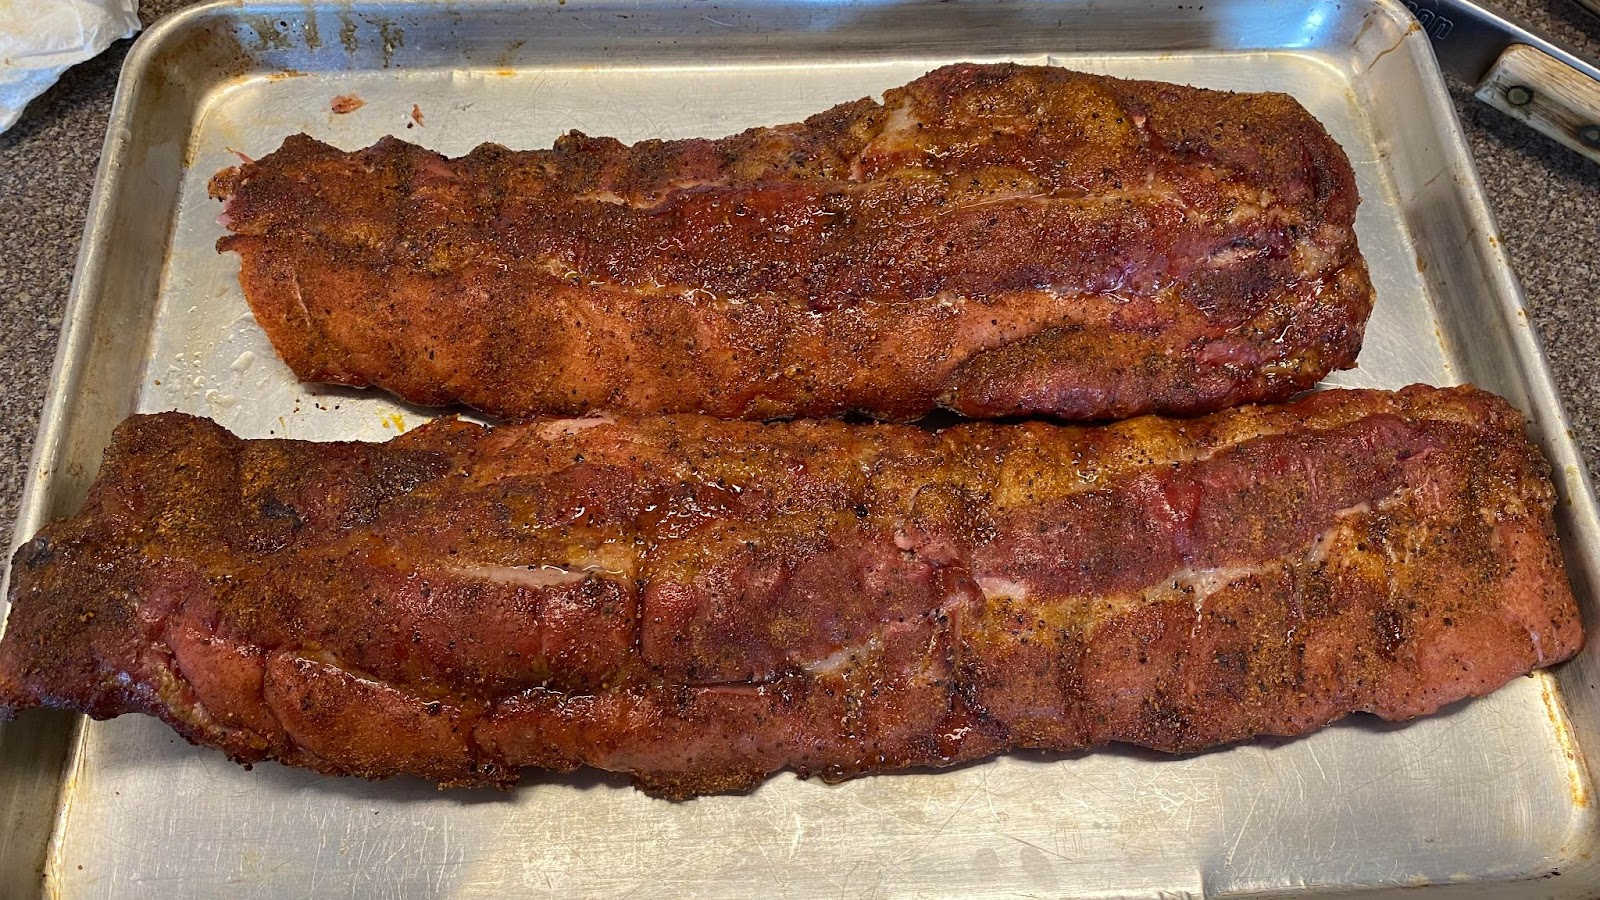
Generously shake the rub over the meaty side of the ribs, you don’t want to sprinkle it, you want to cover it! See the photo below to see how much you need to apply. Flip the ribs over and and give a good shake on the bone side but you don’t need as much on that side.
That’s it, let’s cook!
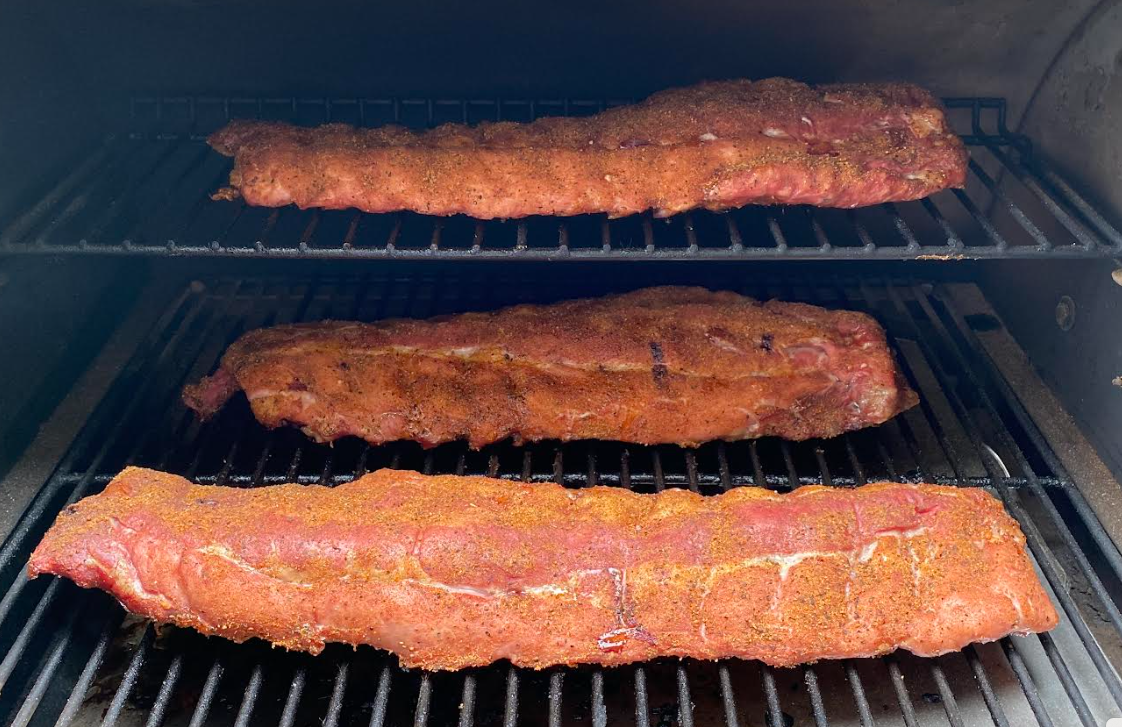
Grill Prep for Your Baby Back Ribs
Load your pellet grill’s hopper with Griller’s Gold pellets and fire it up to deliver 225F temp (the reason we say “deliver” is that some grills run a little higher, some a little cooler. It pays to know how your grill behaves). We like to let ours preheat for a solid 20 minutes, even though it comes “to temp” in 10 – it helps to get all that metal heated up evenly.
And go put them on the grill – meaty side up, bone side down. Leave some room around them to let the air and smoke circulate. On the pellet grill we use the most (which is pretty small, truthfully), 3 slabs fit perfectly – 2 on the main grate, 1 on the upper. Close the lid, set a timer for 3 ½ hours and GO AWAY. Seriously, leave it alone. If you’re lookin’ they are NOT cookin’. You don’t need to baste, spritz, etc. They will cook just fine without your fussing.
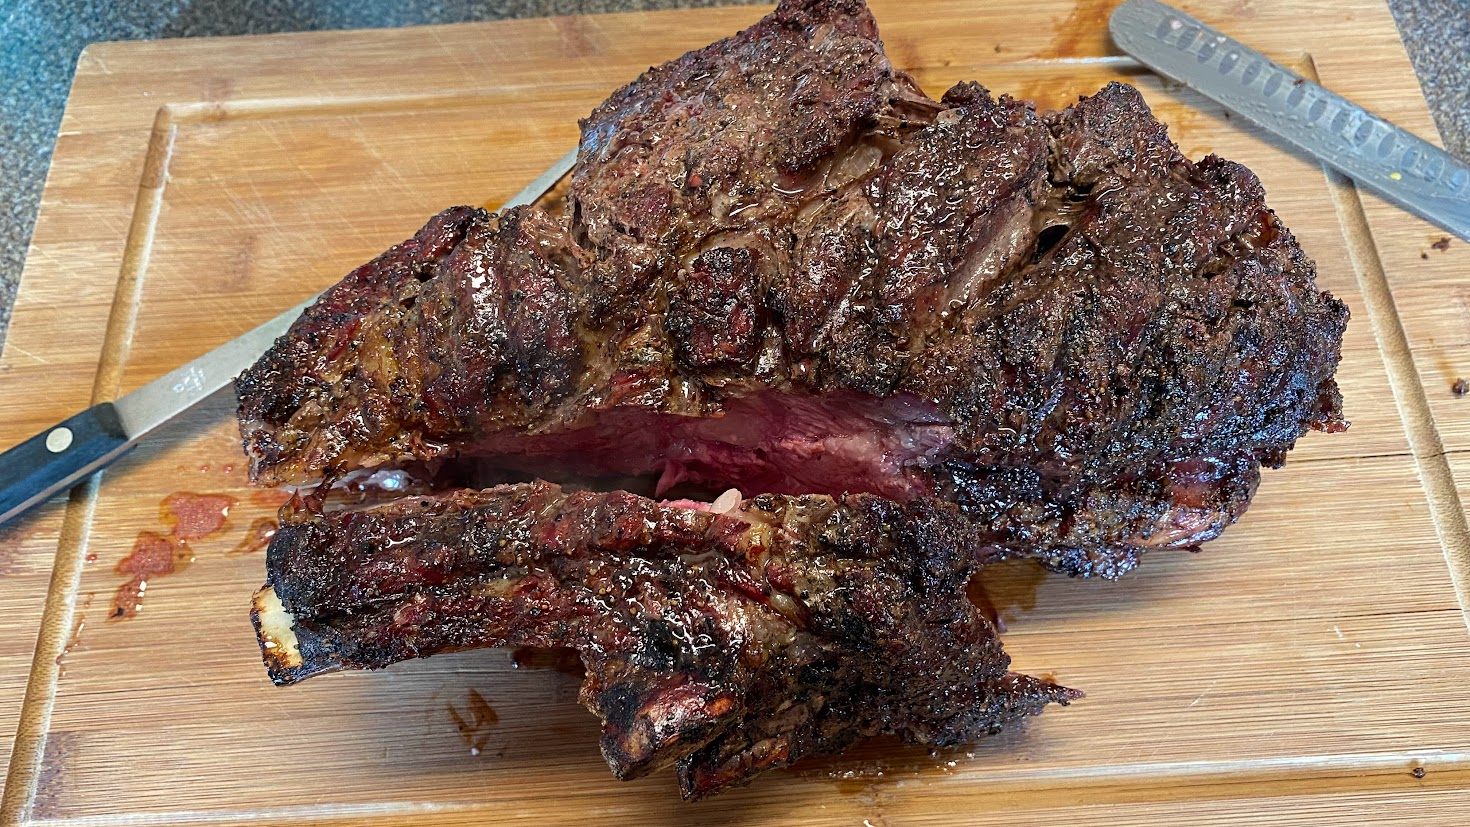
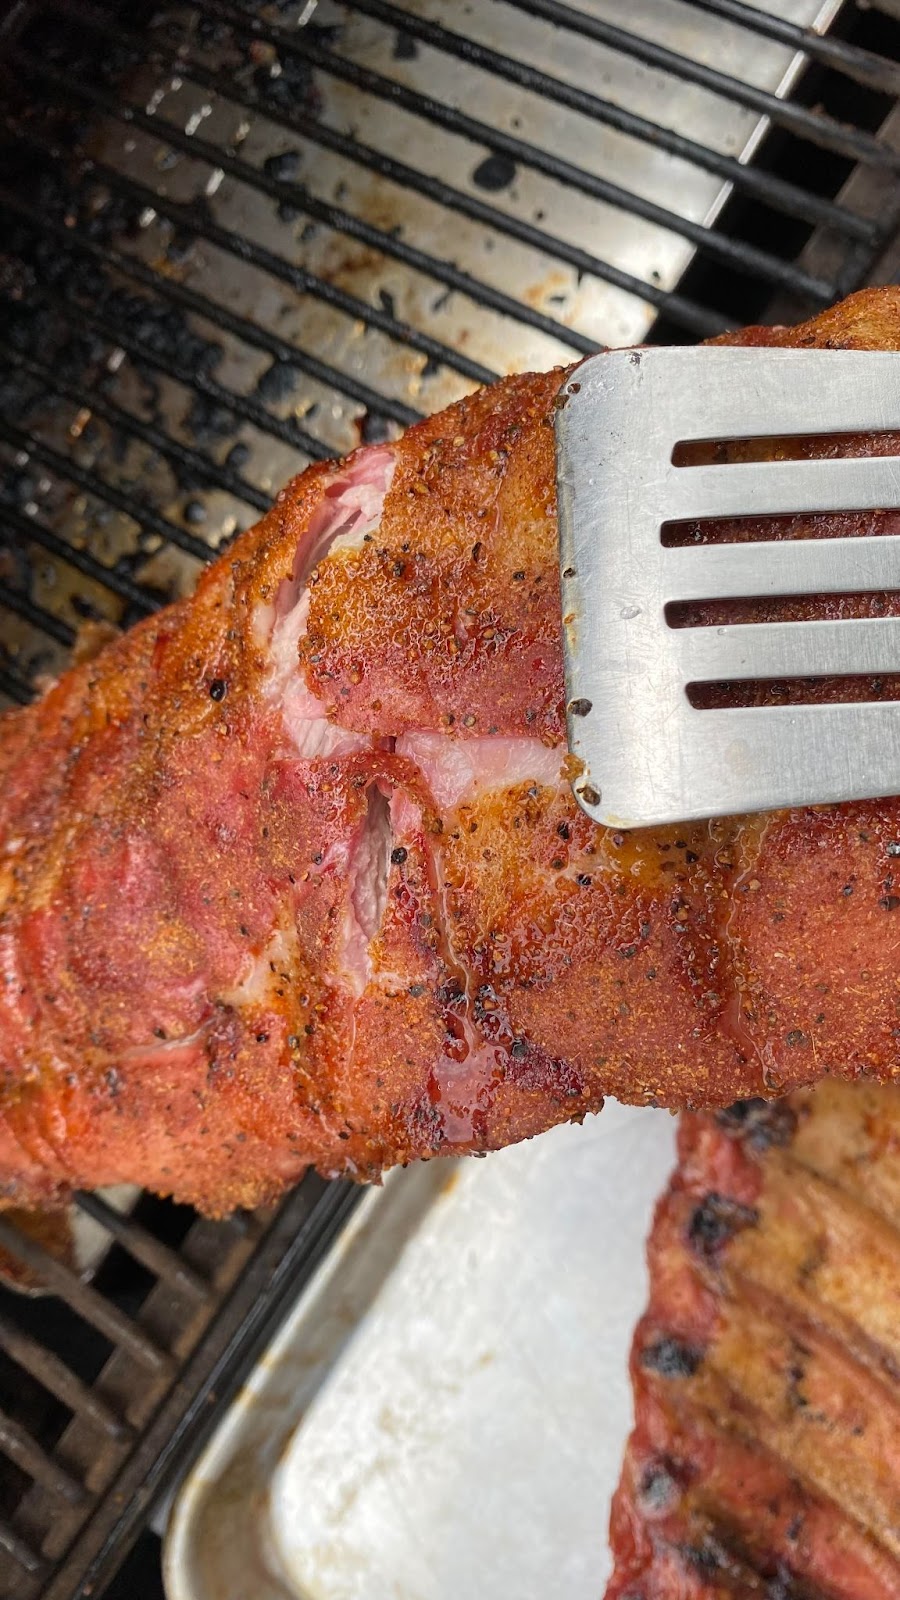
At 3 ½ hours, come back to do the “crack test”. This is where you lift a slab up with a pair of tongs in the middle. If the ribs are done, you’ll see the bark crack and slab start to split in half. When you see that split or crack, they are done on the grill – see the picture below.
Please note, not all slabs will get done at the same time – but that’s ok because you’re going to rest these! If you have a slab that’s not quite cracking at the same time as the others, give it more time on the grill, usually an extra half hour will do the trick.
Resting Your Ribs
Here’s where this recipe becomes great for summer fun. We like to make these starting pretty early in the morning so that they are done late morning – say on at 7:30 and off around 11:00 AM. They can go in the resting cooler for several hours until you’re ready to remove them, sauce them up and serve them! Now this said, if you are having these for lunch, you can do without the rest, but your ribs will be more tender and tasty if you can build in some rest time.
Serving Your Baby Back Ribs
We like to cut the ribs at this point into serving pieces – generally 2 ribs per piece. Then make a double layer of heavy duty foil, pile the rib pieces in and close it up like a packet. For 3 slabs it requires two packet. Nestle the packets in the bottom of a picnic cooler. Then fold up an old bath towel and put it on top for some extra insulation, and close up the cooler. Let rest at least an hour and up to 6 hours.
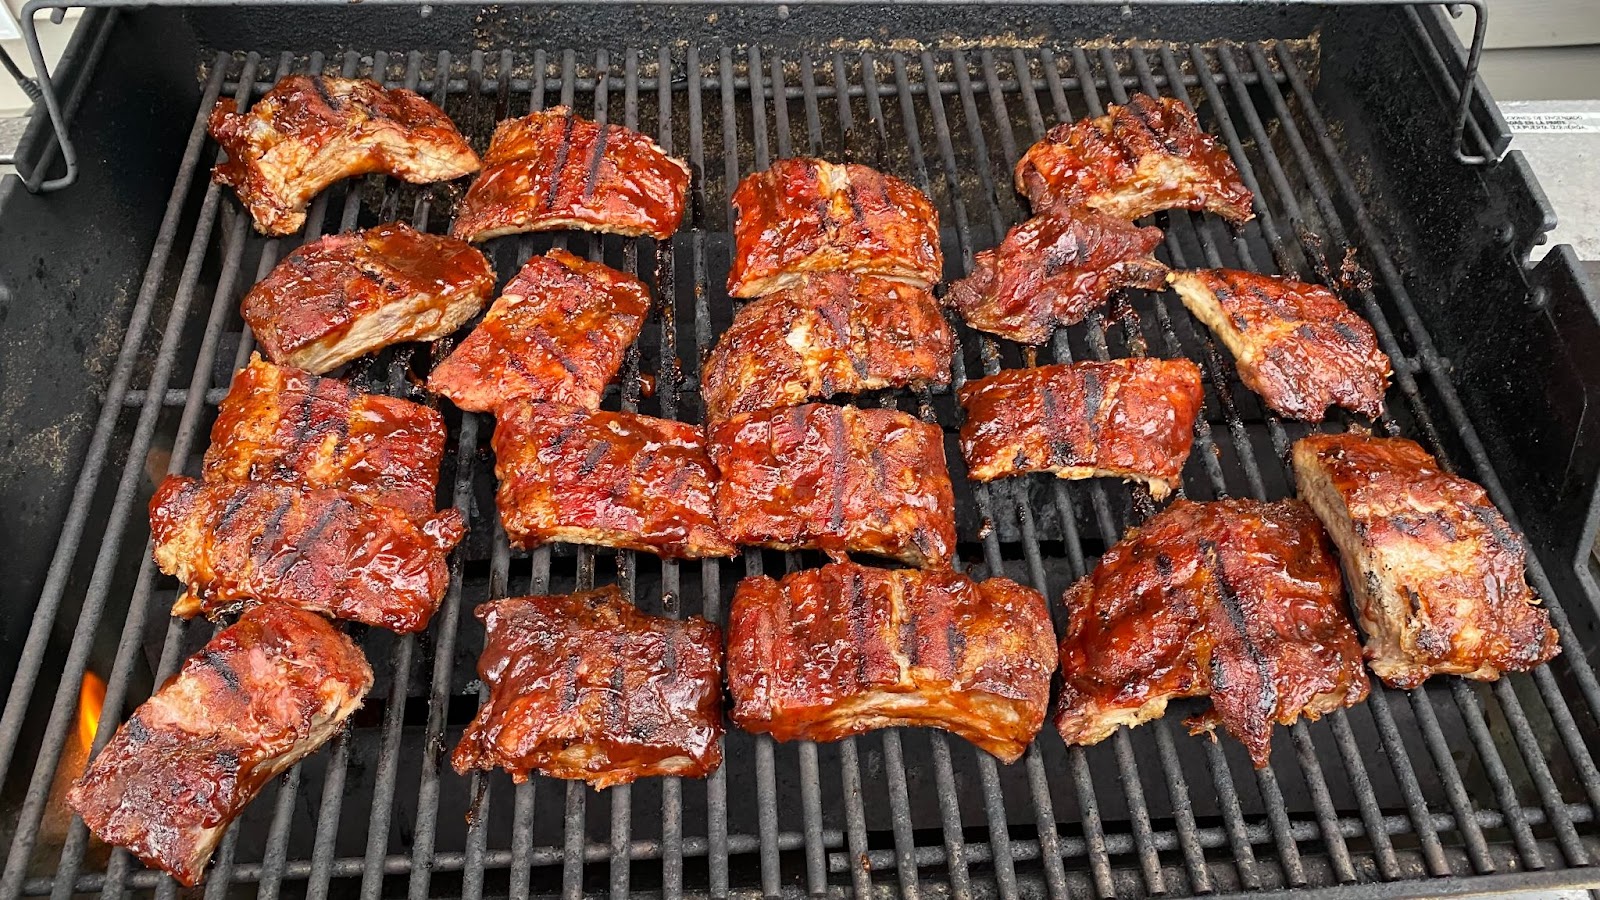
When you’re about 20 minutes from dinner, relight your pellet grill to 400F. Or, if you have one, a gas grill is fine for this step – run it at medium heat. Before you head to the grill, generously brush your favorite barbecue sauce over the meaty sides of the ribs. Head out to the grill, put the rib pieces sauce side down and close the grill. Set a timer for 3 minutes (time is important here as you don’t want to burn the ribs). At 3 minutes, give them a flip to the bone side down and heat for another 3 minutes. Then take them off and serve!
We love our ribs with cole slaw, baked beans, au gratin potatoes, mac and cheese, corn bread, and more for sides.
That’s it! Ribs can be so easy to make and so easy to get spectacular results just by keeping things simple!
Right now is the time of year when everyone’s taxes roll around – and whether you’re lucky enough to get a refund, or have to pay, it certainly makes you think twice about expenditures. And let’s face it, groceries have gotten more expensive this year.
So in this edition of the Griller’s Gold Blog, let’s have a look at some ways to have a great meal cooked on your pellet grill fueled with those amazing Griller’s Gold Premium Wood Pellets!
Let’s do this!
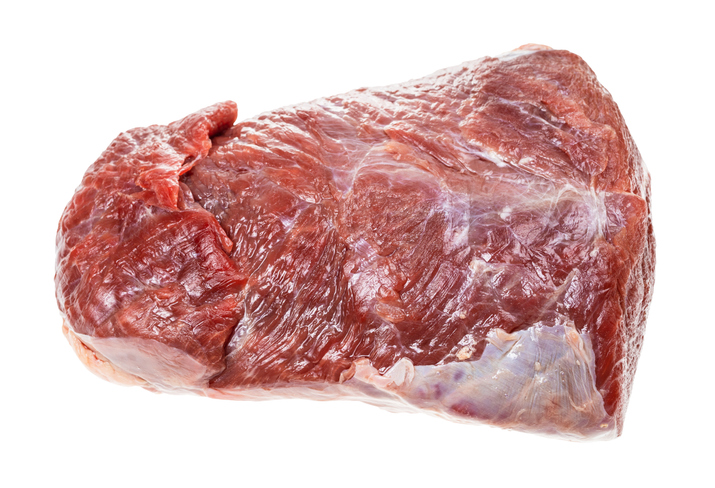
Budget Cut – Chuck Eye Roast (the Beefy Secret!)
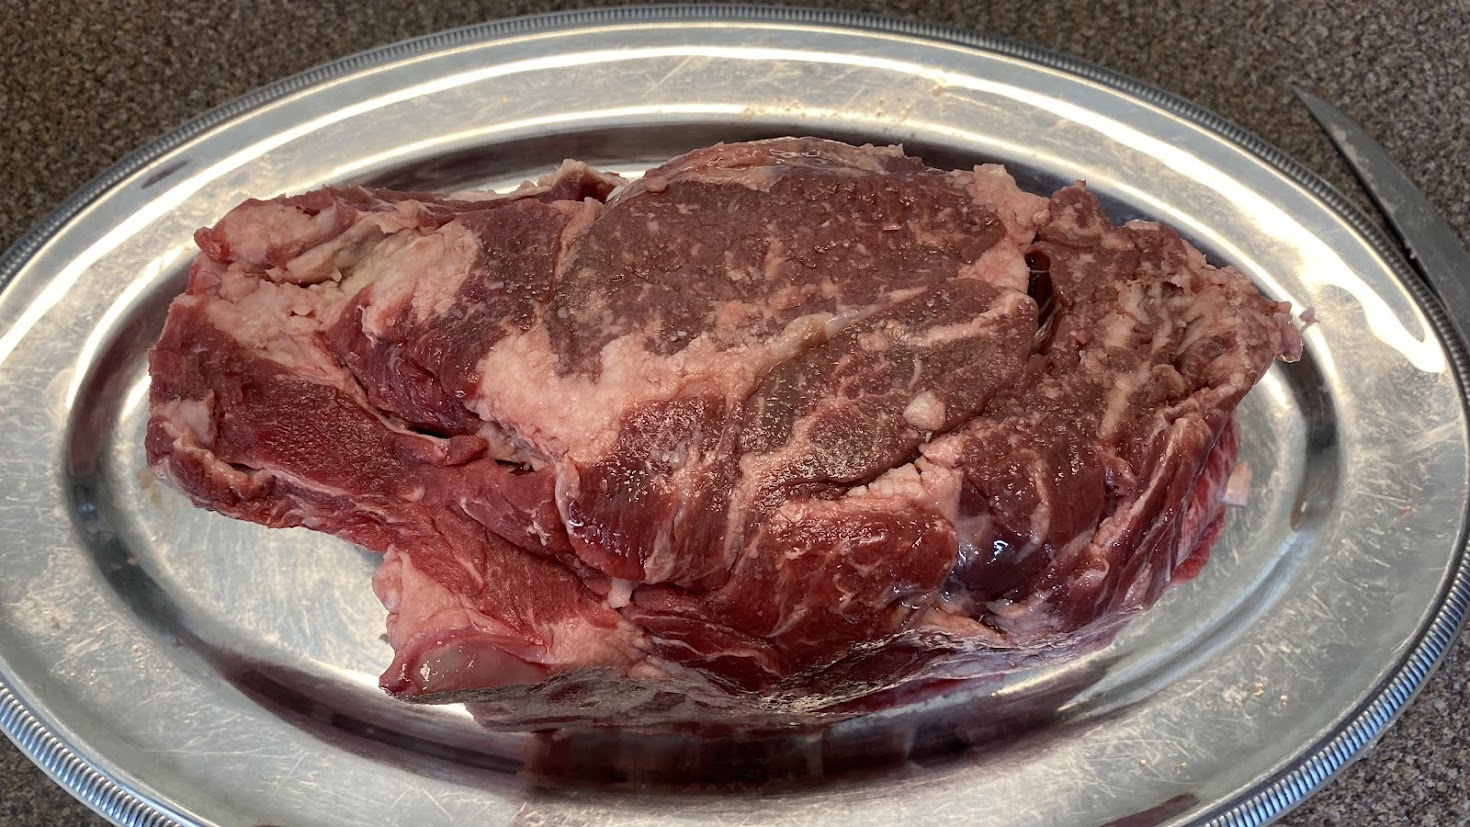
A chuck eye roast is a roast cut from the center of the chuck. The chuck is the primal cut that encompasses the shoulder part of beef cattle, so it is a working muscle.
Chuck is typically what you use to make beef stew or pot roast. It likes a long, slow cooking method for maximum tenderness. BUT! The chuck eye, by the way it’s cut, can actually be grilled like a steak to medium rare.
Chuck eye roasts are kind of oval in cross section and square to cylindrical in shape and are between 2 and 4 inches thick. A direct cousin of the Chuck Eye is a Delmonico Steak – which is a steak cut from the chuck eye.
The thing we like about a chuck eye is you can see a clear grain direction in the meat (in this photo it is running from the lower left to the upper right) therefore, when carving it, it is easy to spot the grain and make cross-grain slices, which enhances the tenderness of your finished meat.
We love doing a Chuck Eye roast on our pellet grill using the reverse sear method.
Here’s how…
Reverse Sear Method for Chuck Eye Roast
Buy:
Chuck Eye Roast (2-4 lbs) – plan on ½ lb precooked weight per person. When we spot them at the grocery store, we usually buy two – one for now, one for the freezer!
Prep:
Go over the outside the roast and trim off any silver skin or obvious gristle. Because it is a working muscle, there will be some connective tissue that cuts through the roast – don’t worry about that, we’ll deal with it when it’s done and carved.
Seasoning:
We like to do at least a 2 hour kosher or sea salt “dry brine” on it prior to cooking. Give it a generous sprinkling of salt all over at least 2 hours prior to cooking (but if you have time, 6 hours or even overnight does wonders!), then immediately before cooking, we coat it with a generous hit of freshly ground black pepper, granulated garlic, granulated onion and paprika. If you want a pop of spice, a nice shake of chili powder also adds to the flavor.
Grill Prep:
Make sure your grill is clean as you’re going to need to fire up to hot temperature later to sear. Load up with your favorite Griller’s Gold Premium Wood Pellet – the stronger flavors are great with this – Cherry, Hickory, Smokeshack or Competition Blend work great, as does Charcoal, although that has a more subtle flavor. Preheat to 250 for the “low and slow” part of the cook.
Cooking:
Once the grill is stable at 250 (most pellet grills take about 15 minutes for this), put the meat on, insert a probe in the thickest part and close it up!
Set a timer for 20 minutes for turning. Turn the meat every 20 minutes until the internal temp hits 125F for medium rare. If you like it more done, adjust accordingly.
Rest:
Take the meat off the grill, wrap it in a double layer of heavy duty foil, then nestle it in some folded towels. We like to put it in a picnic cooler as well. Let it rest for 1 hour. About 15 minutes before the rest ends, fire your grill to it’s highest temperature (ours goes to 550F) and let preheat.
Sear:
Unwrap the meat and bring it to the grill. Sear it on the grill for about 8 minutes, turning every 2 minutes, so each side will be against the grill for two 2-minute cycles, then bring it in.
Serve:
Slice it across the grain (you remember that, right?) in ¼” or so slices and enjoy.
We love this with the usual steakhouse sides of garlic mashed potatoes, a good veggie like sauteed spinach or roasted asparagus, and a bottle of big red wine – Merlot, Cabernet, or if you got a nice tax refund, how about a French Bordeaux? Gotta live a little right?
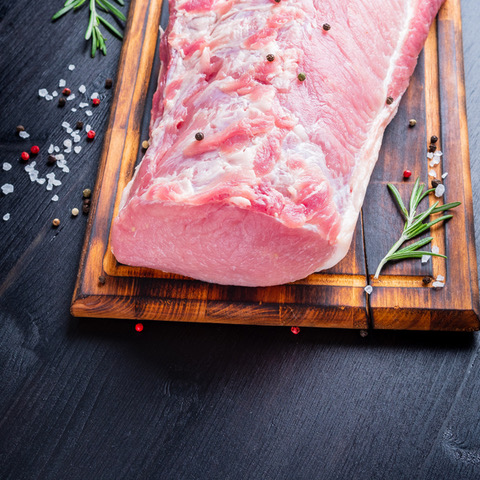
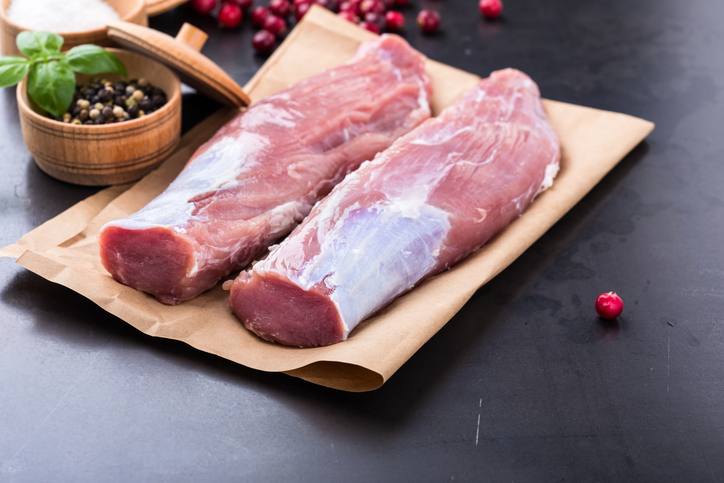
Budget Cut – Pork Loin Roast:
Thankfully due to the abundance of pork production in the US, pork prices have stayed pretty low, so our favorite thing to do is a whole pork loin roast on the grill. These massive cylinders of meat are great for serving a crowd, and the nice thing is, it responds beautifully to the Reverse Sear method we just described. We’ll note the differences as we go here.
A whole pork tenderloin is usually a 5 to 6 pound piece of meat, about 18” to 24” long. It is about 4 or 5 inches in thickness and is oval shaped in cross section. The price on these varies between as low as $0.99 a pound to about $4.00 a pound.
The cut is comprised of several muscles, so the texture and flavor varies end to end. In fact, you can buy one of these and butcher up into a good amount of “freezer food” with roasts, pork chops, etc. We love buying these for that reason.
In the picture here, the lower right end is the “sirloin” end and the upper left end is the rib end. The rib end meat is a bit fattier. In the middle is the “center cut” which is where typical pork loin roasts are cut from, and the sirloin end is usually sliced into thin “breakfast” pork chops. But put away that knife, because we’re cooking this bad boy whole today!
Reverse Sear Method for Whole Pork Loin Roast
Buy:
You’re buying a whole pork loin roast – these are most easily found at Sam’s Club, Costco and other large big box retailers and they are in cryovac packaging. Try to avoid buying ones that say “up to 12% solution of pork broth, salt and …” – those are pre-brined and while they cook up nice, they can be a bit salty and that limits your seasoning creativity a bit.
Prep:
Take it out of the package. That’s it. No need to trim these. They will occasionally have a fat cap on one side, and that’s fine – leave that for flavor.
Season:
Just like for the chuck eye roast, first dry brine it with a generous hit of kosher or sea salt for a couple of hours. But DON’T do that if you bought one with the solution injected in it. After the dry brine, we like to mix up a rub of equal parts sugar, fresh ground pepper, granulated garlic and onion, paprika, and then ½ part chili powder and ¼ part dry mustard powder. For a large roast, use 2T for the whole parts in your mix, which means a ½ part becomes 1T and a ¼ part becomes 1/2T. Rub it generously all over the meat.
Grilling, Resting and Searing:
Follow the instructions for the Chuck Eye roast – it’s the same with one exception – go low and slow until it hits 140F internal. Pork is best between 145 and 150F when finished.
We love to cut this into thin slices if we’re doing sandwiches, or in thick pork chop like slices if we’re serving as a plated dinner.
Some additional great “Budget Cuts”
For chicken, we love chicken thighs and for some reason those are always inexpensive! We also love turkey – whole turkeys are always a great value year round – usually priced between $3 and $4 a pound.
That’s a wrap!
You see! You CAN eat like a king without spending a fortune. Wishing you a happy spring time! Thanks again for reading the Griller’s Gold Blog!
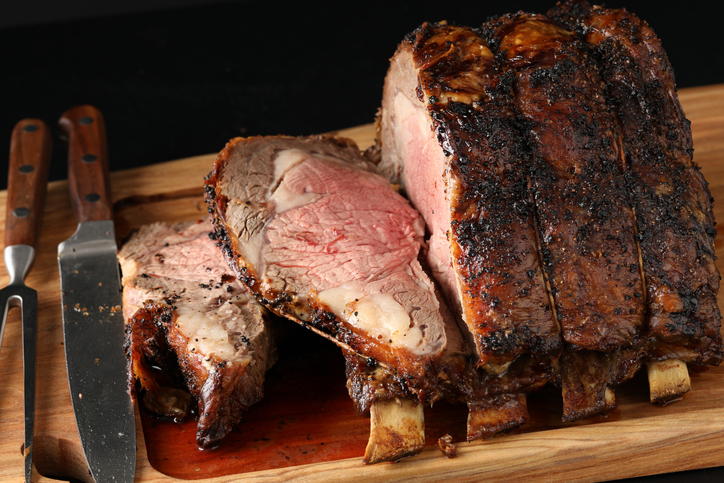
Here we are approaching another New Year and an open calendar. We believe the best way to celebrate any occasion is to gather with some dear friends, cook up an amazing meal and share a toast together! Here’s a celebration menu with the star of the show, Ultimate Prime Rib, getting the Griller’s Gold wood grilled treatment.
The Drinks
For a great party gather relatively early in the evening and have some great cocktails. Even though we’re grillers here on this blog, we know our way around a bar as well. Two great cocktails to start the evening off are a classic Champagne Cocktail as well as an Old Fashioned. Both are quick and easy to make, here’s the techniques:
Champagne Cocktail: Super easy!
Bitters (we like Angostura for this, although Peyaud’s are also good)
Sugar Cube
Champagne or sparkling wine – but don’t go sweet like Asti Spumante, regular sparkling wine, champagne, prosecco or sparkling rose all work great
Drop the sugar cube into the bottom of a champagne or wine glass, then add a few drops of the bitters and fill with the champagne, that’s it!
Old Fashioned:
This is for a classic Old Fashioned. Note some variations at the end. And these scale up nicely so if you’re making a bunch, just do it in a pitcher or bar shaker. For each drink:
2 ounces bourbon, brandy, Canadian Whisky (ex: Crown Royal) or American whisky (Seagram’s 7)
Put all the ingredients into the bottom of a mixing glass or cocktail shaker. Using the handle of a wooden spoon or a cocktail muddler, smash the sugar and mix the ingredients. Pour over ice in a large rocks glass and add 1-2 ounces of club soda or 7 up (for a Sweet Old Fashioned) or ½ ounce of sour mix plus club soda (for a sour Old Fashioned). Garnish with an orange peel and a maraschino cherry. (photo: diffordsguide.com
The Appetizers
Ok now that we’ve got the pump primed, onto the food. For cocktail snacks, nothing beats charcuterie – meats, cheeses, olives, nuts, mustards, jellies, etc. for being able to relax, be social and enjoy the company of your friends. We’re not going to cover that here, but the internet is FULL of ideas for this – just search Pinterest, Google or other places for ideas!
The Dinner, Starring Ultimate Prime Rib!
Our whole goal when we host a dinner party is to be able to be a guest at our own party. Therefore we love it when we can do most of the cooking in advance. For this meal, here’s our menu:
On that plate, you’ll have a big slab of wood-roasted prime rib, topped with fantastic roasted mushrooms with garlic, herbs and capers, a side of crispy smashed red skin potatoes and delicious spears of asparagus wrapped with prosciutto ham! Amazing!
And as far as that “be a guest at your own party” thing? Well, the potatoes make ahead and warm back up nicely, the Asparagus takes only 15 minutes to roast in the same oven where the potatoes are warming back up and the mushrooms reheat beautifully too – so your game plan is make the beef and have it resting (more in the recipe below) then 20 minutes prior to dinner time, toss the sides into a 350 degree oven, and the rib roast back out onto the grill to sear. The roast comes off, the sides come out, slice and serve!
Ultimate Prime Rib Recipe
This recipe couldn’t be easier!
The trick is our favorite pellet grill trick – Reverse Searing – where you cook low and slow until almost the right temperature, then let things rest, then a fast sear in a hot grill and slice and serve. Here’s an in-depth look at that technique.
Buy (for a dinner party for 6-8 people):
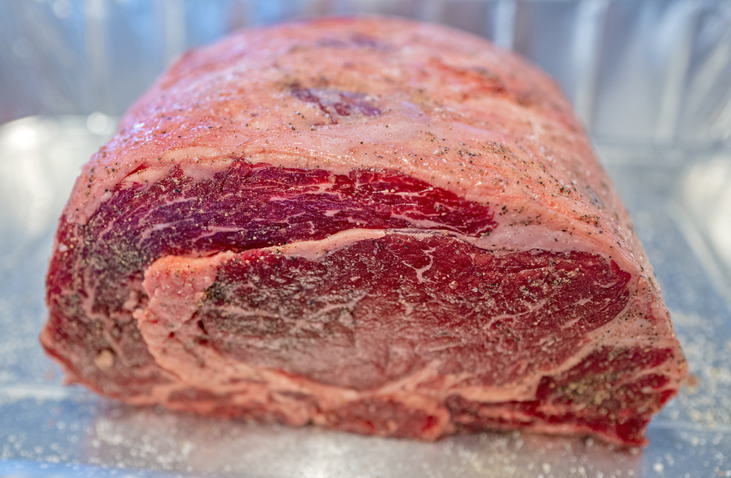
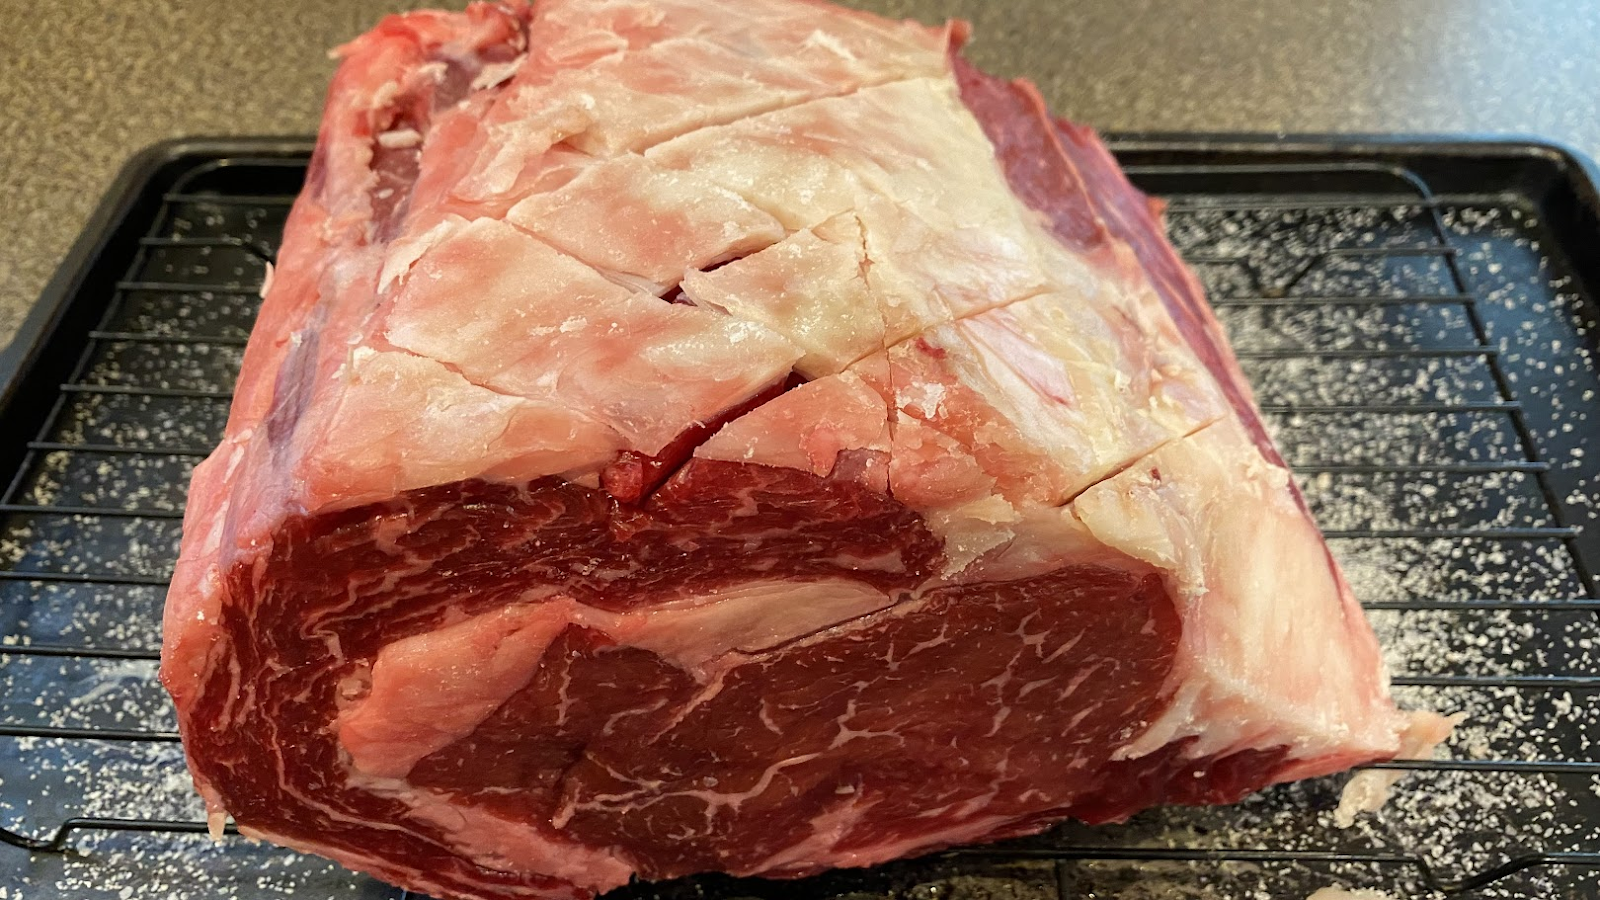
Beef Rib (or Ribeye) Roast: We like to do this with boneless rib roasts – they cook a touch faster. Buy one in the 6 to 7 pound range. Costco and Sam’s Club are the national chain players on this but also don’t be afraid to trust the butcher. This will not be an inexpensive cut of beef but it will be impressive when it’s done! If you can get Prime grade beef, do it, if not, just look for the one that shows the best marbling,
Trim the fat cap on the roast so that it’s an even ¼ to ⅛ inch thick then score it in a crosshatch pattern. That allows the seasoning to get down into the meat.
(Stew Campbell)
Seasoning:
We like to season ours about 3-4 hours prior to cooking and let it “temper” (rise in temperature) on the kitchen counter. For seasoning, our favorite is good ‘ol SPG – salt, pepper and garlic powder. To that you could add onion powder as well. 2 parts salt, 1 part each of the rest. Give it a generous amount over every surface of the roast. We tend to think of steaks as flat objects – season both sides, but roasts are more like cubes!
Grill Prep:
You’ll want your grill nice and clean for this as when it’s time to sear, you’re going to crank the heat way up and that can cause fires if you have grease built up. So start with a clean grill!
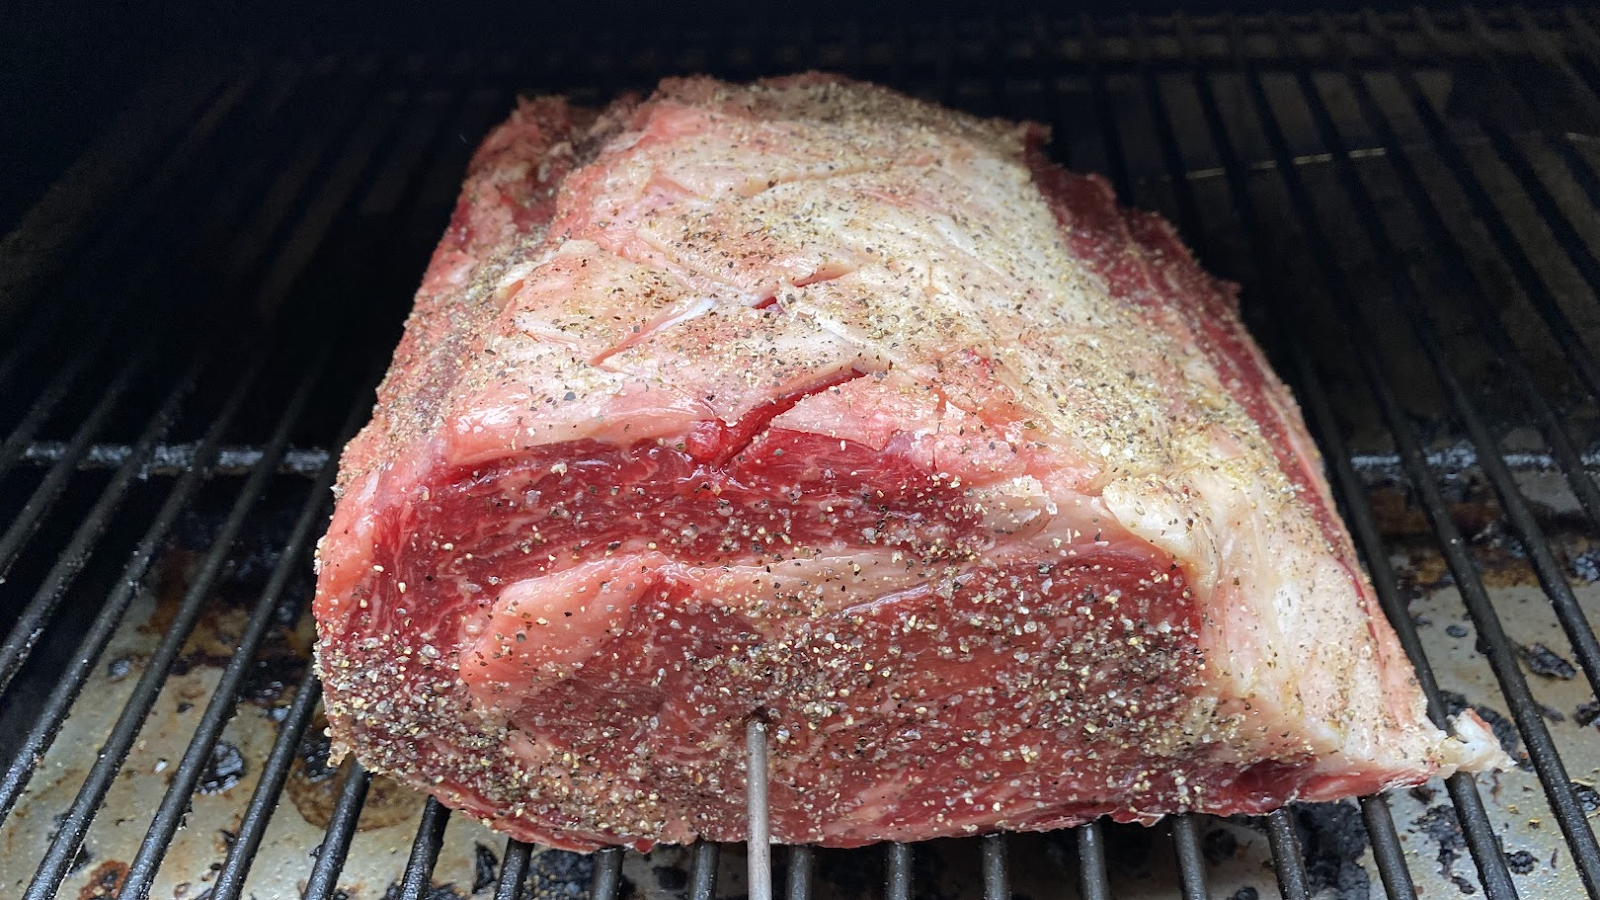
Then preheat to 250F using your favorite Griller’s Gold pellets (we like Smokeshack or Competition for this recipe) for at least 20 minutes (cuz’ baby it’s cold outside!). Put a probe thermometer or your grill’s probe thermometer (if so equipped) into the thickest part of the meat, make sure it’s in meat and not a pocket of fat. And then head to the grill. Place the roast in the middle of the grate, shut the lid, set for your desired setpoint, close the lid and go join your friends.
A roast of this size will take 2-3 or more hours to get to 118F (which is the right temp to pull it off for warm red rare – if wanting pink Medium Rare then go to 122F). Just keep an eye on things and make sure you’re there to pull it off at the right temp.
When it hits the right temp, remove the meat from the grill, then wrap it in 2 layers of foil and nestle it into a picnic cooler lined with a towel on the bottom and a towel over the top. It will snuggle in there and the carryover heat will make it perfect. It can rest for up to 2 hours in there without appreciably cooling.
Then when you’re 35 minutes from eating time, fire the grill to 450 or 500F. When it is fully preheated and you’re 20 minutes from dinner time, put your sides in the oven as mentioned before, then, walk the roast back out to the grill, remove it from the cooler, and partially unwrap the meat, leaving it sitting in a “boat” of foil (that will catch juices and fat and keep your grill from catching fire).
Close the grill up and give it 10 minutes at this temperature, then remove it from the grill. Bring it back in and slice it into ½’ thick slabs of beefy glory! You’ll be the Prime Rib hero when you serve this to your friends and family!
(Stew Campbell)
Pair this with a great dry red wine, more cocktails, and good cheer!
From your family and friends at Griller’s Gold, to you and yours – Cheers to a Happy 2024!